Showing posts with label Bo Bunny. Show all posts

Monday, 14 May 2018

Magnificent Magnolia

Hi there lovely people!

I'm back with an elegant card featuring a beautiful magnolia. Our tree in the garden is clinging onto the last few flowers, it's a shame the flowers don't last longer. I'm still enjoying going through my craft stash and using stamps that I haven't used yet or haven't used in a long time.

This magnolia stamp I've had for a while, I think I grabbed it in a sale online.


What you need...

Stamps: Outline Magnolia (CG193) - Hero Arts; Sentiments Stamp (#10105761) - Bo Bunny
Card stock: white, pale pink
Embossing powder: Detail Clear - Stampendous
Ink pad: Onyx Black - Versafine
Copic: Begonia Pink (RV14), Macadamia Nut (YR30)
Promarker: Pale Pink
Gems: clear
Adhesives

What you do...

1 Cover a 12.5cm square blank with a 12cm square of pale pink card.

2 Stamp the magnolia onto white card and cover with the embossing powder, heat to melt.

3 Shade in the magnolia.

4 Cut out the magnolia and stick to the lower right of the blank, overlapping the bottom and right edges. Trim away the excess.

5 Stamp the sentiment in the top left corner. Add a few gems to finish.

I know that the magnolia stamp is no longer available, but this card would look lovely with any large outline flower stamp. I've got a few of these floral outline stamps from Hero Arts in various sizes. They make a beautiful simple and elegant card that is quick to make.

I'm going to say ta ta for now, thank you for stopping by!


Tuesday, 7 June 2016

Birthday Butterfly

Mornin' peeps!

Today is my friend June's birthday - Happy Birthday June! 

I have some gorgeous papers by Echo park and one in particular would look lovely on a birthday card. I saw a card on Pinterest and loved the layout which would work really well with the patterned paper.


Items needed...

Patterned paper: Splendid Sunshine 12 x 12 Collection Kit - Echo Park
Card stock: bright pink, white
Dies: Echo Park Springtime (659117) - Sizzix
Stamps: Sentiments Stamps (#10105761) - Bo Bunny
Ink pad: Onyx Black - Versafine
Pearls: pale green, white

I used the Floral Fancy paper from the kit and the butterfly from the die set. The two white side panels were raised up using foam tape.

I'm sure June will love her card :o)

So, that's me for this post. Thank you for stopping by and I'll be back soon! x


Saturday, 10 January 2015

Speech Bubble Birdie

Happy Saturday lovelies!

I do hope you are all having a fab weekend so far. I've been busy today doing my DT make for the next challenge for Incy Wincy. 

Simon has been in the garage all day, don't ask what he's up to. Last weekend there was a lot of 'buffing' going on. He is obsessed with making all the parts for Molly very shiny. She's got very shiny parts, but no body shell at the minute (away being sprayed as I speak - hopefully). I daren't go in the garage in case I get a good buffing too - ooer!

So! Onto a little card I made for Will my nephew. It was his birthday during the week and you know how it is to try and come up with a card for a teenage boy - aarrgh!

I got a lovely speech bubble die set for Christmas, Die-namics Say Hello by My Favorite Things. It has two dies, one with 'hello' in it and another that is just a large blank bubble.

Because of the size of the bubble I thought it would be fun to have a ridiculously small character saying happy birthday in very large letters. I scouted through my stamps and came across a fave set that I've had for years - Picoti Picota by Artemio. There is the teeniest little bird in the set that was just what I was looking for..

Anyway, I've waffled long enough, here is said card...


What you need...

Card stock: black, white
Patterned paper: Zip-A-Dee-Doodle 6x6 Paper Pad - Bo Bunny
Stickers: Zip-A-Dee-Doodle Combo Stickers - Bo Bunny
Stamps: Picoti Picota - Artemio
Dies: Die-namics Transformables-Say Hello - My Favorite Things
Promarkers: Duck Egg, Ice Grey 1
Punch: circle 5/8"
Gems: black

What you do...

Cover the bottom of a top fold blank with a 3cm deep strip of 'Meow' paper. Apply a length of black/white striped border sticker along the top edge.

Stamp and colour in the bird and punch out. Fix him to the left, tucking him just under the sticker.

Create and print out a sentiment, then die cut it out. Attach to the top of the blank. Add gems to the exclamation marks and three along the border a the right.

I love this collection by Bo Bunny, the colour palette is limited to black, white, blues and greens, there are a few flowery patterns and but most of the collection has some great designs suitable for male cards. 

I am pleased to say that Will loved it. Success! I now have another teenage boy card to do for the end of the month for Will's brother Tom. Do you think he'd notice if I did him the same card but with a different patterned paper? 

Probably.

I'm going to say ta-ta now. Thank you for calling by and enjoy the rest of your weekend :o) xx

post signature

Tuesday, 7 October 2014

29 Again?

Afternoon peeps!

Well it's another wet, miserable day here in Norfolk. We can't complain too much, because until yesterday the weather here has been glorious. The chickens don't like this rain though, they've been sheltering in the shed :o(

Anyhoo! I'd like to show you the little card I made for my mum's birthday. Thankfully my lovely mum has a great sense of humour. I apologise for the quality of the photo, it was quite a dull day and I needed to get it posted to my mum, so I had no choice but to snap it when I could.

So here it is...


What you need...

Stamps: Bird Brain - The Alley Way Stamps; Birthday Sampler - Paper Smooches
Card stock: white
Ink pad: Onyx Black - Versafine
Patterned paper: Zip-A-Dee Doodle 6x6 Pad - Bo Bunny
Promarkers: Apple, Duck Egg, French Navy

What you do...

Stamp the bird onto white card and colour in.
Trim to size and attach to the top of a white top fold blank 10.5cm x 15cm.
Stick co-ordinating papers either side of the image.
Stamp the sentiment underneath, to the right.

I love this stamp set, the faces on the birds are so comical. I based the layout on Retrosketches #46.


My mum loved the card...phew!

Okay, I'm off now to get on with magazine commissions. Thanks for popping by and enjoy the rest of your day. xx

post signature

Tuesday, 1 October 2013

Believe (Polar Bears)

Hello again my lovelies!
Can you believe it's the 1st October already? Christmas will be upon us before we know it. Talking of Christmas, I'd like to show you another card if I may.
I used a favourite stamp of mine that I have had for quite a few years now. It reminds me a little of the Coke ads they have on television at Christmas.


What you need...

Stamp: Winter Polar Bears (95612-M) - Inkadinkado
Patterned Paper:  'Brrrr', Winter Joy Collection - Bo Bunny
Card stock: white, black
Ink pad: Onyx Black - Versafine
Promarkers: Duck Egg
Ribbon: black
Gems: clear
Rub-on sentiment: black
Adhesives

What you do...

Cover a top fold 10cm square blank with a slightly smaller piece of 'Brrrr' paper. Stamp the image onto white card and highlight with the Promarker. Trim and mount onto black card, attach the image to the top left of the blank.

Wrap ribbon around the blank, underneath the image and tie in a knot at the right. Apply the rub-on below. Finish with a few clear gems.

I've done several versions of this card over the years. I think it always works well with a limited colour palette of aqua/turquoise, black and white.

As it is only a small card it's perfect for those worried about postage costs. Here in the U.K. we have to pay a ridiculous price for an item that is over 5mm thick, even if it's only a small card like this.

So, that's the lesson for today :o)

Thanks for popping in and I'll be back soon xxx

Oooh! I forgot to mention, Hattie laid her first egg on Friday! So I have two of my girls laying now....just two more to go. I'm a proud mummy (smug look on the face).


post signature

Monday, 31 December 2012

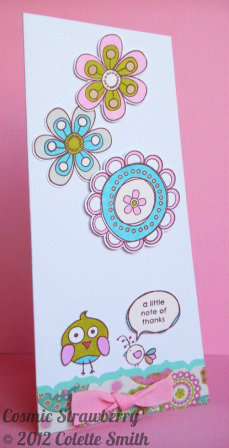
Last Post of 2012 & A Little Note of Thanks

What'cha Peeps!
Well, this is the last post of 2012 for me. It's been quite a year. I thought I would show you one of the thank you cards (for my Christmas pressies) I'll be sending out soon. It is from a past project I had in the January 2011 issue of Crafts Beautiful.


What I used...

Papers: Penny Lane 12x12 Glitter Stack - My Mind's Eye
Stamps: Petal Pushers - Bo Bunny; Green at Heart Tree Hugger - Basic Grey
Punch: Upper Crest Border - Fiskars
Card Stock: white, turquoise
Promarkers
Ribbon: pink
Ink: Rich Cocoa - Memento
Adhesives

How to do it...

Trim a white DL blank to make the top and right side angular. Stamp, cut out and colour two birds, the sentiment and three flowers. Punch the border along a piece of  turquoise card and patterned paper.

Layer the punched borders to the bottom of the card, arrange and attach the flowers, birds and sentiment. Finish with a knotted piece of ribbon applied to the patterned border.

I know that the stamps and papers are probably not available now, but you can use any you have in your stash!

I'm off now, we are going out to a fancy dress tonight (not telling you what I'm going as, just yet), so I have to get ready.

I would like to take this opportunity to wish you all a very happy, healthy and prosperous New Year. Until 2013, toodle-pip! xxx

Tuesday, 6 November 2012

Frosty!

Heevnin chums!
Hope you are all well! It's been a frantic couple of days but here I am.
This card I want to show you doesn't use stamps, just dry embossing and paper piecing.
So, I'd like you to meet Frosty!


What I used...

Winter Joy 12x12 Collection - Bo Bunny
Card stock - white, green, orange, black
Circle punches - various sizes
Snowflake punches - various sizes, styles
Alphabet stickers - black
Fine liner pens - white, black
Black Soot Distress Ink - Ranger
D'Vine Swirl embossing folder - Cuttlebug
Glitter dots

Emboss a square of white card, cover the top left corner with a curved piece of dotty paper.  Cut a piece of green card for the hat brim, ink the edges and adhere to the bottom of the dotty piece. Ink and draw faux stitching around the edges and mount onto black card.

Punch two black circles for the eyes, ten smaller ones for the mouth and a carrot shape out of orange card (ink the edge). Arrange and stick to the embossed panel, highlight in white.

Use alphabet stickers to spell 'Brrr!' in the bottom right hand corner of a white square blank. Punch snowflakes in different papers, arrange and adhere around the sentiment. Attach the panel to the top left of the blank, finish with a few glitter dots.

I think he's really cute. I based him on a Santa card I posted 6th January. There is something really satisfying about creating your own motifs and card toppers.

Okay, Simon's just brought me a brew, so I'll sign off and have a slurp. Thanks for calling in. Night night all! xx


Tuesday, 30 October 2012

Elegant Reindeer

Mornin' chums!
 
What a lovely, bright day! Makes a change from wet and windy.
 
Before I post today's card, I'd like to mention that my blog is being showcased in the December issue of Papercraft Inspirations. The card they have chosen to highlight is the  little 'Joy' snowman card posted on 23rd August 2012. I was so thrilled when they emailed me to ask if they could publish it.

 
On the Papercraft Inspirations website there is a link to Cosmic Strawberry, which includes links to the other fab blogs also showcased in the issue. Why not check out the website? Better still, buy the magazine! It's available in the shops until 22nd November. It's packed with loads of projects, tips, articles, latest products...and you get two brilliant free gifts, a 6x6 Christmas paper pad and co-ordinating die-cut chipboard images.
 
Now for the card.....


Last year I purchased the Bo Bunny Blitzen stamp set and never got round to using it. I thought the image would look good in simple black and white, with a pop of red. This is a 5"x7" card, which is bigger than I usually make.
 
What I used...
 
Blitzen stamp set - Bo Bunny
Black & White Mini Dot Reverse paper - Canvas Corp.
Cardstock - black, white
Black ink - Versafine
Ribbon - grosgrain, red
Stick pins - teardrop, white
Buttons - small, black, white
Pearl - flatbacked, red
'Believe' rub-on - Making Memories
 
After stamping the image onto white card, I trimmed and mounted it onto black card, then onto a larger piece of dot paper. I tied and knotted red ribbon around the right hand side and adhered the panel to the left side of a top fold blank.
 
Three buttons were threaded onto a stick pin and this was pushed, with another, into the knot. A flatbacked pearl was stuck to the reindeer's nose and the 'Believe' rub-on applied just above the reindeer's bum.
 
I was pleased with the way it turned out. You can't go wrong with the red, black and white combo. Very classy (apart from the mention of the reindeer's bum).
 
Going to make a coffee now. Enjoy the rest of your day. Toodle-pip! xx


Sunday, 28 October 2012

Christmas Fluffles

Aft'noon peepsicles!

I'm having a pyjama day today. Got up, washed, brushed teeth etc. changed bedding, put washing in, washed and refreshed Bazoo's litter tray...but...I am not getting dressed!

Well, I don't have any plans to go out and the weather is miserable. Think I'll light the open fire later and cosy up with a film and a hot mug of tea. Then a lovely bubble bath later. Bliss.

Onto the card. I've done a few of Fluffles in the past, he is so cute. It's amazing that if you change the layout and colour scheme, you can get so many different looking cards from the same image.


What I used...

Fluffles Garland stamp (N221) - Stampendous
Mistletoe 6x6 paper pad - Bo Bunny
Card stock - lime green, white
Promarkers
Black ink - Versafine
Clear embossing powder - Stampendous
Buttons - green, red
Ribbon - green
Twine - white

I stamped and heat embossed Fluffles onto white card and coloured him in. I trimmed the image and mounted it onto lime cardstock, trimming again but leaving a narrow border just around the left, top and bottom edges.

I wrapped and tied green ribbon around the left side of a piece of red dotty paper, and adhered it to the lower right side edge of a square top fold blank. The image was mounted onto the patterned paper, again lining it up with the right side.

Three buttons tied with twine were fixed above the image to finish. Ta da!

So there he is. I think last time I made a card with Fluffles on the colour scheme was lime green and shades of pink. Who knows, next time it could be blues!

That's it from me for now. Thanks for popping by, 'til next time. xxx


Thursday, 25 October 2012

Twinkle Star

Heevnin Peeps!

Dull and breezy here today, with the odd shower. The days seem to have been really dark and gloomy of late, then again it is nearly the end of October (yikes). At least it's all warm and cosy inside :)

Today I have another Christmas card for you.


What I used...

'Tis the Season 12 x 12 paper - Bo Bunny
Scallops - On the Edge die - Sizzix
Star, Primitive #2 die & embossing Folder - Sizzix
Walnut Stain Distress Ink - Tim Holtz
Black ink - Versafine
Let It Snow stamp set - Penny Black
Garden & parcel twine
Button - star, wood
Beads - small, red, wood
Florists wire - green
Stems - Canadian Pine, fine - DoCrafts
Glitter Dots

I cut a piece of patterned paper so it would cover approximately two thirds of a 13.5cm square blank and scalloped the lower edge. After sticking to the front of the blank, I wrapped and tied frayed parcel twine around the card and stamped 'Twinkle' in the bottom right hand corner in black.

I die cut and embossed the star, distressed it with Walnut Stain and mounted it onto the card with foam tape.

The embellishment  was created by doubling over florists wire, wrapping it around a pokey tool to create a small spiral. This was then threaded through the bead and pulled taut so the spiral sticks in the bead hole.

After making three of these, they were twisted together and arranged with three short lengths of pine stem. Garden twine was wrapped around to secure and tied in a bow. Frayed parcel twine was threaded through the wood star (enclosing the pine stems at the back) and tied in a knot, positioning it on top of the bow. A few glitter dots were applied to the patterned paper to finish.

Because of the embellishment, it's probably a bit bulky to send through the post, but it's perfect to give by hand, to someone special. I was thinking of doing some more to make into napkin rings, they'll match in perfect with my Christmas decor!

That's me for now, thanks for passing through.

Toodle-pip! xx


Wednesday, 19 September 2012

Kissing Santa

Hello Peepsicles, hope you are well this fine Wednesday afternoon.
I have another Christmas Card for you. Here we go....


The sentiment is from a fab stamp set I came across whilst browsing Country View Crafts website. It's called Egg & Nog 9 (SIEN9) from the Squiggly Ink range by PaperArtsy. I absolutely adore Squiggly Ink stamps, I've got quite a few in my collection now.

So..on with the card. Firstly, I stamped the sentiment on white card with black Versfine and trimmed it to size. I cut a section of patterned paper (Mistletoe Collection 6x6 pad - Bo Bunny) and adhered the sentiment at the top. White seam binding was tied and knotted around the patterned paper under the sentiment.

I die cut three mistletoe branches (Vixen Limited Edition dies - QuicKutz) in green card, arranged and stuck them to the lower right hand corner of the paper panel. I embellised the mistletoe with pearls and a tiny red button threaded with white cord.

I don't usually follow the traditional red/green combo, but the new Bo Bunny Mistletoe Collection is gorgeous with really bright reds and greens. Very retro.

That's me for the time being, thanks for visiting. xx

Monday, 27 August 2012

Let's Chill

Hello Chums!
Hope this post finds you all fit and well! I've had a fairly lazy day today, but I have managed to make another Christmas card.


I love the colours on this one. I was inspired by an old collection of Bo Bunny 'Tis The Season. I have used my fave stamp set of the moment, Swanky Snowdudes by Paper Smooches. I punched a scallop edge onto some turquoise card using the Scallops On the Edge die by Tim Holtz. I then attached this to the top of an A6 blank.

Next I stamped and heat embossed the images with black Versfine and clear embossing powder and coloured in with Promarkers. I punched out the images using various sized punches, along with circles in lime, red and chocolate. After mounting each image onto a coloured circle, I wrapped a length of white sparkly ribbon around the turquoise section and knotted at the left. The images were then arranged and stuck down with foam pads. I finished with some Shimmer Dots by Papermania on the snowflakes.

I think it a fresh, fun and simple card. I had a lot of fun creating this one.

Well, that's it for today. Got to go and get ready, off to an Indian restaurant in Aylsham with some friends for a curry (nom nom). I bet we'll all smell lovely tomorrow!

Take care and thanks for looking.

Colette

Sunday, 26 August 2012

Rudolph Card

Aft'noon peeps!

It's a bit breezy here today in Norfolk, but there is blue sky out there. We had a terrific thunderstorm last evening, it went on for ages too.

Amongst the thunder and rain, I made another Christmas card. I have had this Rudolph stamp for a few years now and I love it. So in my usual style I kept the card clean and simple.


The stamp is Whimsy Rudolph by Magenta (code 37234.H) and is still available.


The spotty card is Black & Kraft Mini Dot Reverse by Canvas Corp. Other supplies used were an A6 kraft blank, red bakers twine, a red button, a rub-on sentiment by Studio G, and a couple of red gems by Bo Bunny. Black Versfine ink and clear embossing powder were used for the image and I coloured it in with Promarkers.

The beauty of this stamp is that Rudolph doesn't have a nose! In the past I have given him one with a gem (as above), a blob of red Stickles glitter glue or a red brad.

This card somehow gives me thoughts of a big mug of cocoa on a cold chilly day!

Hope you like and thanks for popping by.

Colette xx

Sunday, 19 August 2012

Crafts Beautiful October 2012

Good Afternoon!

It's a lovely day again here in Norfolk. Just thought I would post my projects from the October issue of Crafts Beautiful. When they asked me to come for a idea and theme, well it had to be Halloween! I love Halloween, I love doing up the house and carving pumpkins (see a post from Nov 2011 for last years pumpkins).

Of course when I did these for the magazine there wasn't really many crafty Halloween items about. So after the success of my pirate drawings, I did a set of witchy themed ones. I was really pleased with the way they turned out, more comical than scary.


The other project is a couple of Christmas cards I did for Bo Bunny and their Father Christmas range. I don't usually go for traditional colours and images, but I have to say, this range is gorgeous. Me being me, I put my own modern twist on things! I love Bo Bunny anyway, so working with these was great.


Crafts Beautiful has done me proud with fantastic photography and eye catching layouts! Check out the rest of the magazine for some fantastic projects, plus there's a fab free foil embossing kit with this issue. For more crafting ideas visit Crafts Beautiful, a great website where you can find more projects, hints, tips, download papers and templates and there's a friendly forum too. You need to register to download or post on the forum, but it's really quick and simple.

Well, that's all for the moment. Hope to post some more very soon. Thanks for stopping by!

Tuesday, 10 July 2012

A Bit Obsessed With Flowers....

Hi Chums!

I know I said I was going to post soon after the last one, but I just don't know where the time went! Simon's been off on hols for this last week, the weather has been a bit up and down, so we've had a few days out and some pottering around at home, plus, I've had an extra commission to do for Crafts Beautiful - busy busy busy!  I have managed to do a bit of gardening and catching up with the plants. Though I still have some new pond plants to pot (I'm sure they are not bothered about all the rain).

I don't think we're going to get any apples or plums this year, we had plenty of blossom, but with all the wet weather the bees haven't had chance to pollinate the flowers. Oh dear, we'll have to wait and see. It's a shame because the apple tree produces the most wonderful Granny Smiths.

Right, onto the cards. I've got a bit of a thing about making shabby chic roses at the moment, it's so relaxing sitting scrunching and twiddling paper. The first is a birthday card I made for Simon's Mum.


The flowers are a mix of punched and handmade shabby roses in various papers.They were  randomly attached along the top half of the card, then finished with some flat backed pearls and a rub-on sentiment.

Patterned papers - Country Drive; Hello Summer; Summer Days - Echo Park
Dies - Chinese Roses - Marianne Design Creatables

This next card I made just for the sake of it (plus good chance to make more roses). It is only 9cm x 12cm, perfect for a thank you or note card. I kept it quite simple, using a background paper that would not distract from the floral corner.


I chose a 6x6 paper collection with small design, which would be more suitable for a small card. Again the roses are made with the Chinese Rose die. It was then finished off with a simple flat bow.

Patterned Papers - Green at Heart - Basic Grey
Dies - Chinese Roses - Marianne Design Creatables

Lastly, this is a wedding card I made for someone I know. Not really being into the over sentimental slushy cards, I again kept this really simple.


I think the colours are unusual for a wedding card, blues, red, brown, lime and white. But it does work. For the roses, I matched solid card to three of the colours in the paper.

The paper was attached to the lower right hand side of the card, I die cut a heart on the left hand side of a smaller piece of white card (missing off the edge of the heart) and then embossed it with a dot design. This piece was then adhered onto the patterned paper.

The card was finished off with a stamped sentiment, a diamante and a brown scrunched bow.

Patterned paper - Alora - Bo Bunny
Dies - Homespun Hearts - X-Cut
Embossing folder - Swiss Dots - Cuttlebug

Well, that is it from me at the moment. I'm on with another commission for Crafts Beautiful.

Hope you like the cards, thanks for looking and happy crafting!

Colette x


Saturday, 17 March 2012

At last a few cards!!

Well, hello peepsicles! It's been another hectic week. Dust from all the renovations is still mounting up, I think I'm learning to live with it now.

This last few days I have viewed some absolutely wonderful blogs, come across some lovely people which I intend to keep in touch with via our blogs. The blogging crafting community is a really friendly place to be in, and I'm happy to be part of it now.

Commissions for Crafts Beautiful are coming along very well, just about to post my next lot off, hope they like!

I managed to take some piccies of recent cards I made, so here they are :)


This is the card I made for my Mum for Mother's Day. Usually I go for the whole retro flower theme, but I saw these stamps on the Crafts U Love site and just had to have. I luurrve the 'blah blah' one. The stamps are 'Gossip Club' and 'Blah Blah' from the Golden Oldies collection by Art Impressions. I coloured in with Promarkers and the paper is from my huge and much looked at and adored American Crafts paper collection. I love the colours!


So, I decided to do the same for Simon's Mum, but I used pale blue card instead of the yellow. It's amazing that by just changing a colour, you make exactly the same card, but it looks so different.


This one made me laugh so much, the stamps are 'Edna' and 'Don't have time' again from the Golden Oldies collection by Art Impressions available from Crafts U Love. The paper I used on this one was from the Petal Pushers collection by Bo Bunny, I kept the card simple and just finished it off with a yellow ribbon. I did this one for my Nan for Mother's Day, wonder what she'll think, har har!!


Now we come to a card I did for my Uncle Roy. Every year I tend to do him a card that's a bit daft or hasn't got an image of a boat, racing cars, golf, fishing, tools! Last year I did him one with Snoopy dressed as Joe Cool, the year before I did him one with a super hero on it (the superhero was attached by a thin piece of acetate, so he bounced about and looked like he was flying), I think I've even done him a card with a pair of birthday underpants on!!

This card this year is quite sedate really, you can't go wrong with kraft card, muted tones and a bit of string. The patterned cardstock is Kraft Funday - Happy Days, and the stamps are Kraft Funday - Everyday Fun by My Mind's Eye. I made a simple rosette, stamped the 'FUN' onto a piece of scrap card, cut it out and placed just under the spotty border, stamped 'celebrate' in the bottom right corner and finished with a button, string and garden twine.

I hope you like my designs, the photos don't really do them justice, but hey ho! Off now to type up my commission, then I'm going to start on the next one, and later I'll make a tuna lasagna for tea - sounds weird, but it's lovely, you do it with a creamy white sauce - going to make some flapjacks tomorrow, nom nom nom!

Thanks for looking and ta ta for now! Colette xx