Showing posts with label Avery Elle. Show all posts

Tuesday, 3 August 2021

Celebration Cake

Hello there!

I'm back with another card to share with you. This one is a fun cake card done in lovely summer sorbet shades.

I found that I didn't have any colours of card stock in the shades I had in mind. I solved this by creating my own with Promarkers. I haven't used my Promarkers for a while, so I thought I would dust them off and get them used.

Even though I have the full range of Copic markers, I find that sometimes they don't have the exact colour I'm looking for. This is where Promarkers come in, they have some beautiful colours, especially the pastel and sorbet shades. So why not mix the two brands?

This is a simple stamped image on a large white banner. I made the coloured background by die cutting strips of white card, shading them in and then arranging them onto some copy paper and sticking down. This was then cut in a panel.


What you need...

Stamps:
Birthday Bash - Paper Smooches

Dies:
Horizontal Stripes - Waffle Flower
A2 Layers
Scalloped Banner Set - Avery Elle

Ink pads:
Tuxedo Black - Memento

Alcohol markers:
Pink Carnation - Promarkers
Peach
Lime Green
Pastel Green

Embellishments:
Crystal Collection-Glass - Little Thing's from Lucy's Cards

Card stock:
White

Extras:
Adhesives
Crystal Clear Shimmer Pen

Tools:
Big Shot - Sizzix

What you do...

1 Die cut the horizontal stripes in white card. Use Promarkers to colour the stripes in the four colours that you want to arrange them.

2 Add double sided adhesive to a piece of white copy/scrap paper and stick down the stripes. Die cut into a panel using the 3¾" x 5" die from the A2 Layers set. 

3 Stamp the cake onto white card with the sentiment lined up underneath. Colour in using Promarkers.

4 Use the pinpoint border banner to cut out the cake image. 

5 Create a 4¼" x 5½" white blank. Mat the striped panel onto it. Add the banner with foam tape. Embellish with some of the Glass gems and highlight the icing on the cake with shimmer pen.

I used one of my old Paper Smooches stamp sets here, but there are so many cute cake stamps on the market along with some adorable sentiments. Use what ever you have in your stash.

This card layout would look good for a lot of occasions. Done in masculine colours with a male oriented image/motif/sentiment would be great. I think I might do a Christmas version.

Sadly I didn't get round to starting my Christmas cards in July. Magazine work always gets hectic at this time of year as deadlines are tighter to get in the extra issue. Hopefully I should be able to get going with the Christmas cards soon. Watch this space as they say.

Just before I go, I just want to mention that as Feedburner no longer supports email subscriptions, I have changed over to follow.it. This means your notification email will look slightly different, but it still does the same job of notifying you when I upload a new post.

If you have a blog that used Feedburner and haven't changed over to a new email subscription service I can highly recommend follow.it. They had reached out to me, but I had already considered using them anyway. It was so easy to set up and the support is great. Click here to find out more.

Thank you for stopping by, I do appreciate it. See you soon!


Monday, 26 April 2021

Looking Sharp

Hi there!

I hope everyone is keeping safe and well. 

I mentioned in my last post that I have been making a few cactus themed cards lately. The card I want to show you today is a mix of stamping, ink blending and Nuvo Glimmer Paste. So, without further ado, let's get to it.


What you need...

Stamps:
Multi-step Cacti Stamps- Reverse Confetti
Stuck on You (ST-18-42) - Avery Elle

Dies:
Multi-step Cacti Dies - Reverse Confetti

Stencil:
Square Extraordinaire - My Favorite Things

Ink pads:
Honeysuckle - Concord & 9th
Parsley
Sea Glass
Sprout
Walnut Stain - Tim Holtz Distress
Carved Pumpkin
Onyx Black - Versafine

Glimmer paste:
Moonstone - Nuvo

Card stock:
White

Extras:
Black/white Washi
Adhesives

Tools:
Big Shot - Sizzix
Stamping platform - MISTI
Media spatulas - Nuvo

What you do...

1 Create a top fold white blank 4¼"x 5½" (11cm x 14cm) and place the stencil onto the blank, securing with some low tack tape. Blend the Sea Glass ink within the stencil so it is darker at the top and fading to wards the bottom. Allow to dry.

2 Spread the Moonstone paste over the blended area, allow to dry. (Remove the stencil immediately and place in a bowl of water or wash, along with the spatula). 

3 Stamp the solid parts of  the three cacti onto white card along with the flower. Over stamp the detail with black ink.

4 Stamp the outlines of three pots. Blend some of the Walnut Stain and Carved Pumpkin together to create a terracotta colour, add some water and paint the pots.

5 Die cut the cacti, pots and flower and assemble. Attach to the card blank overlapping the Moonstone section.

6 Add a strip of Washi across the base of the blank and add the sentiment above, towards the right.

I had such fun making this little cutey. It was great building up the cacti. You can add as much or little detail as you wish to each cactus.

I do have some more cacti themed cards, these are slightly different in that they are created using the Silhouette Cameo, so stay tuned for those.

I am going to enter this card into the Crafty Creations Challenge #420 - Anything Goes. Click here to take you to the challenge.

I am also going to enter it into the Creative Finger Challenge #206 - Anything Goes. Click here to take you to the challenge.

Thank you for popping by and I'll be back soon!


Friday, 9 April 2021

Sparkly Hello

Hello there!

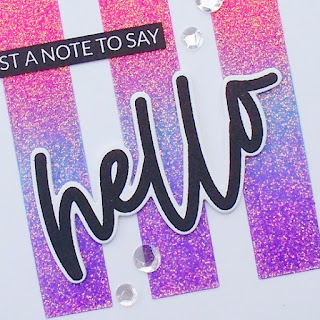
As promised I'm back the second of three cards made using the Moonstone Glimmer paste by Nuvo. The card is very similar to the Hey! Friend card but it uses a different colour scheme and sentiments. Well, without further ado...


What you need...

Stamps: 
Loads of Hello ST-21-11 - Avery Elle

Dies:
Loads of Hello D-21-11 - Avery Elle

Stencil:
Rectangle Trio - My Favorite Things

Ink pads:
Picked Raspberry - Tim Holtz Distress Oxide
Tumbled Glass
Wilted Violet
Onyx Black - Versafine

Glimmer paste:
Nuvo Moonstone - Tonic Studios

Card stock:
White

Embellishments:
Crystal Confetti - The Stamp Market

Extras:
Adhesives
Die cutting machine - Sizzix
Blending brushes - Picket Fence
Nuvo Media Spatulas - Tonic Studios

What you do...

1 Cut a piece of white card 10.5cm x 13.5cm, place the stencil towards the top and secure in place with low tack tape.

2 Start at the top of the stencil and blend Picked Raspberry ink, Tumbled Glass followed by  the Wilted Violet. Allow the ink to dry.

3 Using a spatula, spread some of the Moonstone paste evenly over the stencil. Scrape away the excess and place back in the pot. Remove the stencil. Put the lid back on the pot and wash the stencil and spatula immediately. Allow the paste to dry.

4 Stamp the 'hello' and 'just a note to say' with black ink. Die cut the 'hello' and die cut again twice more in white card. Stack the die cuts lining up each layer. Trim the 'just a note to say'.

5 Create an 11cm x 14cm top fold blank and attach the stencilled panel onto it either with foam tape or some layers of scrap card stock. Attach the 'hello' with the 'just a note to say' above, to the left. Finish with some of the Crystal Confetti.

And there we have it. Another super sparkly card. I have one more in this set which again uses a different colour scheme and wording.

I am going to enter this card into the Creative Fingers Challenge #205. Click here to take you to the challenge.

Thank you so much for popping by, take care and I'll be back soon.


Friday, 2 April 2021

Easter Bun Buns

Hello there!

I can't believe Easter is upon us already, it only seems like yesterday it was Christmas. Speaking of Christmas, I'll be starting Christmas projects for Crafts Beautiful and PaperCrafter soon - eep!

I would like to share with you today, a card I made for my mum. We were chatting on the phone as I made it, so I thought it only fair to post it to her. She loved it. 

This card is slightly different from the usual cutesy, pastel Easter cards and is a more fresh, modern, bold card.


What you need...

Stamps:
#51 - AALL & Create
Dainty Swiss Dots - Altenew
Bunny Hop - Newton's Nook

Dies:
Peek-a-boo Pets - Avery Elle
Heartfelt (660233) - Sizzix

Ink pads:
Mermaid Lagoon - Tim Holtz Distress
Tumbled Glass
Onyx Black - Versafine

Promarker:
Baby Pink

Embellishments:
Black pearl

Washi tape:
Black/white striped

Card stock:
White
Pale pink

Extras:
Masking Magic - Gina K
Adhesives

What you do...

1 Cut a piece of white card 3⅛"x 6¼" (8cm x 15.5cm) mask off 1½" (4.5cm) across the bottom.

2 Stamp the first bunny above the masking in black ink, stamp again onto masking paper and cut out. Apply the mask over the bunny.

3 Stamp the second bunny so he sits just over the first, stamp again on masking paper and cut out. Apply the mask over the bunny. 

4 Die cut a speech bubble from masking paper and position above the bunnies.

5 Blend the Tumbled Glass ink from the top of the card followed by the Mermaid Lagoon. When dry, stamp the Dainty Swiss Dots over the inked surface with black ink.

6 Remove the masks. Use the Baby Pink marker to add colour to the bunnies ears, nose and cheeks. Stamp a sentiment in the speech bubble.

7 Trim the panel to 2⅞" x 6" (7.5cm x 15cm). Add a strip of Washi tape across the base of the blank, under the inked section.

8 Die cut a small heart in pale pink card stock and add to the lower right, overlapping the Washi tape. Add some black pearls to decorate and mat onto a white 3⅛"x 6¼" (8cm x 15.5cm) blank.

As I have quite a lot of American products which are in imperial measurements, I am finding that by making my blanks/panels in inches they are more aesthetically pleasing and easier to work out. If I do use imperial measurements, I will always try to add the nearest measurements in centimeters.

I must admit I do prefer working in imperial anyway. It think this stems from being brought up by my grandparents. Even now, if I do any baking I work in pounds and ounces.

The stamp set with the bunnies unfortunately doesn't have a name. It is packed with the cutest images from the two bunnies, to a panda, racoon, elephant and a bear. It also has some fun sentiments and little add-ons such as party hats, presents and a balloon. The AALL Stamps all seem to just have numbers and not names

I hope you liked this 'different' Easter card. I have one more to share with you which also includes a cute bun bun, but uses mainly dies.

I am entering this make into the Crafty Creations Challenge #419 - Anything goes. Click here to take you to the challenge.

I am also entering this make into the Creative Fingers Challenge #205. Click here to take you to the challenge.

Thank you for stopping by! 


Friday, 26 March 2021

Hey! Friend

Hello there! I hope you are all keeping well.

Nuvo Glimmer Paste! Why, oh why didn't I play around with this stuff when I first purchased it? It's been in my stash for some time and I don't know whether I was a bit frightened of it or just didn't have the inspiration. I'm in love!

I recently purchased the Avery Elle Loads of Hello stamp and die set and thought that these large words would look great over a stencilled background, but with some extra sparkle. This gave me the kick start I needed. Hence, I got on a roll creating a few cards using this wonderful stuff.


What you need...

Stamps: 
Loads of Hello ST-21-11 - Avery Elle

Dies:
Loads of Hello D-21-11 - Avery Elle

Stencil:
Rectangle Trio - My Favorite Things

Ink pads:
Dried Marigold - Tim Holtz Distress Oxide
Picked Raspberry
Wilted Violet
Onyx Black - Versafine

Glimmer paste:
Nuvo Moonstone - Tonic Studios

Card stock:
White

Embellishments:
Crystal Confetti - The Stamp Market

Extras:
Adhesives
Die cutting machine - Sizzix
Blending brushes - Picket Fence
Nuvo Media Spatulas - Tonic Studios

What you do...

1 Cut a piece of white card 10.5cm x 13.5cm, place the stencil towards the top and secure in place with low tack tape.

2 Start at the top of the stencil and blend Dried Marigold ink, followed by Picked Raspberry then Wilted Violet. Allow the ink to dry.

3 Using a spatula, spread some of the Moonstone paste evenly over the stencil. Scrape away the excess and place back in the pot. Remove the stencil. Put the lid back on the pot and wash the stencil and spatula immediately. Allow the paste to dry.

4 Stamp the 'hey!' and 'friend' with black ink. Die cut the 'hey!' and die cut again twice more in white card. Stack the die cuts lining up each layer. Trim the 'friend'.

5 Create an 11cm x 14cm top fold blank and attach the stencilled panel onto it either with foam tape or some layers of scrap card stock. Attach the 'hey! with the 'friend' underneath to the right. Finish with some of the Crystal Confetti.

I am so proud that my photo captured the beauty of this shimmery surface, of course it still isn't as wonderful as in real life. 

It's important that you close the pot of paste and wash your stencil and spatula straight away. This stuff dries quickly and rock hard and will damage your stencil and spatula. I placed a small piece of Press & Seal over the top of the pot before adding the lid. Cling film could also be used.

I am definitely going to use this paste for Christmas cards.

I hope you like my card, I will be back soon with the others I created, two use the remaining large words from the stamp and die sets in a different colour scheme and the third uses some cute cacti stamps.

I am entering this make into the Crafty Creations Challenge #419 - Anything goes. Click here to take you to the challenge.

Keep safe and well and thank you for stopping by.


Monday, 24 August 2020

Stitched Hearts

Hello there!

I hope you are all well. I would like to share with you, if I may, a simple little card featuring a cute heart taken from the Paper Smooches stamp set - Needle Little Love. 

This card combines simple masking and stamping techniques. I finished off the card with the word 'Hi', but it could be adapted to a Valentine's or anniversary card by simply changing the sentiment.


What you need...

Stamps:
Needle Little Love - Paper Smooches

Ink pads:
Magenta - Avery Elle Pigment Ink 
Orchid
Raspberry
Onyx Black - Versafine

Masking paper: 
Stamping Mask Paper - Inkadinkado

Card stock:
White

Gems:
Clear

What you do...

1 Stamp a vertical row of four hearts onto white card with the Onyx Black ink so the stitches line up.

2 Stamp the hearts onto masking paper and cut out. Place over each of the hearts.

3 Apply the inks over the hearts so the paler shade of pink is at the top blending down to the deeper shade.

4 Remove the masks and trim the hearts leaving a narrow white border down each side.

5 Mat the heart strip down the left side of a white blank 10.5cm x 15cm trimming away any excess from the top and bottom. Stamp the 'hi' in the lower right corner and finish with some clear gems.

Sadly Paper Smooches are now closed for business. I will however continue to use their stamp and dies sets as they have such wonderful images and they are one of my favourite go to companies. Plus, I know a lot of people own many of their products. So look out for more of my makes featuring Paper Smooches!

Well, I have to sign off now. Thank you for stopping by and I'll be back soon.Take care!


Monday, 4 May 2020

Ketchup

Hello there!

I hope you are still keeping well. 

I am so off the plot at the moment. It was my birthday yesterday and I didn't realise it was coming up until the other day, plus normally today we celebrate Mayday in the UK, but I only remembered earlier today that this year it has been moved to Friday the 8th to celebrate VE day. I really need to leave orbit and come back to earth!

Anyway, on with today's card. I was going through my lovely Paper Smooches stamps sets and decided on this cute little fellow.

What you need...

Stamps:
Vegtastic - Paper Smooches
Picture It - Avery Elle

Dies:
Vegtastic - Paper Smooches

Ink pads:
Extreme Black - My Favorite Things

Patterned paper:
Highline 6x6 Paper Pad - Basic Grey

Copic:
Cool Gray C-1, Cool Gray C-3, Salmon Red R05, Cadmium Red R27, Green Bice YG01, Acid Green YG07

What you do...

1 Stamp the photo frame and cut out along with the inner section. Add Cool Grey 1 and 3 to add definition.

2 Back the inner section with a piece of the yellow patterned paper from the Basic Grey pad.

3 Stamp the 'Washi' tape strips, colour in and cut out.

4 Stamp the tomato, colour and cut out using the matching die. Fix the tomato to the patterned section of the photo frame.

5 Stamp the 'comment' section to the frame and the speech bubble with the 'We must ketchup' sentiment. Cut out the speech bubble.

6 Attach the photo frame to a white top fold 10.5cm x 14.5cm blank. Add the 'Washi' strips and the speech bubble.

After the lockdown has ended, this would be an excellent card to send to a friend to arrange a coffee and a good catch up chat.

Sadly the Picture It set is no longer available, however there are other stamp sets featuring Polaroid style frames by other brands out there. There are some dies available too. Alternatively you could create your own picture frame by cutting a rectangle with rounded corners and snipping out a section from the centre. There are also lots of stamp sets out there with speech bubbles.

I hope you like my cute little make. I've never seen such a happy tomato! 

I'm going to sign off for now. Thanks for popping by and I'll be back soon.


Thursday, 2 April 2020

Warp Speed

Good afternoon blog friends!

I hope you are all still keeping well, safe and not going too stir crazy.

Before I show you my card, I just want to say that for some reason Blogger has messed up the reply function to comments, this has been going on for quite a while with no real fixes. Apparently this is a big problem for lots of blogs, especially older ones. A suggestion was made that you could completely change the theme of your blog to overcome the problem. I am sure that I am not the only one who spent a lot of time and energy into creating their blog, so I don't really want to go down that route. 

I have got round it by not embedding the comment box and changing it so that it opens in a different window. As I can't reply I will leave a separate comment myself. Aaargh!

Righto, on to the important stuff. I do have a couple of more cards made using the Silhouette, but I did this one the other day and I am so excited to share it with you.


What you need...

Card stock: white
Stamp: Space Cadet - Paper Smooches
Ink pads: Sapphire - Avery Elle; Extreme Black - My Favorite Things
Copic: Pinkish White R00, Cherry White R000, Vermillion R08, New Leaf YG23, Nile Blue BG45, Cool Grey #1 C-1, Acacia Y04, Apricot YR16
Gel pen: Gelly Roll Stardust Clear #700 - Sakura; Signo Broad White UM-153 - Uni-ball
Masking paper: Stamp Masking Paper - Inkadinkado
Adhesives

What you do...

1 Hand cut a rough edged semi-circle of masking paper and attach to the bottom of white card 10cm x 14cm.

2 Stamp the images onto the card, stamp again onto masking paper, cut out and apply over each image.

3 Use the Sapphire ink and blend over the piece of card, leaving areas a little bit lighter.

4 Remove the masking paper and colour in the images.

5 Use the white gel pen to add stars and planets. 

6 Stamp the sentiment at the base in the semi-circle. Highlight the sentiment with the Stardust gel pen and some of the stars/planets.

7 Mat onto a 10.5cm x 14.5cm white blank.

I haven't made this card for anyone in particular. I am trying to do my makes using old supplies from my stash rather than keep purchasing new ones. This stamp set hasn't been used in a while and I thought the sentiment was perfect.

A thoroughly good time was had making this card and I'm really pleased with the way it turned out. 

The thing I love about Paper Smooches stamp sets is that they always have unusual, quirky and different wording/sentiments.

Thank you for popping by, keep well and I'll be back soon.


Friday, 6 September 2019

Old Gull

Hi blog friends!

Well, it is getting close to my fave time of year....Autumn with its leaves, colours, woodland walks and of course Halloween, then Winter with its cosy nights in front of the fire, hot choc and Christmas!

I am so behind this year on starting my Christmas cards. I'm having my art room redone and I've moved into my husband's office which is no where near as big as my room. This means I have half of my stuff in his office and half in another room - it's a pain in the butt. I should be back in my room soon, so I'll post some pics up.

I want to show you another card I did with the seagull stamp set. This one is a bit simpler than the one in the last post.


What you need...

Card stock: white
Stamps: Seaside Seagulls (CS-200) - My Favorite Things; Picture It - Avery Elle; Bird Assortment - Inkadinkado
Ink pads: Extreme Black - My Favorite Things
Copic markers; BG000 Pale Aqua, C-1 Cool Grey 1, C-4 Cool Grey 4, Y13 Lemon Yellow, Y18 Lightning Yellow
Adhesives

What you do...

1 Stamp two seagulls facing each other onto white card with three waves underneath and colour in.

2 Stamp the speech bubble and sentiment above one of the gulls.

3 Trim to 11cm square and mat onto a 12cm square white blank.

There. Quick and simple.

I hope you like this little make. Thank you for stopping by and I'll see you soon!


Wednesday, 3 July 2019

Thanks a Latte

Hello blog friends!

It has been some time since I last posted. We've been on holiday, had a few classic car rallies and I've been busy with magazine work. I've been doing Christmas stuff since May and the last half of the year is always extra busy as we have a couple of extra issues to get out, so that means tighter deadlines.

I made a fun little card for some dear friends, so this is what I want to show you today.


What you need...

Cardstock: Kraft, white

Stamps: Cool Beans ST-17-43 - Avery Elle; Breakfast Club - The Alley Way Stamps; Shadows - Paper Smooches

Dies: Cool Beans Ellements D1743 - Avery Elle, 3 Nested Squares Small 18009 - Gina K; Stitched - Paper Smooches

Ink pads: Smokey Gray, Vintage Sepia - Versafine; Extreme Black - My Favorite Things

Copics: E23 Hazelnut, E25 Caribe Cocoa, E27 Milk Chocolate, E29 Burnt Umber, B0000 Pale Celestine, B000 Porcelain Blue, R24 Prawn, R27 Cadmium Red, R29 Lipstick Red

Adhesives

What you do...

1 Stamp the cup, labek, large heart, a double and a single coffee bean in black ink onto white card and colour in.

2 Die cut the stamped images.

3 Die cut the largest of the stitched squares in white card. Stamp a shadow in Smokey Gray at the lower right corner and a coffee stain at the lower left and upper right in Vintage Sepia. Stamp the sentiment in black in the upper left corner.

4 Assemble the coffee cup and fix to the lower right over the shadow, place the coffee beans around the base. 

5 Die cut two stitched lines approximately 1cm and 2cm up from the bottom of an 11cm x 13cm top fold Kraft blank. Fix the coffee panel above.

6 Finish with two coffee stains at the lower right corner.

And there you have it, a perfect card for coffee lovers. Sadly The Alley Way Stamps is no longer in business, so this stamp set is no longer available. You could draw in some coffee stains or dip the base of a small glass or espresso cup into brown ink and 'stamp' the stains.

John & Peter were thrilled with the card as I was thrilled with the handmade chocolates they got me for my birthday.

Well, that's me for now. I will try and post again soon, thanks for stopping by! 


Thursday, 18 April 2019

Fishy Wishes

Hello blog friends!

I do hope that the weather where you are is as bright and sunny as it is here. It's so lovely to see all the plants and trees bursting open with colour.

Talking of colour, I have a fab colourful card with a fishy theme to show you. One of my favourite stamp sets is the That Bites by Avery Elle. I just find the faces of the fish so comical and the images lend themselves to male cards very well.


What you need...

Card stock: aqua, white
Stamps: That Bites - Avery Elle; Birthday Buddies - Paper Smooches
Copic: C1 Cool Grey 1, RV06 Cerise, YG13 Chartreuse, YR16 Apricot
Promarker: Purple
Ink pad: Extreme Black - My Favorite Things
Gel pens: Signo White UM-153 - Uni-ball, Glaze Clear #800 - Sakura
Dies: circle 8.5cm
Adhesives

What you do...

1 Stamp the fish over white card with black ink and colour in. Stamp the angler fish, colour in and cut out. Colour over the eyes with the clear glaze pen.

2 Die cut a circle in the centre of aqua card 12cm square.

3 Trim the fish panel to 10.5cm square and mat centrally onto a white blank 12.5cm square.

4 Mat the aqua panel onto the blank with foam tape.

5 Mount the angler fish at the lower left of the circle.

6 Stamp the sentiment in the top right and draw some bubbles with the white gel pen.

There you have it!  A bright, colourful card suitable for anyone of any age. 

I did use this stamp set in a previous post where I masked off the fish and inked the background. This made an effective, yet simple card. Here is the link to that post https://cosmicstrawberry-colette.blogspot.com/2018/04/that-bites.html

Thank you for dropping by, I hope you all have a lovely Easter! 


Saturday, 30 March 2019

Monster Hugs

Hello blog friends!

Happy Saturday to you all. It is a bright, sunny Spring morning here.

I would like to show you a card I made for a male friend. I purchased a cute monster themed set of stamps and couldn't wait to use them.


What you need...

Card stock: white
Stamps: More Monsters (CS-222) - My Favorite Things
Ink pads: Extreme Black - My Favorite Things; Mermaid, Celery, Fizz - Avery Elle
Patterned paper: Daily Details 12" x 12" (Spooktacular Collection) - Bella Blvd
Dies: circles
Flat back pearls: black
Adhesives

What you do...

1 Stamp the monsters onto white card in the coloured inks, then stamp the faces onto the monsters in black ink.

2 Cut a strip of spotty paper 6.5cm x 10.5cm and die cut three circles across it. Back each circle with a monster.

3 Fix the paper strip to a white landscape blank, leaving enough space at the bottom for the sentiment.

4 Stamp the sentiment and some stars in the lower right corner and add black pearls to each of the eyes.

This stamp set is so cute, each monster has his own unique face that you can over stamp. The faces would look good stamped onto pumpkin motifs. There is also a die set available to go with the stamps.

I think monster cards are fun to give to adult males rather than the generic car, sport and golf cards. Men are all big kids at heart. I've done a monster card for my husband's birthday, so I'll share that with you soon.

Thank you for stopping by and I hope you like my little monster card. TTFN!