Showing posts with label Altenew. Show all posts

Tuesday, 13 July 2021

You Slay Me

Good afternoon!

I know, it's been a while again, but sometimes life just seems to get in the way.

Well, I'm back and I have an adorable card to share with you today. It's fun, quirky and full of sass. The image is taken from a fab stamp set called Mythical Grumplings by Taylored Expressions. It's packed with mythical creatures with attitude and sassy sayings.

I decided to use the cute dragon and here he is in all his glory...


What you need...

Stamps:
Mythical Grumplings (#TEMD179) - Taylored Expressions

Dies:
Mythical Grumplings (#TE1422) - Taylored Expressions
Small stars

Embossing folder:
Multi Circles - Darice

Ink pads:
Black Soot Distress Ink - Tim Holtz
Carved Pumpkin
Squeezed Lemonade
Twisted Citron
Onyx Black - Versafine

Card stock:
White

Extras:
Adhesives
Masking paper - Altenew
Sparkle Sheer Shimmer Craft Spray - Imagine Crafts

Tools:
Big Shot - Sizzix

What you do...

1 Cut a piece of white card stock 2¼" x 4¼" (5.5cm x 11cm). Stamp the dragon towards the right hand side with Onyx Black ink.

2 Die cut the dragon from masking paper and mat over the stamped image. Die cut three small stars from masking paper and place around the dragon.

3 Starting from the left hand side, blend the Carved Pumpkin, then the Squeezed Lemonade followed by the Twisted Citron inks.

4 Smooch some Black Soot ink onto a surface, such as an acrylic block. Add a drop of water and use a paint brush to add spatters of ink over the blended surface. 

5 Stamp the sentiment at the lower left. Spritz shimmer spray over the surface, allow to dry and carefully remove the masks.

6 Emboss the circles onto white card, trim to 4¼" x 5½" (11cm x 14cm) and mat onto a white top fold blank the same size. Add the dragon panel across the blank, just below half way down.

I have had this embossing folder for many years, but you can use any you have in your stash. A star or spotty themed background would look good.

There are a few stamp sets in the Grumplings range and they are all as sassy! Why not pop on over to Dies to Die For and have a look? Click here to take you to this wonderful site.

I am now thinking of starting my Christmas cards. I have so many stamps and dies that I haven't played with yet, some of which I've had for quite a while (even years). I do promise myself every year that I'm going to start around July/August, but I never seem to get round to it. This year I am determined.

As always, thank you so much for stopping by. I'll hopefully be back soon with a Christmas card, if not it will be a normal card from my stash of recent makes.

Take care! 


Tuesday, 22 June 2021

Kitty Hug

Hi there!

It's been a few weeks since I last posted, but I'm back.

I have a friend, Lindsay who is a big cat fan and we met up a couple of weeks ago after not seeing each other for a couple of years. She had bought me the most adorable Winnie the Pooh mug and I wanted to make her a cat themed card to say how nice it as to catch up and thank her again for the mug.

I had recently purchased a cute cat stamp by Impression Obsession and decided it would be perfect for her card.


What you need...

Stamps:
Kitty Hug (D21359) - Impression Obsession
Dainty Swiss Dots - Altenew

Ink pads:
Onyx Black - Versafine

Patterned paper:
Into the Woods Remix 6x6 Petite Paper Pack - Lawn Fawn

Card stock:
Paradise - Hero Arts
Passionate Pink - Gina K Designs
White

Embellishments:
Black hemp cord

Extras:
Adhesives

Tools:
Big Shot - Sizzix

What you do...

1 Stamp the kitty three times, once onto Passionate Pink card, once onto white card and again onto the orange grid patterned paper.

2 Fussy cut the cat from the orange grid paper and the sign from white card. Layer onto the Passionate Pink layer. Fussy cut this out.

3 Stamp the Dainty Swiss Dots onto Paradise card. Trim to it measures 3¾" x 5½" (9.5cm x 14cm) and adhere centrally down a white blank 4¼" x 5½" (11cm x 14cm).

4 Wrap black hemp cord several times around the blank (under the kitty) and tie in a bow. 

I was trying to go for the pop art look with the style and colours on this one. I ended up snipping through the loops of the bow as I thought these looked a lot like whiskers. My cat Zuzu must have approved as she tried to rearrange them!

I really enjoyed playing with this cute stamp and the fussy cutting wasn't too difficult. This would look great coloured in with alcohol markers or watercolours to represent the colour of the recipients cat. Lindsay's cats aren't ginger, I just loved the patterned paper and thought it would work well the pop art look I was going for.

Lindsay loved it (as did her cats).

I am entering this card into the Anything Goes Challenge #422 over at Crafty Creations and the Creative Fingers Challenge #210 over at Creative Fingers.

Got to sign off, magazine projects to get on with. I'll be back soon with another card to share. Take care and thanks for popping by!


Tuesday, 20 April 2021

Floral Heart

Good afternoon!

I hope you are enjoying the lovely spring weather. I popped out this morning to get my annual tomato plants ready to put in the greenhouse. I also picked up a sweet yellow pepper plant and a hot chilli pepper plant. 

I think everyone else had the same idea, as the garden centre was packed. The garden centre had a really good system in place and luckily everyone practiced social distancing and wore their masks. 

Talking of garden centres and plants, I have an adorable little card to share with you that has a floral theme. This is created by using a stunning stamp set by Concord & 9th. I did do a card back in October (click here to take you to the post) that used this stamp set, but I did it as a new home card and with a different colour scheme.

I do believe that this stamp set is still available at Seven Hills Crafts and Bumbleberry Papercrafts (click on the shop name to link you to the product).


What you need...

Stamps: 
Floral Print Silhouette Stamp Set - Concord & 9th

Dies: 
Halftone Hearts - Altenew
Additional Circles - Waffle Flower

Ink pads:
Onyx Black - Versafine
Grapefruit - Concord & 9th
Sprout

Embellishments:
Droplets Crystal Clear Hearts - Little Things from Lucy's Cards

Card stock: 
White

Tools:
Big Shot  - Sizzix
Stamping Platform - MISTI

Extras:
Foam sheets
Adhesives


What you do...

1 Use a stamp positioning tool to stamp the first layer of the floral image with black ink. Next, line up the flower section and stamp in Grapefruit. Line up the foliage layer and stamp in Sprout ink.

Die cut the stamped panel with a circle die (approx. 3⅜" or 8.5cm diameter). Die cut the fourth largest heart from the centre of the circle. 

3 Die cut the the fifth largest heart from within the larger heart.

4 From a piece of foam sheet, die cut a slightly smaller circle than the stamped section; then cut the larger heart from the centre of it, making sure it lines up. Glue the printed circle onto the foam.

5 Die cut the smaller heart from a foam sheet and glue the printed heart to it.

6 Create a 4¼" x 5½" (11cm x 14cm) white blank and adhere the stamped circle panel at the top. Add the smaller heart to the centre of the larger one.

7 Stamp the sentiment underneath and finish with some heart droplets.

I love this stamp set, I think it's so elegant. I think a colour scheme where the flowers are stamped in red with bright green foliage would make a wonderful and different Christmas card.

I have been having an obsession with making cacti themed cards lately, so I'm looking forward to sharing those with you soon.

Thank you for popping by, take care and keep safe!


Sunday, 4 April 2021

Carrot Bunny

Hello and Happy Easter!

I'm back with another cute bunny card. This one uses quite a lot of die cuts and features the Carrot Bunny die set by Sizzix as part of their new 2021 Chapter 1  release. I decided to cut a Polaroid frame using an old die from Paper Smooches to make it look like a cute photo.

The background of the photo is a piece of pale pool card with some subtle blending at the top and the main background of the card is stamped in black ink using the Dainty Swiss Dots stamp by Altenew.


What you need...

Dies:
Carrot Bunny by Tim Holtz (665213) - Sizzix Thinlits
Heartfelt by Tim Holtz (660233) - Sizzix Bigz
Polaroid - Paper Smooches

Stamps:
Dainty Swiss Dots - Altenew
Happy Happy Happy - Lawn Fawn
Happy Happy Happy Add-on 

Ink:
Garden Patina Make Art - Wendy Vecchi
Obsidian Amalgam - Gina K

Card stock:
Black
Burnt Orange
Green
Lime
Orange
Pale Pink
Pool
White

Embellishments:
Black cord

Extras:
Adhesives

What you do...

1 Die cut the bunny from white card, his eyes/nose/mouth from black and his cheeks/ears from pale pink. Cut the main carrot from burnt orange and orange card and the foliage from green and lime. Assemble the bunny and the carrot.

2 Die cut the Polaroid frame from black, white and pool card. Blend the Garden Patina ink across the top of the pool section.

3 Attach the bunny to the pool panel at an angle so it overlaps the bottom edge. Trim away the excess. Layer the black frame onto the white one and stick onto a piece of white card, trim away any excess. Attach the bunny panel into the frame.

4 Stamp the Dainty Swiss Dots onto white card with the Obsidian ink and trim to 4" x 5¼" (10cm x 13cm) and mat onto a 4¼"x 5½" (11cm x 14cm) blank covered with pool card.

5 Adhere the bunny panel centrally to the top of the blank. Add the carrot, tucking it under the bunny's arms. Die cut three small hearts in pale pink card and fix to the panel. Wrap and tie black cord around the base of the blank and tie in a bow at the right.

As Paper Smooches is sadly no longer trading, the Polaroid die is now unavailable, however there are some cute die sets by companies such as Sweet Pea Designs, Mama Elephant and Lawn Fawn. You could easily make your own by die cutting a square from a rectangle of card.

The Carrot Buuny die set also comes with a larger carrot so you can have two bunnies side by side holding it. So cute.

I am going to enter this card into the Creative Fingers Challenge #205. Click here to take you to the challenge.

Well thank you as always for stopping by, I really appreciate it. I will be back soon with another card made using the Nuvo Glimmer paste. It is similar to the one I recently posted, but has different wording and colour scheme.

Enjoy the rest of your Easter!


Friday, 2 April 2021

Easter Bun Buns

Hello there!

I can't believe Easter is upon us already, it only seems like yesterday it was Christmas. Speaking of Christmas, I'll be starting Christmas projects for Crafts Beautiful and PaperCrafter soon - eep!

I would like to share with you today, a card I made for my mum. We were chatting on the phone as I made it, so I thought it only fair to post it to her. She loved it. 

This card is slightly different from the usual cutesy, pastel Easter cards and is a more fresh, modern, bold card.


What you need...

Stamps:
#51 - AALL & Create
Dainty Swiss Dots - Altenew
Bunny Hop - Newton's Nook

Dies:
Peek-a-boo Pets - Avery Elle
Heartfelt (660233) - Sizzix

Ink pads:
Mermaid Lagoon - Tim Holtz Distress
Tumbled Glass
Onyx Black - Versafine

Promarker:
Baby Pink

Embellishments:
Black pearl

Washi tape:
Black/white striped

Card stock:
White
Pale pink

Extras:
Masking Magic - Gina K
Adhesives

What you do...

1 Cut a piece of white card 3⅛"x 6¼" (8cm x 15.5cm) mask off 1½" (4.5cm) across the bottom.

2 Stamp the first bunny above the masking in black ink, stamp again onto masking paper and cut out. Apply the mask over the bunny.

3 Stamp the second bunny so he sits just over the first, stamp again on masking paper and cut out. Apply the mask over the bunny. 

4 Die cut a speech bubble from masking paper and position above the bunnies.

5 Blend the Tumbled Glass ink from the top of the card followed by the Mermaid Lagoon. When dry, stamp the Dainty Swiss Dots over the inked surface with black ink.

6 Remove the masks. Use the Baby Pink marker to add colour to the bunnies ears, nose and cheeks. Stamp a sentiment in the speech bubble.

7 Trim the panel to 2⅞" x 6" (7.5cm x 15cm). Add a strip of Washi tape across the base of the blank, under the inked section.

8 Die cut a small heart in pale pink card stock and add to the lower right, overlapping the Washi tape. Add some black pearls to decorate and mat onto a white 3⅛"x 6¼" (8cm x 15.5cm) blank.

As I have quite a lot of American products which are in imperial measurements, I am finding that by making my blanks/panels in inches they are more aesthetically pleasing and easier to work out. If I do use imperial measurements, I will always try to add the nearest measurements in centimeters.

I must admit I do prefer working in imperial anyway. It think this stems from being brought up by my grandparents. Even now, if I do any baking I work in pounds and ounces.

The stamp set with the bunnies unfortunately doesn't have a name. It is packed with the cutest images from the two bunnies, to a panda, racoon, elephant and a bear. It also has some fun sentiments and little add-ons such as party hats, presents and a balloon. The AALL Stamps all seem to just have numbers and not names

I hope you liked this 'different' Easter card. I have one more to share with you which also includes a cute bun bun, but uses mainly dies.

I am entering this make into the Crafty Creations Challenge #419 - Anything goes. Click here to take you to the challenge.

I am also entering this make into the Creative Fingers Challenge #205. Click here to take you to the challenge.

Thank you for stopping by! 


Wednesday, 17 March 2021

Spring Roses Mother's Day Card - Altenew & Concord & 9th

Hi blog friends!

My, it's been a while hasn't it? I hope you are all still keeping safe and well in this crazy world.

To be honest I haven't really been making cards for personal use, the craft magazines have been keeping me exceptionally busy and after finishing those projects, I just wasn't in the mood. 

Anyhoo, with Mother's day coming up, I knew I had to get creating. I am a big fan of Altenew and last year I purchased their beautiful die set called Spring Roses. 

This die set consists of three quite large clusters of roses. I knew that I wanted to make my Mum a card using these dies. I teamed them up with some bold lettering by Concord & 9th and some subtle stencilling.

What you need...

Dies: 
Spring Roses - Altenew
Double Cut Alphabet - Concord & 9th

Stencil:
Basic Spots - Clearly Besotted

Ink pad:
Sprout - Concord & 9th

Card stock:
Key Lime - Silhouette Self Adhesive
Leaf Green
Mint
Black
Solar White 110lb - Neenah Classic Crest

Embellishments:
Lucky Dip Night - Little Things from Lucy's Cards

Extras:
Adhesives

What you do...

1 Die cut the larger of the double cluster of roses once each in Black, Mint and Key Lime. Use a small piece of Leaf Green to cut the small cluster of spiky leaves.

2 Cut a 10.5cm x 13.5cm piece of the white card and with the Sprout ink, stencil an area of spots in the centre of the card, blending to a fade.

3 Attach the roses to the lower right corner. Then infill with the Leaf Green, Key Lime and Mint die cut pieces.

4 Die cut the 'MUM' from the Black card and adhere above the rose cluster and add some black gems.

5 Mat the panel onto an 11cm x 14cm top fold blank.

I was debating as to create the roses with pink card, but I'm glad I went with the Mint colour. My Mum loved it. Remember to keep all the extra die cuts to create another card. 

Before I started to infill the roses, I noticed it looked really good with just the outline of the flowers over the stencilled background, I will have to do that one in a future project.

I will sign off for now, I do have a 3D St. Patrick's Day card I did for some friends which was created using my Silhouette, so I'll be back soon with that one.

I am entering this make into the Crafty Creations Challenge #419 - Anything goes. Click here to take you to the challenge.

Thank you for stopping by and see you soon, keep safe!


Tuesday, 3 November 2020

Boo!

Hello there!

I know that Halloween has been and gone, but I did make a few cards for some friends and I just never got round to posting them up to share with you. So, for the next few posts I will show you the Halloween cards I created.


What you need...

Stamps:
Pumpkinhead by Tim Holtz (CMS309) - Stampers Anonymous
Chevron Backdrops - Lawn Fawn

Dies:
Caps Bold - Altenew

Ink pads:
Marmalade - Concord & 9th
Onyx Black - Versafine

Embossing Folder:
Swiss Dots - Cuttlebug

Sprinkles:
Let's Polka - Little Things from Lucy's Cards

Sparklets:
Rainbow - Buttons Galore & More

Card stock:
Black
White

Extras:
Foam sheet
Adhesives

What you do:

1 Trim a piece of white card 4¼" x 5½". Apply black ink to the wide chevron stamp and with the card landscape, stamp the image diagonally across the top.

2 Stamp the pumpkin in the lower right corner, again with black ink.

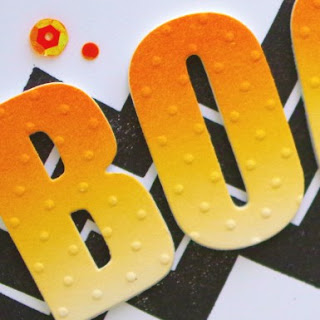
3 Blend the Marmalade ink onto some white card stock fading it towards the bottom. Allow to dry.

4 Die cut the 'B', the 'O' twice and the 'I' from the blended card and again from a foam sheet. Emboss the letters with the Swiss Dots folder.

5 Attach the blended letters to the foam letters.

6 Create a 4¼" x 5½" white landscape bank and cover with black card. Trim the stamped panel to 4" x 5¼" and mat onto the blank.

7 Attach the letters to the blank over the chevrons, using the 'I' as an exclamation mark. Add some orange sequins from the Sparklets Rainbow and orange dots from the Sprinkles Let's Polka.

Ta da! A spooky card. Keeping the colour scheme to white, black and orange gives the card a fresh look whilst maintaining the Halloween feel.

Okay, I want to promote something now. I was never happy with the bone folders I had in my stash. They always seemed to leave shiny marks on the paper/card stock. I saw that a lot of card makers used a Teflon bone folder, but I couldn't justify paying around £26.00 for one.

I did some searching and found a company based here in Norfolk that specialises in book binding and preservation. They sell two sizes of Teflon bone folders, a medium one for £7.95 and a large one for £8.95 excluding VAT. Even with postage and VAT added I still only paid around £14.94. 

To me, it looks exactly the same as the ones sold for crafting. I love it and no more shiny marks. It scores very smoothly and has some weight to it, perfect for strengthening those folds. The company is called Preservation Equipment Ltd, click here to take you to the bone folder page.

Well, that's me for today. I will try to get the other cards uploaded in the next couple of days. Thank you for popping by!

Take care and keep safe x


Friday, 8 May 2020

Poppy Thanks

Hello there!

I hope you are all keeping well.

I'm back with another card to share with you. This one I made for some dear friends to thank them for the birthday goodies they gave me.

I decided to go elegant with a beautiful stamp set by Altenew called Poppy Garden. I also used the co-ordinating stencil and mask set. I created the background with Tim Holtz Distress Oxide ink in Candied Apple. The photo doesn't really do the colour justice as the red in real life is a very bright true red. The centre of the poppy was highlighted with dimensional gloss by Nuvo.

So without further ado, here it is...

What you need...

Stamps:
Poppy Garden - Altenew

Stencils/masks:
Poppy Garden Mask Stencil - Altenew

Ink pads:
Extreme Black - My Favorite Things
Candied Apple Tim Holtz Distress Oxide - Ranger

Die:
Thanks - Paper Smooches

Dimensional medium:
Morning Dew Crystal Drops - Nuvo

Glitter Spray:
Sparkle Sheer Shimmer Craft Spray - Imagine Crafts

Embellishments:
Droplets - The Stamp Market


What you do...

1 Stamp the poppy towards towards the lower right corner of white cardstock 10cm x 14cm. Mask off and stamp several leaves.

2 Keeping the masks in place, apply the Candied Apple ink with a blending brush (or sponge). Blend so that the colour gently fades towards the top of the piece of card.

Spritz the panel with the shimmer spray, when dry remove the masks and trim the card to 9.5cm x 13.5cm. 

4 Die cut the 'thanks' several times in white card and once in black. Stack the layers finishing with the black one on top. Add to the panel just above the poppy.

5  Mat onto a white top fold blank 10cm x 14cm with foam tape.

6 Add some Nuvo drops to the centre of the poppy and attach a few droplets around the poppy to decorate.

This is another card that is a little different for me, but I so enjoyed playing with the ink and masks. It got quite messy at one point and with the ink being bright red it looked like I had massacred someone.

I love the subtle sheen that the shimmer spray gives to the background. I also like it when you get a few larger droplets of it.

I'm going to have another play with this stamp set and masks and maybe create a card where the poppies are coloured and the background is left white.

Thank you for stopping by, keep safe and well and I'll be back soon. 


Saturday, 26 August 2017

Mum

Happy Saturday!

It's Bank Holiday here in the UK so we're having a nice long weekend. So far the weather is great.

I have a card to share with you that I did for my Mum some time ago. As usual with my style it's very clean and simple.


What you need...

Stamps: Simple Flowers - Altenew
Ink pads: Aquamarine, Celery, Fizz, Lemon Grass, Magenta, Sugar Plum - Avery Elle
Masking sheets: Stamping Mask Paper - Inkadinkado
Alphabet stickers

I had some large Basic Grey alphabet stickers and I just coloured them with blank alcohol marker. Sadly Basic Grey no longer make paper craft items, it's shame as they were always one of my favourite manufacturers. Luckily I've purchased a lot of their collections in the past, some in duplicate, so it will take me some time to get through it all.

I hope you like this simple little card. Thank you for stopping by and I'll be back soon. I'm off to get out all my Christmas stock and hopefully start on some Christmas cards.