Showing posts with label Fancy Pants Designs. Show all posts

Wednesday, 18 November 2020

Cold Outside

Good afternoon!

I know I promised another Halloween card, but I got busy and too much time has passed now, so I will share it with you next year...maybe. So, I have a lovely Christmas card instead.

This elegant card uses some simple die cut snowflakes with some Distress Oxide ink a printed die cut sentiment and a touch of sparkle.


What you need...

Dies:
Large Snowflakes - Paper Smooches

Ink pads:
Salty Ocean Tim Holtz Distress Oxide - Ranger

Printed die cut:
Wish Season Ephemera Pack - Fancy Pants Designs

Shimmer Spray:
Sparkle Sheer Shimmer Spray - Imagine Crafts

Embellishments:
Blue Lagoon Lucky Dip - Little Things from Lucy's Cards

Cardstock:
White

Extras:
Foam sheet
Adhesives

What you do...

1 Cut a piece of white card 3⅝" x 4⅞" and apply Salty Ocean ink in the centre with a blending brush or foam pad blending out the edges.

2 Spray Sparkle shimmer over the surface allowing some larger droplets to fall. Allow to dry.

3 Die cut two large snowflakes in white card and three small snowflakes. Arrange onto the inked panel.

4 Mat the inked panel onto a smaller piece of foam sheet. Create a 4¼" x 5½" white blank and mat the panel centrally onto it.

5 Add some gems and sequins to the centre of the snowflakes and add the sentiment with foam pads.

I'm afraid my photo doesn't really do the card justice. I can't seem to get the right settings on my camera for good close up work. The exposure is never spot on. I tend to take the photos in the conservatory with good daylight, but I can't get it right. Any tips would be highly appreciated.

This card would be great using any snowflake dies that you have in your stash along with any printed die cut sentiments you may have or stamp your own. For a different look it would be lovely with a red inked background.

Well, thank you for popping by and I'll be back soon with another Christmas card soon.

Keep safe and take care! x


Thursday, 6 December 2018

Holly Jolly Christmas

Hi blog friends!

I want to say a special hello, thank you and welcome to my new followers!

After Inktober and all the sketchy posts, I'm back with a quick and cute Christmas card.


What you need...

Cardstock: Kraft
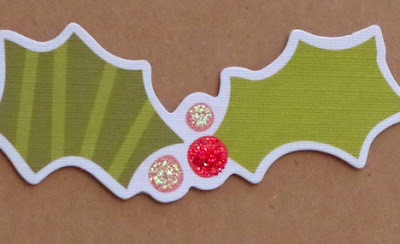
Printed die cuts: Mistletoe Kisses (#7429) Bits & Pieces - Simple Stories (sentiment); Oh, Deer! Ephemera Pack - Fancy Pants (holly)
Glitter glue: Stickles Crystal, Christmas Red - Ranger
Adhesives

What you do...

1 Create an 8.5cm x 12.5cm Kraft card blank.

2 Stick the sentiment centrally across the bottom of the blank.

3 Add the die cut holly above the sentiment with foam pads.

4 Highlight the berries with the glitter glues.

There you have it. Quick and simple. 

I love the look of Kraft card, especially with splashes of colour such as reds and greens or aqua shades. It looks really good used for Christmas cards - it reminds me of gingerbread.

I do have a few more quick and simple cards to share with you, but I want to get on and do some more detailed and time consuming makes such as stamping and die cutting. Things are still so busy with magazine work at the moment.

Thank you for stopping by and I'll be back soon!


Monday, 19 January 2015

Sup? - Grumpy Monkey - Dr Digi/Incy Wincy

Good afternoon!

I do hope you are all well and rested after the weekend.

We have another fabulous challenge over at Incy Wincy this week - make an easel card.

Our fantastic sponsor is Dr Digi. The winner will get two digis as a prize (you lucky thing, you).


Now then, I am not in any way a fan of easel cards, in any shape or form; so this was indeed a very big challenge for me.

I chose a brilliant image called Grumpy Monkey and here is what I did with this 'cool dude'...


What you need...

Digi stamp: Grumpy Monkey - Dr Digi's House of Stamps
Digital card stock: white - Craftwork Cards
Card stock: black
Patterned paper: Swagger 6x6 Paper Pad - Fancy Pants Designs
Promarkers: Black, Ice grey 1, 2, 3, 4 & 5
Pearls: black

What you do...

Re-size the image to suit. Add the 'Sup?', print out and colour.
Create a 13cm square easel card.
Trim and mat the image onto black card and attach to the blank.
Create a sentiment, mat onto black card and fix to the base of the card with foam tape.
Add some black pearls to finish.

I just love the look on this guys face. If he wasn't saying 'Sup?' I think it would be 'What u lookin' at?' As it's a perfect image to use for a male card, I stuck with monochromatic tones of blacks and greys.

Why not pop on over to Incy Wincy to enter the challenge and have a look at the scrummy inspiration my talented teamies have created?

Thank you for stopping by, ttfn xx

P.S. I'm still not a fan of easel cards :o(

post signature

Saturday, 15 November 2014

Let's Be Merry

Happy Saturday peeps!

I hope you are all having a lovely weekend.

This card is one of three I did using the Tim Holtz Halftone Christmas Stamps. I kept the colour scheme similar for all three. The card looks quite big in the photo, but it's only a tincy wincy one - 7.5cm x 14.5cm.


What you need...

Stamps: Tim Holtz Collection Halftone Christmas (CMS204) - Stampers Anonymous; Christmas Sampler - Paper Smooches
Patterned paper: Oh Deer! 6"x6" Paper Pad - Fancy Pants Designs
Card stock: white
Ink pads: Spanish Moss - Versafine; Aquamarine - Avery Elle; Jumbo Java - VersaMagic
Ribbon: teal
Gems: teal
Adhesives

What you do...

Create a white 7.5cm x 14.5cm top fold blank.
With Spanish Moss, stamp the halftone part of the tree to the left, just over half way up the blank. Over stamp the tree detail with Jumbo Java ink.
For the moon, stamp the halftone part of the snowflake in Aquamarine to the right at the top of the tree.
Cut a piece of the tree paper 4.5cm x 7.5cm and attach to the blank under the tree.
Wrap and tie ribbon around the patterned section.
Stamp the sentiment with Jumbo Java and finish with a few gems.

I love the colour combination of teals, blues and browns for Christmas. They seem to work really well together.

With this being an odd sized card, I'll have to make an envelope for it. It's a good way to use up old papers from my stash.

I'll be back soon with the last card I did using this colour scheme and stamp set. Thank you for calling by! TTFN xx

post signature

Saturday, 15 March 2014

Old Bird

Happy Saturday peepsicles!
I hope you are all enjoying the weekend :o)
It was my Uncle Roy's birthday on the 13th (Happy Birthday Uncle Roy! - sorry the card was a day late - oops) and I decided to put together this little creation.


What you need...

Stamps: Bird Assortment (97729) - Inkadinkado
Papers: Swagger 6 x 6 Paper Pad - Fancy Pants Designs
Promarkers: Burnt Orange, Ice Grey 1, Mustard, Pear Green, Petrol Blue, Rock Pool
Dies: Framelits Circles (657551) - Sizzix
Card: white
Ink pad: Onyx Black - Versafine
Button: mustard
Parcel string
Adhesives

What you do...

Stamp and colour the owl. Die cut into a circle and mount onto a larger circle of pale blue paper. Cover a top fold 12cm square blank with a smaller square of patterned paper. Cut a panel of the petrol blue paper and die cut a part circle from the lower left side. Adhere the panel the right side of the patterned paper.

Mat the owl onto the blank so it sits in the cut out circle of the panel. Stamp a sentiment and trim into a banner, fix above the owl and finish with a button tied with frayed string.

I know the sentiment is a bit cheeky, but Uncle Roy has a good sense of humour so I know he can take it. Plus, this bird stamp set is just so cool. The bored/not impressed look on the birds' faces is classic.

I based the layout on the Retrosketches #99.


Click here to link to the Retrosketches site or you can find them in the sidebar under Brilliant blogs I follow.

Anyhoo, that's me for now. People to do, places to go, things to see....
Enjoy the rest of your Saturday! xx

post signature

Monday, 10 December 2012

True Spirit of Christmas

Well hello there chums!
Hope you all had a lovely weekend. I really don't know where it went to and at what speed. Back to Monday already.
The showcasing of my Christmas cards is winding down now. I just have one more to make, the most special one of all...Simon's (mushy stuff...bleugh). So this one I want to show you today is the last one of the cards I'm sending out.
I'm a bit disappointed that I didn't get more made, I still have loads of new stamps, papers and ideas to play with. I've been so busy and basically ran out of time. Maybe I will make the odd one or two throughout the coming year and at least build a stock up.


What you need...

Stamps: Happy Holidays Star - Fancy Pants Designs
Dies: Framelits Circles - Sizzix
Embossing folder: Seeing Spots - Cuttlebug
Ink: Onyx Black - Versafine
Promarkers: Lime Zest, Cardinal Red - Letraset
Embossing powder: Detail Clear - Stampendous
Card stock: white, lime green, red
Ribbon: red
Glitter Dots

How you do it...

Onto a top fold white square blank, mat a smaller piece of lime green card, making sure you line up one edge with the fold of the blank. Emboss spots onto white card, trim so that it is slightly smaller than the lime green panel and mat on top.

Stamp and heat emboss the image onto white card and colour in. Cut out using a circle die. Mat onto a larger circle in red card. Attach to the blank so the circle overlaps the fold and trim off any excess.

Finish with red ribbon tied around the bottom and a few random glitter dots.

I'm not sure if you can this stamp now. I have had it a few years, but you could use any stamp and sentiment you have in your stash, just follow the layout of the card. Try using a different colour theme too.

Okay, that was the last one, except for Simon's card. I will post that one up when I've made it and given it to him (he reads the blog).

I'll be back soon with some sneaky peeks at my projects in the new issue of Crafts Beautiful, until then, take care and thanks for stopping by. xx

Friday, 9 November 2012

Merry Birdy

Afternoon chumleys!
Hope you are all fine and well this bright Friday afternoon. The leaves are nearly all off the trees now. I'm keeping an eye on the ash tree out the front, I've read up on what symptoms to look out for, it seems okay at the moment, fingers crossed. It would be such a shame to lose it :( 
I'm currently in between commissions, but I'd like to show you a card I made last week.


Adorable isn't he?

What I used...

Home for Christmas 6x6 Paper Pad - Fancy Pants Designs
Home for Christmas Clear Stamps  - Fancy Pants Designs
Home for Christmas Stickers - Fancy Pants Designs
Home for Christmas Banners - Fancy Pants Designs
Ink - Burgundy, Split Pea - Versacolor
Card stock - cream
Punch - corner rounder
Button - red
Garden twine
Pearls - ivory

I rounded the top right corner of an A6 landscape Kraft blank and a smaller piece of cream card. The bird and snowflakes were stamped in the bottom right corner of the cream piece; this was mounted to the left of the blank.

I attached a spotty banner to the top left corner with foam tape and a red button tied with twine.  To finish, I wrapped and tied twine around the bottom of the blank and pearls were adhered to the bird and snowflakes.

I love the colours in this collection. Even though it follows the traditional red and green Christmas colours, they are quite vintage. The whole scrummy collection is based around red, green, ochre and brown, with whimsical and traditional designs. Gorgeous!

My only complaint is why do these companies release such beautiful and must have collections? I mean... I want them all!

Righty-hoo. Must get on. Thanks for popping in. xxxx