Showing posts with label Stampabilities. Show all posts

Tuesday, 17 July 2018

Dude, ...Chill - Snoopy

Hello peeps!

I hope you are all well! I thought I would do a quick post before I start a new commission.

Okay, so my crafty mojo is definitely back. I was on such a roll at the weekend that I actually got a few Christmas cards made.

As I mentioned in my last post, I have been looking through my wood mounted stamps and I came across my Snoopy ones. This card features Snoopy chilling on top of his Christmas light covered dog house. So cute.


What you need...

Stamps: Snoopy Decorated Dog House I1017 - Stampabilities; Freezy Fellas - Paper Smooches
Copic: BG0000 Snow Green, BG02 New Blue, R29 Lipstick Red, R35 Coral, RV06 Cerise, YG23 New Leaf
Ink pad: Onyx Black - Versafine
Patterned paper: Happy Holiday Trees #SW2604 12"x12" - Echo Park
Card stock: white
Ribbon: red
Stickers: snowflakes
Adhesives

What you do...

1 Stamp the image onto white card and colour in.

2 Mat onto the top of a 10.5cm x 14.5cm blank.

3 Cover the bottom of the blank with the patterned paper.

4 Stamp the Christmas phrase at the top left, tie a red ribbon around the top of the patterned paper and decorate with some snowflakes.

Isn't he adorable and of course totally cool and chilled? I have a few of these Stampabilities stamps, they are quite rare now, but with a bit of shopping around you can still pick them up.

This is another card that you can do quite quickly, perfect for churning out those Christmas cards!

I'm going to sigh off for now, thank you for stopping by and I'll see you soon :o)


Thursday, 30 August 2012

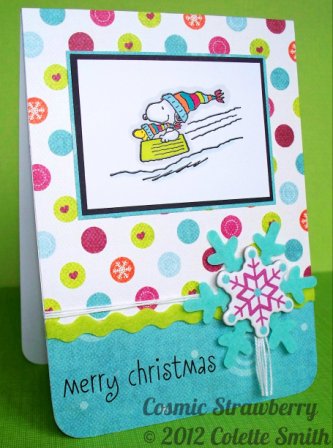
Sledding Snoopy

Aft'noon peeps! What a horrible wet and windy day!
Today I have made another Snoopy Christmas card. It's soooo cute!


I covered a portrait top fold A6 blank with paper from My Mind's Eye Colorful Christmas range. The two lower corners were rounded off. I adhered a length of green felt ricrac over the join and knotted some white cord above, leaving a tassel. The knot was covered with a felt and a chipboard snowflake from the Colorful Christmas range. A Pebbles Inc. sentiment rub-on was applied to the lower left corner.

The Snoopy stamp is called Snow Sledding (FR1045) by Stampabilities, this was stamped in black Versafine and clear embossed. It was then coloured in with Promarkers, trimmed and matted on black card then onto a piece of patterned paper. The image was then adhered to the top of the card.

Tip: When heat embossing I heat from behind, you have much more control and you get a smoother finish with less chance of burning. Don't 'waft' the heat gun around, hold it in one place and when the powder starts to melt, move to another part of the image.

I hope you like this card, it is fun, bright and quirky. As soon as I saw this stamp it was one of those I HAD to have!!!

Right, off now to do an hour of Yoga. Until next time....Colette xx

Tuesday, 28 August 2012

Snoopy & the Snowman

Heevnin all!
Hope you all had a lovely Bank Holiday and didn't get too drenched. I'm all mixed up today, I keep thinking it's Monday (probably not the only one). Anyhoo, here is another Christmas card :)


It's actually one I did last year and never got round to posting on the blog. I love it though, so am going to make another exactly the same.

I have quite a few Snoopy stamps, they are all wood mounted so they are quite nice to collect. I know wood mounted take up more space, but I always find they stamp the image much better.

The stamp is called Snoopy and the Snowman (G1077) by Stampabilities, available from The Glitter Pot, the sentiment is from the Let It Snow (00306) 12 x 12 cut out sheet by Around the Block, which is also still available from The Craftz Boutique. You can go straight to these shops by clicking the links on the right.

After stamping the image in black Versafine ink and heat embossing with clear embossing powder, I coloured it in with Promarkers, then covered the snowman with Stickles Crystal glitter glue.

I trimmed the image and  sentiment and mounted them side by side onto black card, the join was covered by black and white spotty ribbon tied in a knot at the top. This panel was then mounted onto an A6 blank. I finished the card off with some rub-on snowflakes, a sentiment and a couple of stick pins secured in the knot of the ribbon. It's a bright, fresh card, a bit more time consuming than some, but for that special person, it's worth it.

So that's it for today, can't wait to get started on another of these Snoopy cards! Ta ta for now, Colette xx