Showing posts with label Tim Holtz. Show all posts

Tuesday, 13 July 2021

You Slay Me

Good afternoon!

I know, it's been a while again, but sometimes life just seems to get in the way.

Well, I'm back and I have an adorable card to share with you today. It's fun, quirky and full of sass. The image is taken from a fab stamp set called Mythical Grumplings by Taylored Expressions. It's packed with mythical creatures with attitude and sassy sayings.

I decided to use the cute dragon and here he is in all his glory...


What you need...

Stamps:
Mythical Grumplings (#TEMD179) - Taylored Expressions

Dies:
Mythical Grumplings (#TE1422) - Taylored Expressions
Small stars

Embossing folder:
Multi Circles - Darice

Ink pads:
Black Soot Distress Ink - Tim Holtz
Carved Pumpkin
Squeezed Lemonade
Twisted Citron
Onyx Black - Versafine

Card stock:
White

Extras:
Adhesives
Masking paper - Altenew
Sparkle Sheer Shimmer Craft Spray - Imagine Crafts

Tools:
Big Shot - Sizzix

What you do...

1 Cut a piece of white card stock 2¼" x 4¼" (5.5cm x 11cm). Stamp the dragon towards the right hand side with Onyx Black ink.

2 Die cut the dragon from masking paper and mat over the stamped image. Die cut three small stars from masking paper and place around the dragon.

3 Starting from the left hand side, blend the Carved Pumpkin, then the Squeezed Lemonade followed by the Twisted Citron inks.

4 Smooch some Black Soot ink onto a surface, such as an acrylic block. Add a drop of water and use a paint brush to add spatters of ink over the blended surface. 

5 Stamp the sentiment at the lower left. Spritz shimmer spray over the surface, allow to dry and carefully remove the masks.

6 Emboss the circles onto white card, trim to 4¼" x 5½" (11cm x 14cm) and mat onto a white top fold blank the same size. Add the dragon panel across the blank, just below half way down.

I have had this embossing folder for many years, but you can use any you have in your stash. A star or spotty themed background would look good.

There are a few stamp sets in the Grumplings range and they are all as sassy! Why not pop on over to Dies to Die For and have a look? Click here to take you to this wonderful site.

I am now thinking of starting my Christmas cards. I have so many stamps and dies that I haven't played with yet, some of which I've had for quite a while (even years). I do promise myself every year that I'm going to start around July/August, but I never seem to get round to it. This year I am determined.

As always, thank you so much for stopping by. I'll hopefully be back soon with a Christmas card, if not it will be a normal card from my stash of recent makes.

Take care! 


Wednesday, 2 June 2021

Celebrate!

Hello again!

I'm back with another colourful card. This one features candles....and lots of them! I came across a gorgeous die by Sizzix and well, I had to have it. 

The die set is so versatile and there are a few ways that you can use it. I made two cards using two very different techniques, I will share the other card with you in my next post.


What you need...

Stamps:
Sentiment Sampler - Paper Smooches

Dies:
Birthday Candles (665071) by Kath Breen - Sizzix

Ink pads:
Dried Marigold Distress Oxide - Tim Holtz
Kitsch Flamingo
Squeezed Lemonade
Twisted Citron
Onyx Black - Versafine

Embellishments:
Over the Rainbow Crystal Collection - Little Things from Lucy's Cards

Card stock:
White

Extras:
Adhesives

Tools:
Big Shot - Sizzix
Blending tools

What you do...

1 Cut a panel of white card to 2⅞" x 6" (7.5cm x 15.5cm). Die cut the candles centrally within the panel.

2 On a slightly smaller piece of white card, blend the inks starting with Kitsch Flamingo followed by Dried Marigold, Squeezed Lemonade and Twisted Citron.

3 Mat the die cut panel onto the inked panel. 

4 Stamp the sentiment onto white card with the Onyx Black, trim and adhere to the centre of the candle panel.

5 Create a white blank 3⅛" x 6¼"  (8cm x 16cm). Add the candle panel with foam tape.

6 Add some gems to some of the candles, matching with the colour of each candle.

I kept all the cut pieces of the candles, these could be inked for a future card. I think this is such a fun card and would be ideal for any recipient, young or old.

As I mentioned before, I made another card with this die and I will be back soon to share it with you. Until then, please take care and happy crafting!


Monday, 26 April 2021

Looking Sharp

Hi there!

I hope everyone is keeping safe and well. 

I mentioned in my last post that I have been making a few cactus themed cards lately. The card I want to show you today is a mix of stamping, ink blending and Nuvo Glimmer Paste. So, without further ado, let's get to it.


What you need...

Stamps:
Multi-step Cacti Stamps- Reverse Confetti
Stuck on You (ST-18-42) - Avery Elle

Dies:
Multi-step Cacti Dies - Reverse Confetti

Stencil:
Square Extraordinaire - My Favorite Things

Ink pads:
Honeysuckle - Concord & 9th
Parsley
Sea Glass
Sprout
Walnut Stain - Tim Holtz Distress
Carved Pumpkin
Onyx Black - Versafine

Glimmer paste:
Moonstone - Nuvo

Card stock:
White

Extras:
Black/white Washi
Adhesives

Tools:
Big Shot - Sizzix
Stamping platform - MISTI
Media spatulas - Nuvo

What you do...

1 Create a top fold white blank 4¼"x 5½" (11cm x 14cm) and place the stencil onto the blank, securing with some low tack tape. Blend the Sea Glass ink within the stencil so it is darker at the top and fading to wards the bottom. Allow to dry.

2 Spread the Moonstone paste over the blended area, allow to dry. (Remove the stencil immediately and place in a bowl of water or wash, along with the spatula). 

3 Stamp the solid parts of  the three cacti onto white card along with the flower. Over stamp the detail with black ink.

4 Stamp the outlines of three pots. Blend some of the Walnut Stain and Carved Pumpkin together to create a terracotta colour, add some water and paint the pots.

5 Die cut the cacti, pots and flower and assemble. Attach to the card blank overlapping the Moonstone section.

6 Add a strip of Washi across the base of the blank and add the sentiment above, towards the right.

I had such fun making this little cutey. It was great building up the cacti. You can add as much or little detail as you wish to each cactus.

I do have some more cacti themed cards, these are slightly different in that they are created using the Silhouette Cameo, so stay tuned for those.

I am going to enter this card into the Crafty Creations Challenge #420 - Anything Goes. Click here to take you to the challenge.

I am also going to enter it into the Creative Finger Challenge #206 - Anything Goes. Click here to take you to the challenge.

Thank you for popping by and I'll be back soon!


Friday, 9 April 2021

Sparkly Hello

Hello there!

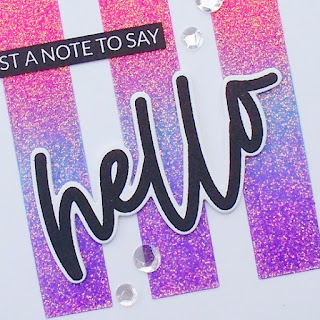
As promised I'm back the second of three cards made using the Moonstone Glimmer paste by Nuvo. The card is very similar to the Hey! Friend card but it uses a different colour scheme and sentiments. Well, without further ado...


What you need...

Stamps: 
Loads of Hello ST-21-11 - Avery Elle

Dies:
Loads of Hello D-21-11 - Avery Elle

Stencil:
Rectangle Trio - My Favorite Things

Ink pads:
Picked Raspberry - Tim Holtz Distress Oxide
Tumbled Glass
Wilted Violet
Onyx Black - Versafine

Glimmer paste:
Nuvo Moonstone - Tonic Studios

Card stock:
White

Embellishments:
Crystal Confetti - The Stamp Market

Extras:
Adhesives
Die cutting machine - Sizzix
Blending brushes - Picket Fence
Nuvo Media Spatulas - Tonic Studios

What you do...

1 Cut a piece of white card 10.5cm x 13.5cm, place the stencil towards the top and secure in place with low tack tape.

2 Start at the top of the stencil and blend Picked Raspberry ink, Tumbled Glass followed by  the Wilted Violet. Allow the ink to dry.

3 Using a spatula, spread some of the Moonstone paste evenly over the stencil. Scrape away the excess and place back in the pot. Remove the stencil. Put the lid back on the pot and wash the stencil and spatula immediately. Allow the paste to dry.

4 Stamp the 'hello' and 'just a note to say' with black ink. Die cut the 'hello' and die cut again twice more in white card. Stack the die cuts lining up each layer. Trim the 'just a note to say'.

5 Create an 11cm x 14cm top fold blank and attach the stencilled panel onto it either with foam tape or some layers of scrap card stock. Attach the 'hello' with the 'just a note to say' above, to the left. Finish with some of the Crystal Confetti.

And there we have it. Another super sparkly card. I have one more in this set which again uses a different colour scheme and wording.

I am going to enter this card into the Creative Fingers Challenge #205. Click here to take you to the challenge.

Thank you so much for popping by, take care and I'll be back soon.


Sunday, 4 April 2021

Carrot Bunny

Hello and Happy Easter!

I'm back with another cute bunny card. This one uses quite a lot of die cuts and features the Carrot Bunny die set by Sizzix as part of their new 2021 Chapter 1  release. I decided to cut a Polaroid frame using an old die from Paper Smooches to make it look like a cute photo.

The background of the photo is a piece of pale pool card with some subtle blending at the top and the main background of the card is stamped in black ink using the Dainty Swiss Dots stamp by Altenew.


What you need...

Dies:
Carrot Bunny by Tim Holtz (665213) - Sizzix Thinlits
Heartfelt by Tim Holtz (660233) - Sizzix Bigz
Polaroid - Paper Smooches

Stamps:
Dainty Swiss Dots - Altenew
Happy Happy Happy - Lawn Fawn
Happy Happy Happy Add-on 

Ink:
Garden Patina Make Art - Wendy Vecchi
Obsidian Amalgam - Gina K

Card stock:
Black
Burnt Orange
Green
Lime
Orange
Pale Pink
Pool
White

Embellishments:
Black cord

Extras:
Adhesives

What you do...

1 Die cut the bunny from white card, his eyes/nose/mouth from black and his cheeks/ears from pale pink. Cut the main carrot from burnt orange and orange card and the foliage from green and lime. Assemble the bunny and the carrot.

2 Die cut the Polaroid frame from black, white and pool card. Blend the Garden Patina ink across the top of the pool section.

3 Attach the bunny to the pool panel at an angle so it overlaps the bottom edge. Trim away the excess. Layer the black frame onto the white one and stick onto a piece of white card, trim away any excess. Attach the bunny panel into the frame.

4 Stamp the Dainty Swiss Dots onto white card with the Obsidian ink and trim to 4" x 5¼" (10cm x 13cm) and mat onto a 4¼"x 5½" (11cm x 14cm) blank covered with pool card.

5 Adhere the bunny panel centrally to the top of the blank. Add the carrot, tucking it under the bunny's arms. Die cut three small hearts in pale pink card and fix to the panel. Wrap and tie black cord around the base of the blank and tie in a bow at the right.

As Paper Smooches is sadly no longer trading, the Polaroid die is now unavailable, however there are some cute die sets by companies such as Sweet Pea Designs, Mama Elephant and Lawn Fawn. You could easily make your own by die cutting a square from a rectangle of card.

The Carrot Buuny die set also comes with a larger carrot so you can have two bunnies side by side holding it. So cute.

I am going to enter this card into the Creative Fingers Challenge #205. Click here to take you to the challenge.

Well thank you as always for stopping by, I really appreciate it. I will be back soon with another card made using the Nuvo Glimmer paste. It is similar to the one I recently posted, but has different wording and colour scheme.

Enjoy the rest of your Easter!


Friday, 2 April 2021

Easter Bun Buns

Hello there!

I can't believe Easter is upon us already, it only seems like yesterday it was Christmas. Speaking of Christmas, I'll be starting Christmas projects for Crafts Beautiful and PaperCrafter soon - eep!

I would like to share with you today, a card I made for my mum. We were chatting on the phone as I made it, so I thought it only fair to post it to her. She loved it. 

This card is slightly different from the usual cutesy, pastel Easter cards and is a more fresh, modern, bold card.


What you need...

Stamps:
#51 - AALL & Create
Dainty Swiss Dots - Altenew
Bunny Hop - Newton's Nook

Dies:
Peek-a-boo Pets - Avery Elle
Heartfelt (660233) - Sizzix

Ink pads:
Mermaid Lagoon - Tim Holtz Distress
Tumbled Glass
Onyx Black - Versafine

Promarker:
Baby Pink

Embellishments:
Black pearl

Washi tape:
Black/white striped

Card stock:
White
Pale pink

Extras:
Masking Magic - Gina K
Adhesives

What you do...

1 Cut a piece of white card 3⅛"x 6¼" (8cm x 15.5cm) mask off 1½" (4.5cm) across the bottom.

2 Stamp the first bunny above the masking in black ink, stamp again onto masking paper and cut out. Apply the mask over the bunny.

3 Stamp the second bunny so he sits just over the first, stamp again on masking paper and cut out. Apply the mask over the bunny. 

4 Die cut a speech bubble from masking paper and position above the bunnies.

5 Blend the Tumbled Glass ink from the top of the card followed by the Mermaid Lagoon. When dry, stamp the Dainty Swiss Dots over the inked surface with black ink.

6 Remove the masks. Use the Baby Pink marker to add colour to the bunnies ears, nose and cheeks. Stamp a sentiment in the speech bubble.

7 Trim the panel to 2⅞" x 6" (7.5cm x 15cm). Add a strip of Washi tape across the base of the blank, under the inked section.

8 Die cut a small heart in pale pink card stock and add to the lower right, overlapping the Washi tape. Add some black pearls to decorate and mat onto a white 3⅛"x 6¼" (8cm x 15.5cm) blank.

As I have quite a lot of American products which are in imperial measurements, I am finding that by making my blanks/panels in inches they are more aesthetically pleasing and easier to work out. If I do use imperial measurements, I will always try to add the nearest measurements in centimeters.

I must admit I do prefer working in imperial anyway. It think this stems from being brought up by my grandparents. Even now, if I do any baking I work in pounds and ounces.

The stamp set with the bunnies unfortunately doesn't have a name. It is packed with the cutest images from the two bunnies, to a panda, racoon, elephant and a bear. It also has some fun sentiments and little add-ons such as party hats, presents and a balloon. The AALL Stamps all seem to just have numbers and not names

I hope you liked this 'different' Easter card. I have one more to share with you which also includes a cute bun bun, but uses mainly dies.

I am entering this make into the Crafty Creations Challenge #419 - Anything goes. Click here to take you to the challenge.

I am also entering this make into the Creative Fingers Challenge #205. Click here to take you to the challenge.

Thank you for stopping by! 


Tuesday, 30 March 2021

If You Were Milk - Snarky Cat

Hello there!

I'm back with another card. This one is very quirky and snarky. I have used the oh so funny Snarky Cats by Tim Holtz. The cat I used in this one went perfectly with the sentiment, its face says it all.


What you need...

Stamps:
Tim Holtz Snarky Cats (CMS392) - Stampers Anonymous

Stencil:
Circle Extraordinaire (ST-122) - My Favorite Things

Ink pads:
Dried Marigold - Tim Holtz Distress
Squeezed Lemonade
Twisted Citron
Tuxedo Black - Memento

Embellishments:
Midnight Mix Sequins - Little Things from Lucy's Cards

Washi tape:
Black/white houndstooth - MT

Card stock:
white

Extras:
Adhesives
Masking paper - Inkadinkado

What you do...

1 Cut a piece of white card stock 4"x 5¼" (10.5cm x 13.5cm) and position the stencil so it sits central. Use the stencil to get an idea where you want the cat to go. 

2 Ink up the cat and stamp so it sits near the lower right corner. Stamp the cat again onto some masking paper and fussy cut out. Place over the original cat.

3 Replace the stencil and blend the inks, starting with Dried Marigold followed by Squeezed Lemonade and finishing with Twisted Citron. Remove the masking paper.

4 Add a strip of Washi tape across the bottom of the panel so it lies at an angle and immediately under the cat.

5 Stamp the sentiment at the top left of the circle.

6 Mat the panel onto a white 4¼"x 5½" (11cm x 14cm) top fold blank. Add some black sequins to decorate.

I always use a quick drying dye ink to stamp the image onto the card panel and masking paper otherwise it can smudge when you ink blend over it. If you have a stamping platform, keep the cat stamp on the platform and after removing the mask, stamp over the cat with a crisp, rich ink such as Onyx Black by Versafine. This will really make the original stamped image pop with the risk of smudging.

Sometimes if you don't use a quick drying dye ink on the original image, the masking paper can pick up some of the ink and transfer it onto your card panel if you have to reposition it. Not good.

I hope you like my snarky little card, I have the Christmas version too, so I'm looking forward to playing with that one.

As always, thank you for stopping by and take care. 

Friday, 26 March 2021

Hey! Friend

Hello there! I hope you are all keeping well.

Nuvo Glimmer Paste! Why, oh why didn't I play around with this stuff when I first purchased it? It's been in my stash for some time and I don't know whether I was a bit frightened of it or just didn't have the inspiration. I'm in love!

I recently purchased the Avery Elle Loads of Hello stamp and die set and thought that these large words would look great over a stencilled background, but with some extra sparkle. This gave me the kick start I needed. Hence, I got on a roll creating a few cards using this wonderful stuff.


What you need...

Stamps: 
Loads of Hello ST-21-11 - Avery Elle

Dies:
Loads of Hello D-21-11 - Avery Elle

Stencil:
Rectangle Trio - My Favorite Things

Ink pads:
Dried Marigold - Tim Holtz Distress Oxide
Picked Raspberry
Wilted Violet
Onyx Black - Versafine

Glimmer paste:
Nuvo Moonstone - Tonic Studios

Card stock:
White

Embellishments:
Crystal Confetti - The Stamp Market

Extras:
Adhesives
Die cutting machine - Sizzix
Blending brushes - Picket Fence
Nuvo Media Spatulas - Tonic Studios

What you do...

1 Cut a piece of white card 10.5cm x 13.5cm, place the stencil towards the top and secure in place with low tack tape.

2 Start at the top of the stencil and blend Dried Marigold ink, followed by Picked Raspberry then Wilted Violet. Allow the ink to dry.

3 Using a spatula, spread some of the Moonstone paste evenly over the stencil. Scrape away the excess and place back in the pot. Remove the stencil. Put the lid back on the pot and wash the stencil and spatula immediately. Allow the paste to dry.

4 Stamp the 'hey!' and 'friend' with black ink. Die cut the 'hey!' and die cut again twice more in white card. Stack the die cuts lining up each layer. Trim the 'friend'.

5 Create an 11cm x 14cm top fold blank and attach the stencilled panel onto it either with foam tape or some layers of scrap card stock. Attach the 'hey! with the 'friend' underneath to the right. Finish with some of the Crystal Confetti.

I am so proud that my photo captured the beauty of this shimmery surface, of course it still isn't as wonderful as in real life. 

It's important that you close the pot of paste and wash your stencil and spatula straight away. This stuff dries quickly and rock hard and will damage your stencil and spatula. I placed a small piece of Press & Seal over the top of the pot before adding the lid. Cling film could also be used.

I am definitely going to use this paste for Christmas cards.

I hope you like my card, I will be back soon with the others I created, two use the remaining large words from the stamp and die sets in a different colour scheme and the third uses some cute cacti stamps.

I am entering this make into the Crafty Creations Challenge #419 - Anything goes. Click here to take you to the challenge.

Keep safe and well and thank you for stopping by.


Sunday, 13 December 2020

Winter Christmas Trees

Hello friends!

I'm back with another card to share with you, this one being Christmas. This is a card I did for my Mum and was inspired by one that Jennifer McGuire created. It is a trifold card where the sides open outwards and uses a beautiful die set by Hero Arts.


What you need...

Dies: 
Winter Pine Fancy Dies - Hero Arts

Stamps:
Silent Night - Concord & 9th

Ink pads:
Chipped Sapphire - Tim Holtz Distress Oxide
Blueprint Sketch
Salty Ocean
Onyx Black - Versafine

Embellishments:
Glass Crystal Collection - Little Things from Lucy's Cards

Extras:
Sparkle Sheer Shimmer Craft Spray - Imagine Crafts
Crystal Clear Sparkle - Spectrum Noir
Titanium White Acrylic Ink - Amsterdam
Adhesives

What you do...

1 To make the trifold section, click here to see the project by Jennifer along with the instructions and measurements - she can explain it better than I ever could!

2 Set the assembled trifold section aside. Cut a piece of card 4¼" x 5½" and blend the three blue inks over the surface. Spritz with the Sparkle spray and use a paintbrush to flick white ink over the surface. Allow to dry.

3 Fix the inked panel to the back of the trifold section. 

4 Add some Crystal sparkle around the edges of the trees and add plenty of the Glass crystals. Stamp the sentiment on the back panel between the trees.

I'm so sorry that the photo doesn't do the card justice, plus it was difficult to position due to the nature of the blank. The best thing is my Mum loved it.

Jennifer did her card with a pink/red/purple background which looked stunning, but I thought I would stick to the traditional blue night sky.

I hope you like my little make and thank you so much for popping by. I'll be back soon with another, until then take care and keep safe.


Wednesday, 18 November 2020

Cold Outside

Good afternoon!

I know I promised another Halloween card, but I got busy and too much time has passed now, so I will share it with you next year...maybe. So, I have a lovely Christmas card instead.

This elegant card uses some simple die cut snowflakes with some Distress Oxide ink a printed die cut sentiment and a touch of sparkle.


What you need...

Dies:
Large Snowflakes - Paper Smooches

Ink pads:
Salty Ocean Tim Holtz Distress Oxide - Ranger

Printed die cut:
Wish Season Ephemera Pack - Fancy Pants Designs

Shimmer Spray:
Sparkle Sheer Shimmer Spray - Imagine Crafts

Embellishments:
Blue Lagoon Lucky Dip - Little Things from Lucy's Cards

Cardstock:
White

Extras:
Foam sheet
Adhesives

What you do...

1 Cut a piece of white card 3⅝" x 4⅞" and apply Salty Ocean ink in the centre with a blending brush or foam pad blending out the edges.

2 Spray Sparkle shimmer over the surface allowing some larger droplets to fall. Allow to dry.

3 Die cut two large snowflakes in white card and three small snowflakes. Arrange onto the inked panel.

4 Mat the inked panel onto a smaller piece of foam sheet. Create a 4¼" x 5½" white blank and mat the panel centrally onto it.

5 Add some gems and sequins to the centre of the snowflakes and add the sentiment with foam pads.

I'm afraid my photo doesn't really do the card justice. I can't seem to get the right settings on my camera for good close up work. The exposure is never spot on. I tend to take the photos in the conservatory with good daylight, but I can't get it right. Any tips would be highly appreciated.

This card would be great using any snowflake dies that you have in your stash along with any printed die cut sentiments you may have or stamp your own. For a different look it would be lovely with a red inked background.

Well, thank you for popping by and I'll be back soon with another Christmas card soon.

Keep safe and take care! x


Monday, 9 November 2020

Mwaahaahahaaa!

Good morning!

I hope everyone had a lovely weekend. The weather here in Norfolk was beautiful and I finally managed to get out in the garden and do some tidying up. I did have a lot of help from my chickens. They had a field day. they just constantly followed me round and scattered all the leaves I had raked up. It's so funny to watch.

As promised, I have another Halloween card I made for a friend, I just adore this one.


What you need...

Stamps:
Ghoulfriends - Paper Smooches
Spooky Sweets - My Favorite Things

Ink pads:
Picked Raspberry Tim Holtz Distress - Ranger
Ripe Persimmon
Seedless Preserves
Onyx Black - Versafine

Masking paper:
Stamping Mask Paper - Inkadinkado

Stencil:
Circle Extraordinaire (ST122) - My Favorite Things

Embellishments:
Crystal Confetti - The Stamp Market
Sparkle Crystal Clear - Spectrum Noir
Glossy Accents - Ranger

Card stock:
White

Extras:
Adhesives
Foam sheet

What you do...

1 Cut a piece of white card to measure 4¼" x 5½". Lay down the circle stencil onto the card and secure in place with low tack tape.

2 Stamp the ghoul in the lower right of the circle. Stamp the ghoul onto masking paper, cut out and place over the original image.

3 Start to blend the Distress inks within the stencil working from Seedless Preserves to Picked Raspberry ending with the Ripe Persimmon.

4 Remove the stencil and mask. Use the stars from the Spooky Sweets set to create a cluster of stars in black ink above the ghoul. Highlight the stars with the Crystal Clear Sparkle.

5 Stamp the 'Mwaahaahahaaa!' below the image panel.

6 Trim the panel to 4" x 5¼", back with a smaller sheet of foam and attach to a 4¼" x 5½" white blank. Add some of the Crystal Confetti to decorate.

The Sparkle Crystal Clear doesn't photograph very well and gives the black a dull greyish tinge. In real life it looked great.

As with a lot of my makes I try and use some older stamps sets such as the Ghoulfriends and newer ones such as the Spooky Sweets. I think it's fun to go back and look in your stash and as there is now more choice now of inks, stencils, dies and embellishments you can give those old stamps a new lease of life.

I have one more Halloween card to share with you and then it is onto the ol' Christmas cards.

Thank you for stopping by and I'll see you soon!