Tuesday 18 December 2018

Winston & Flo Christmas Card

Hello Blog friends!

Also a big hello and welcome to my new followers! Thank you so much.

I'd like to share with you today, a card I designed and illustrated for my husband's Christmas card.  Winston is a cute bunny I've created and decided to give him a little friend called Flo.

I sketch my illustrations in pencil and then scan and tidy them up using Photoshop and my Wacom Cintiq. The design is then printed out and coloured in, just like a digi stamp. The sentiment was added when the image was in Photoshop.

Here is the card....


I used Copics to shade in the image and added the stars with a white gel pen. I am hoping to come up with some more images of Winston and Flo, I did actually do a set of illustrations featuring Winston for the current issue of PaperCrafter (#129). It is a new home card with Winston peeping out the windows - so cute!

The photo doesn't really do the image justice, especially the colour of the sky.

I hope you like my little illustration, thank you for popping by and I'll be back soon.


Thursday 6 December 2018

Holly Jolly Christmas

Hi blog friends!

I want to say a special hello, thank you and welcome to my new followers!

After Inktober and all the sketchy posts, I'm back with a quick and cute Christmas card.


What you need...

Cardstock: Kraft
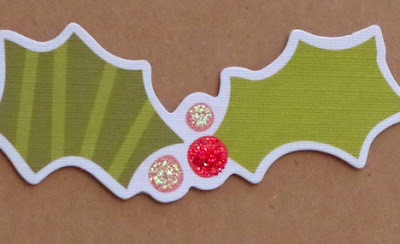
Printed die cuts: Mistletoe Kisses (#7429) Bits & Pieces - Simple Stories (sentiment); Oh, Deer! Ephemera Pack - Fancy Pants (holly)
Glitter glue: Stickles Crystal, Christmas Red - Ranger
Adhesives

What you do...

1 Create an 8.5cm x 12.5cm Kraft card blank.

2 Stick the sentiment centrally across the bottom of the blank.

3 Add the die cut holly above the sentiment with foam pads.

4 Highlight the berries with the glitter glues.

There you have it. Quick and simple. 

I love the look of Kraft card, especially with splashes of colour such as reds and greens or aqua shades. It looks really good used for Christmas cards - it reminds me of gingerbread.

I do have a few more quick and simple cards to share with you, but I want to get on and do some more detailed and time consuming makes such as stamping and die cutting. Things are still so busy with magazine work at the moment.

Thank you for stopping by and I'll be back soon!


Saturday 24 November 2018

Inktober 2018 - 29th-31st October (inc) The Final Installment!

Hi there blog friends!

After a few hectic days, I've managed to find some time to post the last three sketches for Inktober 2018.

I am proud of myself for sticking with the challenge, it was quite draining at times, but I think because I had so many ideas flying around in my head I didn't burn myself out. Some of the detailed sketches took a long time, so there were many, many late nights.

I really enjoyed it and will certainly be doing it next year. I loved having the Halloween theme, so I will probably do that again.

Anyhoo, here are the last three sketches...

29th October - Demon Robot

Derwent Precision 0.5mm, Sakura Pigma Micron 005 & 01

30th October - Rainbow Ghosts

Derwent Precision 0.5mm, Kuretake Cartoonist Nib Holder, Nikko G Nib, Winsor & Newton Ink Apple Green, Blue, Canary Yellow, Crimson, Orange, Violet, Diamine Drawing & Calligraphy Ink English Red, Jet Black

31st October - Bats!

Derwent Precision 0.5mm, Sakura Pigma Micron 005, 01. 03 & 05, Posca White 0.7mm

The challenge also allowed my use dipping pens and coloured inks. The Rainbow Ghosts were stippled with coloured inks and took forever!

So that's it. I hope you liked my sketches. I may try and post the sketches everyday next time, but I'm not promising!

Thank you for stopping by and I'll be back soon with more little cards that I've created.


Sunday 11 November 2018

Inktober 2018 - 22nd-28th October (inc)

Hello blog friends!

Before I get into the post, just a quick hello to my new followers!

I've been a bit busy with magazine work lately so I've just got around to doing this next installment of Inktober. Again, these sketches are a mix of simple line work down to more detailed work. I did cheat with the dragon's eye and use Faber-Castell Polychromos pencils, because I wanted to get the detail of the iris.

So here we go with the next batch...

22nd October - Cute & Spooky 2

Derwent Precision 0.5mm, Sakura Pigma Micron 005 

23rd October - Dragon's Eye

Derwent Precision 0.5mm, Sakura Pigma Micron 005 & 001, Faber-Castell Polychromos Pencils, Posca White 0.7mm

24th October - Potions

Derwent Precision 0.5mm, Sakura Pigma Micron 005 & 01, Pilot Choose White Gel Pen

25th October - Fearsome Fruit & Vile Veg 2


Derwent Precision 0.5mm, Sakura Pigma Micron 005 & 01

26th October - Haunted House

Derwent Precision 0.5mm, Sakura Pigma Micron 005 & 01, Pilot Choose White Gel Pen

27th October - Sad Ghost

Derwent Precision 0.5mm, Sakura Pigma Micron 005

28th October - Zombie Shroom & Grumpy Shroom

I've been happy with all my sketches during this challenge, I think my ultimate favourite is the Dragon's Eye (even though I cheated slightly). The haunted house took me forever to add the detail. I love the look of stippling, but it takes soooo long to do.

I will be back soon with the last three sketches, then I have some more simple cards to share with you.

Thank you for stopping by! TTFN x


Friday 2 November 2018

Inktober 2018 - 15th -21st October (inc)

Hello blog friends!

Well, Inktober is now finished and I did it! I managed to sketch everyday throughout October. I did a mix of simple line art to more detailed shaded art. Because I could only use ink based items I couldn't use pencils or other mediums to add shading and detail. I overcame this by stippling (or adding millions of dots). This took forever on some of the sketches, but I think it was worth it.

Here is the next set of spooky themed sketches...

15th October - Cute & Spooky

Derwent Precision 0.5mm, Sakura Pigma Micron 005 & 01

16th October - Triffid

Derwent Precision 0.5mm, Sakura Pigma Micron 005 & 01

17th October - Dumpy Grim Reaper

Derwent Precision 0.5mm, Sakura Pigma Micron 005 & 01


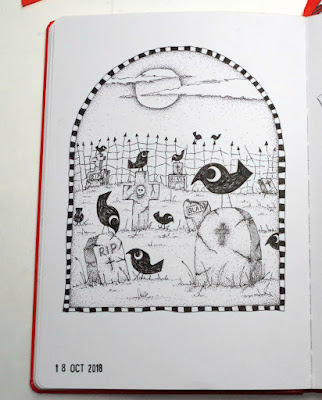
18th October - Cemetery of Crows

Derwent Precision 0.5mm, Sakura Pigma Micron 005 & 01

19th October - EEEK!

Derwent Precision 0.5mm, Sakura Pigma Micron 005, 01 & 02, Posca White 0.7mm, Winsor & Newton Ink Black, Violet, Orange

20th October - The Hand

Derwent Precision 0.5mm, Sakura Pigma Micron 005 & 01

21st October - Mumpkin


Derwent Precision 0.5mm, Sakura Pigma Micron 005 & 01

Again, sorry for the not so great photos, they really don't do the sketches justice :o(

The hand was based on my own, I was sat in bed the night before, doodling a pencil sketch and then tried to think of my hand as if it had been buried in the ground for a few months. Then of course it needed to come alive like a zombie's. My husband wonders at what goes on in my head at especially at night. I love sketching when in bed, it relaxes me.

I will be back soon with the next set of sketches from the 22nd - 28th October and then I will do a post of the last three.

Thank you for stopping by! x


Saturday 20 October 2018

Inktober 2018 - 8th - 14th October (inc)

Hi blog friends!

Hello to my new subscribers, thank you so much for following me.

I would like to share with you the next seven days of Inktober. I can't say it has been easy, some of the illustrations have taken nearly a full day to shade in, especially the ones that have dot shading.

So far I'm pleased with what I have done. Sketching and inking each day has certainly given me more focus, enthusiasm and energy to draw and I want to carry on with daily sketching and illustrating after Inktober has finished. This will help towards a new venture I'm hoping to start in the new year.

I am actually keeping up with the spooky Halloween theme, I thought I might have run out of ideas, but there are plenty still going around my head. I find myself sketchy rough thoughts out at 11.30 at night.

As with last time, I will list each item used below the picture. The book I'm sketching is Leuchturm 1917 Medium Pad (145mm x 210mm).

Anyhoo, here we go...

8th October - Witchy Poo

Derwent Precision 0.5mm, Sakura Pigma Micron 005 & 01

9th October - Fearsome Fruit and Vile Veg

Derwent Precision 0.5mm, Sakura Pigma Micron 005 & 01

10th October - Spooky Coffin

Derwent Precision 0.5mm, Sakura Pigma Micron 005 & 01, Winsor & Newton Ink Black, William Mitchell Mapping Pen, Posca White 0.7mm

11th October - Pumpkin Scarecrow

Derwent Precision 0.5mm, Sakura Pigma Micron 005 & 01

12th October - Spooks

Derwent Precision 0.5mm, Sakura Pigma Micron 005 & 01, Winsor & Newton Ink Black, Posca White 0.7mm

13th October - Spooky Spider

Derwent Precision 0.5mm, Sakura Pigma Micron 01

14th October - Pumpkin Patch

Derwent Precision 0.5mm, Sakura Pigma Micron 005, 01, 02 & 08, Posca White 0.7mm

I again apologise for the photo quality - not brill at all :o( 

Just for information, in the fruit and veg sketch, the first one is a pea who then turns into a pea demon on Halloween. the other two are self explanatory really.

I hope you like this set of sketches. I am still on track and will be back next week with the next seven. Thank you for stopping by and I'll see you soon. x


Saturday 13 October 2018

Inktober 2018 - 1st - 7th October (inc)

Hello blog friends!

As you can tell by the title of this post I am participating in Inktober this year. For those who don't know what Inktober is, it is a sketch challenge that runs from the 1st to the 31st October and you have to create a sketch each day using any form of ink you desire.

I am actually on track, but instead of posting a picture each day I thought I would show a week at a time.

There is an official prompt list that you can follow, but as I love all things Halloween and October, I thought I would do spooky stuff.

I think I'm going to mainly do outline illustrations/sketches, though some may be coloured in using Copics or drawing inks. I will also be experimenting with mapping pens to do the final sketch. 

I found that with some mediums they bled through the page, so I couldn't sketch on both sides, so I used the page that may get bleed through to do my rough concept sketch. I also noted the items used for my own reference. The sketch book I am using is the Leuchtturm1917 Medium Pad (145mm x 210mm) in bright Orange (apt for Halloween). 

Below is a photo of each sketch, with the title and items used. The photo quality isn't perfect but I'm sure you will forgive me for that :o) Brace yourself, this is a long post.

Here goes...

1st October - Grave Demon

Using Derwent Precision Pencil 0.5mm, Sakura Pigma Micron 005 & 01, Copic C1 Cool Gray#1, C2 Cool Gray #2, C3 Cool Gray #3, Pentel Colour Brush Black #101, Posca White 0.7mm

2nd October - Hell Bunny

Using Derwent Precision Pencil 0.5mm, Sakura Pigma Micron 005 & 01, Pentel Colour Brush Black #101

3rd October - Spooky Chest

Using Derwent Precision Pencil 0.5mm, Sakura Pigma Micron 005 & 01, Pentel Colour Brush Black #101, Posca White 0.7mm, Winsor & Newton Ink Scarlet, Orange, Apple Green

4th October - Halloween Ornament Tree

Using Derwent Precision Pencil 0.5mm, Sakura Pigma Micron 005 & 01, Posca White 0.7mm

5th October - Frankie's Monster

Using Derwent Precision Pencil 0.5mm, Sakura Pigma Micron 005 & 01

6th October - Halloween Cat

Using Derwent Precision Pencil 0.5mm, Sakura Pigma Micron 005 & 01

7th October - Head Ripper

Using Derwent Precision Pencil 0.5mm, Sakura Pigma Micron 005 & 01, Copic YG11 Mignonette, YG07 Acid Green, BG02 New Blue, BG05 Holiday Blue, BV000 Iridescent Mauve, BV01 Viola, BV17 Deep Reddish Blue, RV09 Fuchsia, E81 Ivory, E84 Khaki, C2 Cool Gray #2, Posca White 0.7mm

As expected, the Copic markers bleed terribly through the paper and feathered around the outlines of the sketch. Because these are only sketches I'm not too bothered, if I want to do them again as a proper illustration I will use the correct paper. You will see how badly they bleed through when I show the sketch for 8th October in my next post. The pages are ink proof to a certain degree.

Well thank you for sticking with this long post, see you in the next one! Stay spooky! x


Friday 12 October 2018

A Little Birdie

Hello Blog friends!

Before I start I would like to say a big hello and thank you to my new followers. I really appreciate you stopping by and reading my blog :o)

It was my mum's birthday last weekend and I made her a cute little card using Waffle Flower stamps and Tim Holtz Distress Inks.


What you need...

Stamps: Little Birdie Enveloper (271094); Birthday Enveloper (271092)
Ink: Tim Holtz Distress Ink Salty Ocean; Tumbled Glass; Picked Raspberry - Ranger; Onyx Black - Versafine
Masking paper: Stamping Mask Paper - Inkadinkado
Card stock: white smooth digital
Adhesives

What you do...

1 Mask off the bottom of white digital card 14cm square.

2 Stamp the birdie image and two butterflies above the masked area.

3 Stamp the two birds and butterflies onto masking paper, cut out and stick over the original stamped image.

4 Blend the inks over the image.

5 Remove the masks and the masked area from the bottom. Stamp the sentiment on the left under the blended ink.

6 Mat onto a 14.5cm white square blank.

I also stamp some images on the inside of the blank along the bottom.

I've been participating in Inktober this year. So for my next post I will show you the first week of sketches. I didn't follow the official prompts as I wanted to do a full spooky Halloween theme.

Thank you for popping by and I'll see you soon with some spookiness!


Tuesday 25 September 2018

Beautiful Butterflies

Happy Tuesday peeps!

Ooops! I've not been around again for a couple of weeks. It's been mad crazy since we got back from holiday.

A dear friend had a birthday a few days ago and I created a simple, yet beautiful card for her.


What you need...

Card stock: white
Patterned paper: Hello Summer 6 x 8 Paper Pad - Simple Stories
Dies: Beautiful Butterflies (WP9D-214) - WPlus9
Gems: clear
Adhesives

What you do...

1 Create a 10.5cm x 14.5cm top fold portrait blank.

2 Cover the blank with a 10cm x 14cm piece of the striped paper.

3 Die cut the butterflies and lettering in white textured card stock.

4 Place the lettering in the centre of the blank the same way as the die is laid out, then add a butterfly at the top and bottom. Add a few gems to finish.

This is an unusual sized paper pad with quite large motifs. Some of the papers have just one image with an inspirational phrase or word. These would be perfect to trim and frame, or even make a huge card.

The colours are bright, yet muted if you know what I mean and is full of motifs such as palms, flamingos, watermelons, cacti and flowers to name but a few.

Okay, so that is me for now. I'll be back soon with some more quick and easy Christmas cards using one collection.

I would also like to start sharing with you more of my magazine projects, I feel that I don't push myself out there enough.

Anyhoo! Take care and thanks for popping by.