Wednesday 18 November 2020

Cold Outside

Good afternoon!

I know I promised another Halloween card, but I got busy and too much time has passed now, so I will share it with you next year...maybe. So, I have a lovely Christmas card instead.

This elegant card uses some simple die cut snowflakes with some Distress Oxide ink a printed die cut sentiment and a touch of sparkle.


What you need...

Dies:
Large Snowflakes - Paper Smooches

Ink pads:
Salty Ocean Tim Holtz Distress Oxide - Ranger

Printed die cut:
Wish Season Ephemera Pack - Fancy Pants Designs

Shimmer Spray:
Sparkle Sheer Shimmer Spray - Imagine Crafts

Embellishments:
Blue Lagoon Lucky Dip - Little Things from Lucy's Cards

Cardstock:
White

Extras:
Foam sheet
Adhesives

What you do...

1 Cut a piece of white card 3⅝" x 4⅞" and apply Salty Ocean ink in the centre with a blending brush or foam pad blending out the edges.

2 Spray Sparkle shimmer over the surface allowing some larger droplets to fall. Allow to dry.

3 Die cut two large snowflakes in white card and three small snowflakes. Arrange onto the inked panel.

4 Mat the inked panel onto a smaller piece of foam sheet. Create a 4¼" x 5½" white blank and mat the panel centrally onto it.

5 Add some gems and sequins to the centre of the snowflakes and add the sentiment with foam pads.

I'm afraid my photo doesn't really do the card justice. I can't seem to get the right settings on my camera for good close up work. The exposure is never spot on. I tend to take the photos in the conservatory with good daylight, but I can't get it right. Any tips would be highly appreciated.

This card would be great using any snowflake dies that you have in your stash along with any printed die cut sentiments you may have or stamp your own. For a different look it would be lovely with a red inked background.

Well, thank you for popping by and I'll be back soon with another Christmas card soon.

Keep safe and take care! x

Monday 9 November 2020

Mwaahaahahaaa!

Good morning!

I hope everyone had a lovely weekend. The weather here in Norfolk was beautiful and I finally managed to get out in the garden and do some tidying up. I did have a lot of help from my chickens. They had a field day. they just constantly followed me round and scattered all the leaves I had raked up. It's so funny to watch.

As promised, I have another Halloween card I made for a friend, I just adore this one.


What you need...

Stamps:
Ghoulfriends - Paper Smooches
Spooky Sweets - My Favorite Things

Ink pads:
Picked Raspberry Tim Holtz Distress - Ranger
Ripe Persimmon
Seedless Preserves
Onyx Black - Versafine

Masking paper:
Stamping Mask Paper - Inkadinkado

Stencil:
Circle Extraordinaire (ST122) - My Favorite Things

Embellishments:
Crystal Confetti - The Stamp Market
Sparkle Crystal Clear - Spectrum Noir
Glossy Accents - Ranger

Card stock:
White

Extras:
Adhesives
Foam sheet

What you do...

1 Cut a piece of white card to measure 4¼" x 5½". Lay down the circle stencil onto the card and secure in place with low tack tape.

2 Stamp the ghoul in the lower right of the circle. Stamp the ghoul onto masking paper, cut out and place over the original image.

3 Start to blend the Distress inks within the stencil working from Seedless Preserves to Picked Raspberry ending with the Ripe Persimmon.

4 Remove the stencil and mask. Use the stars from the Spooky Sweets set to create a cluster of stars in black ink above the ghoul. Highlight the stars with the Crystal Clear Sparkle.

5 Stamp the 'Mwaahaahahaaa!' below the image panel.

6 Trim the panel to 4" x 5¼", back with a smaller sheet of foam and attach to a 4¼" x 5½" white blank. Add some of the Crystal Confetti to decorate.

The Sparkle Crystal Clear doesn't photograph very well and gives the black a dull greyish tinge. In real life it looked great.

As with a lot of my makes I try and use some older stamps sets such as the Ghoulfriends and newer ones such as the Spooky Sweets. I think it's fun to go back and look in your stash and as there is now more choice now of inks, stencils, dies and embellishments you can give those old stamps a new lease of life.

I have one more Halloween card to share with you and then it is onto the ol' Christmas cards.

Thank you for stopping by and I'll see you soon! 


Tuesday 3 November 2020

Boo!

Hello there!

I know that Halloween has been and gone, but I did make a few cards for some friends and I just never got round to posting them up to share with you. So, for the next few posts I will show you the Halloween cards I created.


What you need...

Stamps:
Pumpkinhead by Tim Holtz (CMS309) - Stampers Anonymous
Chevron Backdrops - Lawn Fawn

Dies:
Caps Bold - Altenew

Ink pads:
Marmalade - Concord & 9th
Onyx Black - Versafine

Embossing Folder:
Swiss Dots - Cuttlebug

Sprinkles:
Let's Polka - Little Things from Lucy's Cards

Sparklets:
Rainbow - Buttons Galore & More

Card stock:
Black
White

Extras:
Foam sheet
Adhesives

What you do:

1 Trim a piece of white card 4¼" x 5½". Apply black ink to the wide chevron stamp and with the card landscape, stamp the image diagonally across the top.

2 Stamp the pumpkin in the lower right corner, again with black ink.

3 Blend the Marmalade ink onto some white card stock fading it towards the bottom. Allow to dry.

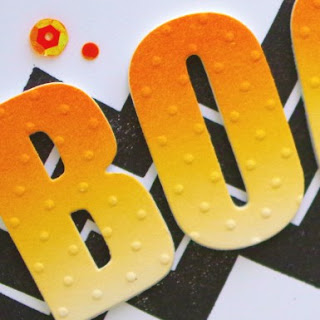
4 Die cut the 'B', the 'O' twice and the 'I' from the blended card and again from a foam sheet. Emboss the letters with the Swiss Dots folder.

5 Attach the blended letters to the foam letters.

6 Create a 4¼" x 5½" white landscape bank and cover with black card. Trim the stamped panel to 4" x 5¼" and mat onto the blank.

7 Attach the letters to the blank over the chevrons, using the 'I' as an exclamation mark. Add some orange sequins from the Sparklets Rainbow and orange dots from the Sprinkles Let's Polka.

Ta da! A spooky card. Keeping the colour scheme to white, black and orange gives the card a fresh look whilst maintaining the Halloween feel.

Okay, I want to promote something now. I was never happy with the bone folders I had in my stash. They always seemed to leave shiny marks on the paper/card stock. I saw that a lot of card makers used a Teflon bone folder, but I couldn't justify paying around £26.00 for one.

I did some searching and found a company based here in Norfolk that specialises in book binding and preservation. They sell two sizes of Teflon bone folders, a medium one for £7.95 and a large one for £8.95 excluding VAT. Even with postage and VAT added I still only paid around £14.94. 

To me, it looks exactly the same as the ones sold for crafting. I love it and no more shiny marks. It scores very smoothly and has some weight to it, perfect for strengthening those folds. The company is called Preservation Equipment Ltd, click here to take you to the bone folder page.

Well, that's me for today. I will try to get the other cards uploaded in the next couple of days. Thank you for popping by!

Take care and keep safe x