Showing posts with label Cuttlebug. Show all posts

Tuesday, 3 November 2020

Boo!

Hello there!

I know that Halloween has been and gone, but I did make a few cards for some friends and I just never got round to posting them up to share with you. So, for the next few posts I will show you the Halloween cards I created.


What you need...

Stamps:
Pumpkinhead by Tim Holtz (CMS309) - Stampers Anonymous
Chevron Backdrops - Lawn Fawn

Dies:
Caps Bold - Altenew

Ink pads:
Marmalade - Concord & 9th
Onyx Black - Versafine

Embossing Folder:
Swiss Dots - Cuttlebug

Sprinkles:
Let's Polka - Little Things from Lucy's Cards

Sparklets:
Rainbow - Buttons Galore & More

Card stock:
Black
White

Extras:
Foam sheet
Adhesives

What you do:

1 Trim a piece of white card 4¼" x 5½". Apply black ink to the wide chevron stamp and with the card landscape, stamp the image diagonally across the top.

2 Stamp the pumpkin in the lower right corner, again with black ink.

3 Blend the Marmalade ink onto some white card stock fading it towards the bottom. Allow to dry.

4 Die cut the 'B', the 'O' twice and the 'I' from the blended card and again from a foam sheet. Emboss the letters with the Swiss Dots folder.

5 Attach the blended letters to the foam letters.

6 Create a 4¼" x 5½" white landscape bank and cover with black card. Trim the stamped panel to 4" x 5¼" and mat onto the blank.

7 Attach the letters to the blank over the chevrons, using the 'I' as an exclamation mark. Add some orange sequins from the Sparklets Rainbow and orange dots from the Sprinkles Let's Polka.

Ta da! A spooky card. Keeping the colour scheme to white, black and orange gives the card a fresh look whilst maintaining the Halloween feel.

Okay, I want to promote something now. I was never happy with the bone folders I had in my stash. They always seemed to leave shiny marks on the paper/card stock. I saw that a lot of card makers used a Teflon bone folder, but I couldn't justify paying around £26.00 for one.

I did some searching and found a company based here in Norfolk that specialises in book binding and preservation. They sell two sizes of Teflon bone folders, a medium one for £7.95 and a large one for £8.95 excluding VAT. Even with postage and VAT added I still only paid around £14.94. 

To me, it looks exactly the same as the ones sold for crafting. I love it and no more shiny marks. It scores very smoothly and has some weight to it, perfect for strengthening those folds. The company is called Preservation Equipment Ltd, click here to take you to the bone folder page.

Well, that's me for today. I will try to get the other cards uploaded in the next couple of days. Thank you for popping by!

Take care and keep safe x


Sunday, 24 February 2019

Love Kraft

Hello blog friends!

Hope you are all having a wonderful weekend. It is very spring like today. Warm, sunny, buds are out, spring flowers are blooming and the birds are singing. It would be fabulous if it could stay like this, but there is always time for the weather to turn cold and wintry again.

As Valentine's Day has recently passed I thought I would share with you the 'Love' card I created. I'm a firm believer that you don't need one over commercialised day to tell someone you love them. Send them a card anytime!

I decided to keep this non traditional by using cream and Kraft colours.


What you need...

Card stock: Kraft, ivory
Embossing folder: D'Vine Swirls - Cuttlebug
Stamps: Falling For You - Paper Smooches
Ribbon: Bare Basics Jute Ribbon - Papermania
Twine: cream
Ink pad: Onyx Black - Versafine
Decorative pins: ivory oval, heart
Pearls: ivory
Flower: Bare Basics Burlap Flowers - Papermania
Adhesives

What you do...

1 Hand cut a large heart from Kraft card and emboss. Mat onto ivory card and trim again.

2 Wrap and tie cream twine around the base of the heart, secure in place and attach to a 10.5cm x 14.5cm Kraft blank.

3 Attach a jute ribbon bow over the ivory twine bow, add a flower and two decorative pins. 

4 Stamp the sentiment in the top left corner and add pearls to the heart.

To give it a more shabby feel, I didn't cut the heart or its mat too precisely and I also frayed the ends of the jute ribbon.

This is quite a bulky card, so for posting you could create a matching box or make paper flower for a flatter look.

Well that's my little make for this time. Thank you for popping by and I'll see you soon!

Tuesday, 10 April 2018

Spiffingly Good Easter

Hello there!

I'm back with the second card I did for Easter. Again this is a remake of a card I did a couple of years ago. 

In my last post, I changed the colour scheme of the original card but kept the same layout. With this one I have done the card exactly the same as the original because I just love the colours.


What you need...

Stamps: Claudine Hellmuth Doodles, Claudine Hellmuth Nature - Ranger; Cheree the Chicken - The Rubber Stamp Gallery
Embossing folder: Spots & Dots - Cuttlebug
Card stock: white, lime
Promarkers
Ink pads: Key Lime - VersaMagic; Onyx Black - Versafine
Buttons: orange, pink, yellow
Crochet cotton: white
Adhesives

I have the original card with full instructions here. For the sentiment banner, I created the sentiment on the computer, printed it out and then trimmed into a fish tail banner shape. I recommend printing a full sheet of sentiments, so that you have them to hand for future.

I am loving these bright zingy colours for Easter. This card could also be adapted for a birthday and you could use more muted colours for a male card.

I'm going to sign off now. Thank you for popping by and I'll be back soon with the birthday card I did for my husband Simon.


Monday, 18 January 2016

Monsterific - Incy Wincy/Bugaboo

Hello Peepsicles!

My! Doesn't a fortnight fly by quickly? I can't believe it's two weeks since our last Incy wincy challenge, which means we have a new one for you. Yay!

This time the theme is Tic-Tac-Toe and we have THREE fab sponsors, these are Bugaboo, Di's DigiStamps and Craft Classes Online.

From the Tic-Tac-Toe board I chose embossing/sentiment/pearls and the image is called Make it snappy - Monsterific by Bugaboo.

Here is my card...


Items needed...

Card stock: white, yellow
Promarkers: Aegean, Bright Green, Ice Grey 1, Molten Red*, Yellow
Washi tape: black/white striped
Embossing folder: Kirstie Allsopp Zig-Zag - Cricut® Cuttlebug™
Pearls: black
Adhesives

*limited edition colour(s)

Is this image hilarious or what? I love the way the monster in the background is squishing down the head of the round spiky monster :oD

Three lucky winners will get either 7 free digis from Bugaboo, a $12 voucher for Di's DigiStamps or an on line seat with Craft Classes Online. Click on each of the badges below to take you to the sponsor websites.


Before I go, we have another new member of the DT, Catherine! It would be great if you popped on over to Incy Wincy and have a look at her lovely make for the challenge. Plus the DT have been busy coming up with some gorgeous makes for your inspiration.

Thank you so much for stopping by! TTFN xxx


Monday, 22 December 2014

Stamped & Embossed Cards (Crafts Beautiful Oct 2013)

A very festive hello to you all!

I have another back to the archives for you. This time it's a couple of funky cards I did for Crafts Beautiful last year for the October 2013 issue. The projects used stamping and embossing with a little 'snow heap and drip' illustration from me, which resulted in quite a comical card.

Here they are...


The stamp sets used were from Paper Smooches - Freezy Fellas and All Yule Need. The embossing folders used were D'Vine Swirls and Snowflakes by Cuttlebug. 

The illustration of the snow heap and drip can be downloaded here from the Crafts Beautiful website, along with other fab patterns, templates and papers - all free!!!

Thank you for popping by and I will be back tomorrow to show you the card I made for my hubby, Simon this year. TTFN xx

post signature

Wednesday, 23 October 2013

Seasons Greetings

Hello all!
It's a beautiful day here in Norfolk. The chickens are happily strutting around the garden. They have been dust bathing and Dolly (the white one) is now the colour of mud. Doh!
Today I would like to show you a card I rustled up yesterday. It's like one I did for a post last Christmas, though I have altered it slightly.
So here we are...


What you need...

Stamps: Warm Hearts - Paper Smooches
Stamps: Swanky Snowdudes - Paper Smooches
Ink: Onyx Black - Versafine
Card stock: aqua, white
Embossing folder: D'Vine Swirl - Cuttlebug
Dies: Framelits Circles - Sizzix
Promarkers: Bright Green, Burnt Sienna, Lime Green, Lime Twist, Lime Zest
Flat backed pearls: red, white
Adhesives

What you do...

Die cut a circle of aqua card and attach to the bottom of a kraft blank 11.5cm x 13.5cm. Stamp and colour in the trees, cut out and stick to the circle.

For the snow, emboss D'Vine Swirl onto white card, cut into wavy sections, cover the bottom of the card with one section securing with double sided tape, then overlay with another section using foam tape.

Stamp the sentiment onto white card, trim into a banner and attach to the top left corner and add a few pearls to finish.

I love kraft card and I think this colour combo works really well. What do you think? Are you a fan of kraft card?

I'm going to pop off now. I'll be back soon with a quick little card I've done using the fabulous new Basic Grey collection... 25th and Pine.

Thanks for calling in, see you soon :o}

post signature

Thursday, 19 September 2013

Dude, ...chill (2013)

Aft'noon me ol' lovelies! I haven't been around for a while... busy doing commissions, but now I am back (for the time being). 
I'd like to show you a funny, cute little card I did for the last issue (Oct 2013) of Crafts Beautiful.


What you need...

Card stock: white, aqua, pale grey, black
Stamps: Freezy Fellas, All Yule Need - Paper Smooches
Embossing  folders: D'Vine Swirls, Snowflakes - Cuttlebug
Promarkers: Ice Grey 1, Lime Green, Lime Zest, Pear Green, Raw Sienna
Ink pad: Onyx Black - Versafine
Glazed gems
Googly eyes
Sanding block
Adhesives

What you do...

Emboss aqua card with snowflakes, distress with a sanding block and cover the top two thirds of a 12.5cm square blank.

Trim a wavy edge along one side of grey card, adhere to the blank overlapping the aqua card. Emboss swirls on white card, cut a wavy edge along on side and fix to the bottom of the blank, trimming any excess.

Stamp the tree four times onto white card, colour three in shades of green. Cut the tops off three and layer at an angle finishing with the white one, trim any excess.

Download and print the snow drip and snow pile from Crafts Beautiful. Stamp and cut out two stick arms and attach to the side of the snow pile, then add two googly eyes.

Attach the tree, snow pile and drip to the blank and cut a wavy edge along a piece of white swirl embossed card and adhere to the blank with foam tape so it covers the bottom of the snow pile and tree trunk.

Stamp and trim the sentiment into an arrow, mount onto black card and attach to the top left corner. Finish with a few gems.

Ta da!

Of course you can use any stamps or embossing folders you have in your craft stash. The snow drip and snow pile are free to download from the Crafts Beautiful website, plus there are lots more images and free patterned papers to choose from. You just need to register, which is also free.

Just before I sign off, I am pleased to announce that one of my lovely chickens, Bren, laid her first little egg on Tuesday. She also laid one whilst I was with her yesterday and there was another waiting for me this morning. They are only small, but oh so perfectly formed. I have a suspicion Hattie may be then next one to go into production. Watch this space....

Thanks for dropping by xxx

post signature


Wednesday, 29 May 2013

Happy Birthday (Cute Aliens)

Evenin' lovelies!

How's it been with you? It's been a busy week for me - lots of socialising - you know, lots of eating, drinking and just being very, very merry.

A group of us from the little village where I live got together on Monday (it was a Bank Holiday in the UK) and had the most fantastic picnic on the village green. The weather was glorious. Needless to say a lot of wine was consumed! A great time was had by all, we all hope to get together and do it again soon.

Right-ho then, onto the important stuff.

Here is a little card I created the other day, using the Space Cadet stamps from Paper Smooches. It's one of those stamp sets where you want to use all the stamps on one project - but less is more as they say. So after the 'Go Boldly' card I did the other week, I decided to make another using other images from the set.

Without further ado doo....


What you need...

Stamps: Space Cadet - Paper Smooches
Dies: Framelits Circles - Sizzix
Embossing folders: Swiss Dots; Seeing Spots - Cuttlebug
Card stock: aqua, bright pink, yellow, white
Ink pad: Onyx Black - Versafine; Cloud White - Versamagic
Promarkers: Bright Orange, Canary, Ice Grey 1, Lime Green, Oasis, Poppy
Baker's twine: yellow
Adhesives

What you do...

Cover an A6 landscape blank with a slightly smaller piece of aqua card. To make the planets, die cut two different sized circles, one in pink and the other in yellow. Run the pink one through the Seeing Spots embossing folder and the yellow through the Swiss Dots. Adhere the pink one to the lower left corner of the card, overlapping the edge and trim away the excess. Mount the yellow planet just above it, to the right.

Stamp, colour and cut out an alien, the alien in the saucer and a telescope. Create a sentiment on a piece of white card, trim into a banner. Fold a short length of yellow twine in half and fix the open ends to the reverse of the banner, attach the looped end to the reverse of the saucer. Stick to the top of the blank with foam tape, as shown.

Attach the other alien and the telescope to the top of the pink planet. Finish with a few stars stamped in Cloud White randomly around the images.

This is such a cute set and would work well for boys (big and small) and of course the odd girly likes cute aliens too. I can't wait to have another play with it. Paper Smooches stamps are perfect to colour in because of their bold images and outlines.

So my wonderful peeples, I'll have to sign off and say nighty night. Thanks for stopping by, until next time....xxx
post signature

Wednesday, 15 May 2013

Go Boldly

Mewnin peepsicles!

Oooo! It's a bit windy 'ere in ol' Norfolk! Not good, not good at all :o(

Anyhoo...here is the card I made for my brother-in-law, Robert. Happy Birthday Chuck!


What you need...

Stamps: Space Cadet - Paper Smooches
Card stock: black, white, aqua, red
Dies: Framelits Circles - Sizzix
Embossing folder: Spots and Dots - Cuttlebug
Ink: Onyx Black - Versafine; Cloud White - VersaMagic
Promarkers: Bright Green, Bright Orange, Ice Grey 1, Ice Grey 2, Lipstick Red, Oasis, Sand Dune, Sun Kissed Pink, Yellow
Baker's twine: black

What you do...

Create an A6 top fold blank in black card. Die cut a circle in aqua and emboss with Spots and Dots, attach to the lower left corner and trim the excess.

Stamp, colour and cut out the spaceman, two planets, the spaceship, flame and an alien. Cut out the window of the spaceship, trim the alien and attach to the reverse, so he looks like he's peeping out. Adhere to the card along with the other images, as shown.

Stamp the sentiment and stars onto white card, trim to a banner, mount onto red card, wrap and tie twine on the left. Attach to the lower left of the blank. Finish with a few stars stamped in Cloud White.

Yeah, yeah, I know...another Paper Smooches set. Well they are so gorgeous and fun! I could have gone mad with this set. I wanted to use every stamp, but that would have been just plain silly.

I love the alien peeping out of the window, he looks a bit worried to me.

Okay, I'm going to love ya and leave ya...thanks for dropping in (ooo! the sun is coming out - such excitement!). xxxx
post signature


Thursday, 28 March 2013

Bottom's Up

Well hello me ol' chums!
Hope you are all fit and well on this bright, breezy and cold March day.
As I mentioned in my last post, it was His Lordship's birthday yesterday, and by order of the cat (with supervision) I had to do him a card from her. So with Bazoo's laser eyes upon me, I came up with this...


What you need...

Stamps: Nine Lives - Penny Black; Li'l Grumpies Occasions - Smeared Ink
Card stock: white
Embossing folder: Spots & Dots - Cuttlebug
Ink: Tuxedo Black - Memento
Promarkers: Ice Grey 1, Ice Grey 3
Washi tape: black/white stripe, red/white diagonal stripe - MT; He Said Decorative Tape (He Said She Said Collection) - Teresa Collins
Baker's twine: red
Button: black
Adhesives

What you do...

Create an 8cm x 11cm top fold blank in white card. Emboss a piece of white card 7.5cm x 10.5cm with Dots & Spots.

Cut three lengths of washi tape and fix to the card from the top right, folding the ends over to the reverse. Cut a notch from the end of each one and then rub gently to allow the embossing to show. Attach centrally to the blank with foam tape.

Stamp the cat and sentiment onto white card and colour in. Trim and mount over the washi tape at the upper right corner of the blank.

Wrap baker's twine around the base of the card several times and tie in a floppy bow at the left. Finish with a button threaded and tied with baker's twine.

It's only an iddy biddy card, but ever so cute.

Anyone who is owned by a cat or has been owned by one will know this pose very well. It's the 'I'm listening to every word you are saying, but I choose to ignore you never the less' pose.

Bazoo does it very well. Infact you know when she is ignoring you from another room, you can feel the vibes - whoooOOOoo! If she isn't wearing this pose, she's doing the Hypno-cat laser eye thingy.

Oooh! Don't forget this month's Blog Candy ends on March 31st! Good luck!

Right, me lovelies, I'm off for a cuppa tea. Thanks for popping by xxx
post signature

Tuesday, 19 March 2013

Have a Spiffingly Good Easter...

Mewnin' my lovely peepsicles!

Hope you are all well. Soon the first day of spring will be upon us, but we have more snowy weather forecast here in 'ol Blighty :o(

The best thing to do is stay indoors where it's warm and do some creative messing about (or crafting as it's commonly known)

Yesterday I made another Easter card, again with a comical feel and bright zingy colours. Here it is, ta da da da da da dah........


What you need...

Stamps: Claudine Hellmuth Doodles, Claudine Hellmuth Nature - Ranger; Cheree the Chicken - The Rubber Stamp Gallery
Embossing folder: Spots and Dots - Cuttlebug
Card stock: white, lime
Ink: Tuxedo Black - Memento; Key Lime - VersaMagic
Promarkers: Cool Aqua, Gold, Hot Pink, Lime Green, Magenta, Mandarin, Pumpkin, Summer Sun
Buttons: yellow, orange, pink
Crochet cotton: white
Adhesives

What you do...

Create a 10.5cm x 14cm top fold blank. Ink the embossing folder with Key Lime and run a sheet of white card through and trim to 9.5cm square. Adhere to the blank in line with the fold.

Stamp the chicken, cloud shape, large circle, dotty border and three flowers in black ink and colour in. Cut out and attach to the blank as shown.

Use a computer and printer to create the sentiment and fix to the lower section of the blank. Finish with buttons tied with cotton for the flower centres.

I wanted to make the embossed pattern stand out a bit, not too much to distract from the main images, so I used the technique where you apply ink onto the embossing folder. Using the Key Lime chalk ink just gives enough definition without overpowering. The photo's don't really show it up that much, because it is so subtle. I like!

The Rubber Stamp Gallery has lots of handmade (usually to order) stamps. They have some really unusual and quirky images. As I love chickens, I couldn't resist Cheree with her 'I'm not impressed' face. This card would be perfect to send to the Bah Humbugs! of the Easter season.

I'm going to sign off now, I have a couple of lads here servicing the central heating and I've got my next PaperCrafter commission to start. Thanks for popping in. xx


Saturday, 16 March 2013

Easter Bunny

Mewnin peeps!
Hope you are all having a fab weekend so far. Pudding club went very well last night. We have probably upped our calorie and cholesterol levels one hundred fold! Simon and I are not really pudding people any other time, so we will soon recover.
Okey dokey me 'ol chums onto another Easter card.


What you need...

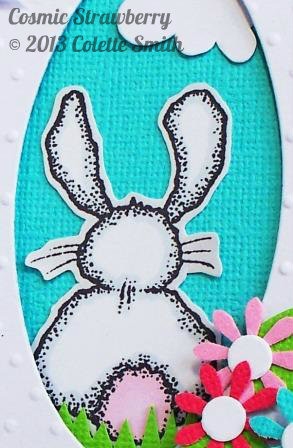
Stamp: Bunny Behind - Crafty Impressions
Card stock: white, lime, turquoise, pale pink, bright pink
Dies: Framelits Ovals - Sizzix
Embossing folder: Swiss Dots - Cuttlebug
Punches: daisy, hole
Ink: Tuxedo Black - Memento
Promarkers: Pink Mittens, Icicle, Cool Grey 1
Baker's twine: pink
Button: pink
Rub-on sentiment
Adhesives

What you do...

Create a white 11.5cm x 14cm top fold blank. Cut a 10cm x 13cm piece of white card. Die cut an oval in the upper right corner and emboss with Swiss Dots.

Stamp, colour and cut out the bunny. Mount onto a piece of turquoise card, along with some grass cut in lime card and a white cloud. Trim so that it slightly bigger than the die cut oval, and attach to the card blank. Wrap and tie baker's twine around the bottom of the white embossed panel and attach centrally onto the blank with foam tape.

Punch out three daisies, one in pale pink, one in bright pink and one in turquoise. Use the hole punch to make the flower centres in white. Hand cut two leaves in lime card. Assemble the flowers and adhere to the lower right of the oval.

Apply a rub on sentiment to a piece of white card, trim into a banner and attach to the top left of the card, overlapping the edge slightly. Finish with a pink button threaded with baker's twine.

I fell in love with this bunny as soon as I saw it. You can buy this super cute stamp from http://www.craftsulove.co.uk/miscellaneous_stamps.htm and it is only £1.29.

I thought it would be interesting to have the bunny image sat behind a raised section of card. It took a while to get the position just right, but I am really pleased with the way the little bunny turned out. Introducing a small amount of bright colour with the lime, turquoise and pinks, really makes an impact. Hope you like :o)

Well, that's me for the nonce. I will be back soon with another make. I've just realised that by the time I post this, it will be afternoon - oh well, it was in the a.m. when I started.

Take care and thanks for dropping in. xxx


Saturday, 9 March 2013

Happy St Patrick's Day!

Aft'noon chums!
How are you today? It's raining here, but at least the fog has gone.
Simon is playing Mr D.I.Y and generally making a mess and being very noisy. After all the remodelling of the bathrooms last year, we are now starting with the hall and landing, so he is ripping it to bits. We're also replacing all the internal doors and surrounds, with the exception of the en suite (11 doors! - I'm dreading the painting).
At least it will be worth it in the end. It's going to take a few years to get the house completely finished, but we'll get there. We're not into ultra modern etc, so we're keeping it very vintage, shabby chic and cottage like.
Anyhoo! I've a friend Stephen who is Irish, and every year I always send him and his lovely wife June, a St Patrick's Day card. I've just finished it, so here it is...


I wanted the monster to hold a bunch of balloons, so I created them along with the sentiment on the computer and printed them out.

What you need...

Stamps: Falling For You - Paper Smooches
Dies: Framelits Ovals (657563) - Sizzix
Punch: corner rounder
Embossing folder: Seeing Spots - Cuttlebug
Card stock: lime green, grey, white
Ink: Jet Black Archival - Ranger
Promarkers: Lime Green, Lime Zest, Lime Twist, Pear Green, Cool Grey 1
Crochet cotton: white
Self-adhesive pearls: black
Shimmer dots

What you do...

Create a bunch of balloons with the sentiment using Wordart and shapes in Microsoft Word and print out. Colour in each balloon, using Lime Zest, Lime Green and Pear Green and cut out.

Stamp the monster in black ink, colour in with Lime Twist and shade his horns, tooth and eyes with Cool Grey 1 and cut out.

Create a top fold A6 blank in lime card and round the upper right corner. Emboss a smaller piece of white card with Seeing Spots and round the upper right corner, attach centrally onto the blank. Die cut the smallest oval in grey card, shade around the edge with Cool Grey 1 and adhere to the lower right corner.

Cut three lengths of white cotton and colour each strand with the corresponding colours of the balloons. Fix one end of each to the back of the balloons and attach to the top left with foam tape.

Cut small slits either side of the monster's arm and thread the other ends of the cotton through the slits (I found it easier to thread them onto a fat needle and pull through). Attach the monster to the grey oval, pull the cotton strands taut, tie a length of white cotton in a bow around the ends and trim. Add a black pearl to each pupil of his eyes. Finish with a few glitter dots.

Cute isn't he? I love this stamp set - you've probably guessed by now, I'm a big fan of Paper Smooches. This layout would make a great birthday card too, just change the sentiment and the colours.

Well peeps, that's me for the nonce. Thanks for dropping in, until next time....xxx