Showing posts with label Picket Fence. Show all posts

Friday, 9 April 2021

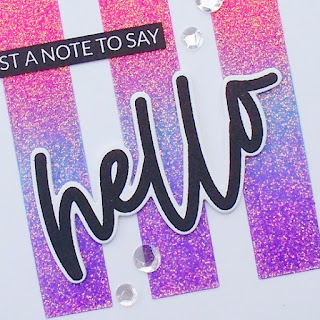
Sparkly Hello

Hello there!

As promised I'm back the second of three cards made using the Moonstone Glimmer paste by Nuvo. The card is very similar to the Hey! Friend card but it uses a different colour scheme and sentiments. Well, without further ado...


What you need...

Stamps: 
Loads of Hello ST-21-11 - Avery Elle

Dies:
Loads of Hello D-21-11 - Avery Elle

Stencil:
Rectangle Trio - My Favorite Things

Ink pads:
Picked Raspberry - Tim Holtz Distress Oxide
Tumbled Glass
Wilted Violet
Onyx Black - Versafine

Glimmer paste:
Nuvo Moonstone - Tonic Studios

Card stock:
White

Embellishments:
Crystal Confetti - The Stamp Market

Extras:
Adhesives
Die cutting machine - Sizzix
Blending brushes - Picket Fence
Nuvo Media Spatulas - Tonic Studios

What you do...

1 Cut a piece of white card 10.5cm x 13.5cm, place the stencil towards the top and secure in place with low tack tape.

2 Start at the top of the stencil and blend Picked Raspberry ink, Tumbled Glass followed by  the Wilted Violet. Allow the ink to dry.

3 Using a spatula, spread some of the Moonstone paste evenly over the stencil. Scrape away the excess and place back in the pot. Remove the stencil. Put the lid back on the pot and wash the stencil and spatula immediately. Allow the paste to dry.

4 Stamp the 'hello' and 'just a note to say' with black ink. Die cut the 'hello' and die cut again twice more in white card. Stack the die cuts lining up each layer. Trim the 'just a note to say'.

5 Create an 11cm x 14cm top fold blank and attach the stencilled panel onto it either with foam tape or some layers of scrap card stock. Attach the 'hello' with the 'just a note to say' above, to the left. Finish with some of the Crystal Confetti.

And there we have it. Another super sparkly card. I have one more in this set which again uses a different colour scheme and wording.

I am going to enter this card into the Creative Fingers Challenge #205. Click here to take you to the challenge.

Thank you so much for popping by, take care and I'll be back soon.


Friday, 26 March 2021

Hey! Friend

Hello there! I hope you are all keeping well.

Nuvo Glimmer Paste! Why, oh why didn't I play around with this stuff when I first purchased it? It's been in my stash for some time and I don't know whether I was a bit frightened of it or just didn't have the inspiration. I'm in love!

I recently purchased the Avery Elle Loads of Hello stamp and die set and thought that these large words would look great over a stencilled background, but with some extra sparkle. This gave me the kick start I needed. Hence, I got on a roll creating a few cards using this wonderful stuff.


What you need...

Stamps: 
Loads of Hello ST-21-11 - Avery Elle

Dies:
Loads of Hello D-21-11 - Avery Elle

Stencil:
Rectangle Trio - My Favorite Things

Ink pads:
Dried Marigold - Tim Holtz Distress Oxide
Picked Raspberry
Wilted Violet
Onyx Black - Versafine

Glimmer paste:
Nuvo Moonstone - Tonic Studios

Card stock:
White

Embellishments:
Crystal Confetti - The Stamp Market

Extras:
Adhesives
Die cutting machine - Sizzix
Blending brushes - Picket Fence
Nuvo Media Spatulas - Tonic Studios

What you do...

1 Cut a piece of white card 10.5cm x 13.5cm, place the stencil towards the top and secure in place with low tack tape.

2 Start at the top of the stencil and blend Dried Marigold ink, followed by Picked Raspberry then Wilted Violet. Allow the ink to dry.

3 Using a spatula, spread some of the Moonstone paste evenly over the stencil. Scrape away the excess and place back in the pot. Remove the stencil. Put the lid back on the pot and wash the stencil and spatula immediately. Allow the paste to dry.

4 Stamp the 'hey!' and 'friend' with black ink. Die cut the 'hey!' and die cut again twice more in white card. Stack the die cuts lining up each layer. Trim the 'friend'.

5 Create an 11cm x 14cm top fold blank and attach the stencilled panel onto it either with foam tape or some layers of scrap card stock. Attach the 'hey! with the 'friend' underneath to the right. Finish with some of the Crystal Confetti.

I am so proud that my photo captured the beauty of this shimmery surface, of course it still isn't as wonderful as in real life. 

It's important that you close the pot of paste and wash your stencil and spatula straight away. This stuff dries quickly and rock hard and will damage your stencil and spatula. I placed a small piece of Press & Seal over the top of the pot before adding the lid. Cling film could also be used.

I am definitely going to use this paste for Christmas cards.

I hope you like my card, I will be back soon with the others I created, two use the remaining large words from the stamp and die sets in a different colour scheme and the third uses some cute cacti stamps.

I am entering this make into the Crafty Creations Challenge #419 - Anything goes. Click here to take you to the challenge.

Keep safe and well and thank you for stopping by.