Showing posts with label VersaMagic. Show all posts

Thursday, 6 May 2021

miss YOU

Hi there!

As promised I'm back with another make. I decided not to share the remaining cactus card with you today, I will share it at a later date. I wanted to show you another card instead.

I purchased the You Confetti Cuts die set by Reverse Confetti some time ago and thought it was about time I used it.

As it is a large word die with a shadow background, I wanted it to be the main focus of the card and team it up with some other lettering/wording. The good thing about this die is that it can be used with many other words for different themes/occasions.


What you need...

Dies:
You Confetti Cuts - Reverse Confetti
Bee Bold Lowercase Honey Cuts - Honey Bee Stamps
A2 Layers Die Rectangles - Waffle Flower

Stencil:
Splash (TESN28) - Taylored Expressions

Stamps:
Chit Chat - Paper Smooches

Ink Pads:
Turquoise Gem  - VersaMagic
Onyx Black - VersaFine

Card stock:
Black - Concord & 9th
Grapefruit
White

Extras:
Adhesives

Tools:
Big Shot - Sizzix
Blending brushes

What you do...

1 Lightly blend the Turquoise Gem ink over white card. Secure the stencil over the inked card and blend the Turquoise Gem over the stencil creating a heavier tone. Remove the stencil and allow the inked card to dry.

2 Die cut the 'you' in black card along with letters form the Bee Bold set to spell 'miss'. Die cut the 'you' shadow in white and the little heart in Grapefruit. Assemble the 'you' dies and add the heart with foam pads.

3 Use the second largest die from the A2 Layers set to cut a rectangle from the inked/stencilled card.

4 Line up the letters/wording onto the stencilled panel and using these as a guide, stamp the 'so much' in Onyx Black.

Create a 4¼"x 5½" white blank and mat the stencilled panel onto it. Attach the 'you' with foam pads and stick the 'miss' directly onto the panel above the 'you'.

There we have it. The photo of the card doesn't really show the true colour of the ink, it is certainly more of a greener turquoise hue in real life.

I am so pleased with the way this turned out. I am planning to keep on using older items (such as the stamp set) along with newer items in future projects. I have recently discovered some really old stamp sets/dies in my stash that I would like to use again. Watch this space!

As usual, thank you so much for popping by, I really appreciate it. Take care and I'll be back soon.


Tuesday, 15 September 2020

Winter Snowglobe

Hello all!

I hope you are all well. I have a little Christmas card to share with you today. This features a cute little snow globe die set from Sizzix and was inspired by the wonderful Pete Hughes. There are a few of these little sets available and the domes are purchased separately. 

What you need...

Dies: 
Tiny Snowglobes by Tim Holtz (663119) - Sizzix

Snowglobe domes:
Dimensional Domes by Tim Holtz (663559) - Sizzix

Ink pads:
Turquoise Gem - VersaMagic

Card stock:
Turquoises
White

Gel pen:
White

Fonts: 
Raleway
Beach Script

Glitter: 
White iridescent

What you do...

1 Print the sentiment onto white card and trim to 6.5cm x 9.5cm.

2 Blend the Turquoise Gem ink from the top fading down to white.

3 Die cut the aperture centrally at the top and attach the dome.

4 Die cut two small trees and their branches from shades of turquoise card. Attach to a piec of white card so that they will sit perfectly within the globe.

5 Fill the dome with some iridescent glitter and place the tree panel on the back to seal.

6 Create an 8.5cm x 12.5cm white blank and attach the dome panel with foam tape. Use the white gel pen to add snowflakes.

There are lots of little Christmas/Winter images within this set, so you can chop and change along with the colour scheme. Of course you can use these dies without the domes to create flatter cards or gift tags. The die set also includes a snowglobe base.
The fonts were downloaded from FontSpace. They are free to use for personal use, however if you plan to sell your cards then you will need to purchase them for commercial use.

You can check out more inspiration for this die set by Pete Hughes by clicking here.

Thank you so much for popping by and I'll be back soon with another card to share!


Saturday, 25 April 2020

Peas Love Happiness

Hello there!

Well I'm back with another make. I am still going through some of my old stamp sets and of course some of my faves are Paper Smooches. The 'Vegtastic' stamp set is just so cute, I used it in my last post with the carrot card. At least with this stamp set you are getting one of your five a day!

Without further ado do here we are...

What you need...

Stamps:
Vegtastic - Paper Smooches

Embossing folder:
Swiss Dots - Cricut

Ink pads:
Extreme Black - My Favorite Things
Sea Breeze - VersaMagic

Alcohol markers:
Nile Green G07, Apple Green G14, Green Bice YG01, New Leaf YG23, Sugared Almond Pink RV02, Tender Pink RV13 - Copic

Gel Pen:
Signo White Broad (UM-153) - Uni-ball

Dimensional medium:
Glossy Accents - Ranger

Card stock: 
White, Pale Aqua

Masking paper:
Stamping Mask Paper - Inkadinkado

What you do...

1 Stamp the peas onto white card stock with the little heart above. Stamp the images again onto masking paper and cut out. Lay the masks over the original stamped image.

2 Use a blending tool to blend the Sea Breeze ink around the images and remove the masks.

3 Colour in the images and add the sentiment underneath. Trim the image to 7.5cm square.

4 Emboss a 10cm square piece of white card with the Swiss Dots.

Cover a 12cm square blank with pale aqua card. Then layer the embossed panel followed by the stamped panel.

6 Add some highlights to the heart, pod and peas with gel pen, apply Glossy Accents and allow to dry.

I did notice that the Glossy Accents can affect the gel pen a little, so you need to be careful when applying it that you don't move it around too much, but you can't really notice on the card.

I still have quite a few rainbow themed cards to post up, but I'm trying to spread them out a little so you are not overloaded!

I'm going to sign off for now and have a coffee and maybe a shortbread or two (yum) whilst enjoying the sun in the conservatory. Plus I can see what the chickens are up to!

Thank you for popping by and I'll be back soon. Enjoy the rest of your weekend.


Monday, 12 August 2019

Hey, Gullfriend!

Hello blog friends!

I hope you are all keeping well. I have a cute, funny card to share with you today. It features images from the Seaside Seagulls stamp set by My Favorite Things.


What you need...

Card stock: white
Stamps: Seaside Seagulls (CS-200) - My Favorite Things
Dies: Nested Small Square - Gina K
Ink pads: Extreme Black - My Favorite Things; Sea Breeze - VersaMagic
Copic markers; C-1 Cool Grey 1, C-4 Cool Grey 4, E42 Sand White, E44 Clay, Y13 Lemon Yellow, Y18 Lightning Yellow
Masking paper
Gems; clear
Adhesives

What you do...

1 Die cut the largest square in white card. Mask off the faux stitching and a section at the bottom. 

2 Stamp three clouds in the top section and mask. Apply the Sea Breeze ink to cover the area. Remove the masks.

3 Stamp some waves and the sentiment.

4 Stamp the seagull, colour and cut out.

5 Create a 10.5cm x 14.5cm top fold blank. Add the square panel to the top and a sentiment at the bottom. Add the seagull to the bottom right of the square panel with foam pads. Finish with a gem on each cloud.

There you have it! A clean, simple and fresh card. Living near the sea I know for a fact that seagulls DO love chips (and ice-cream).

I did this card for a friend's birthday and she loved it. I hope you love it too.

Thanks for popping by and I'll be back soon! x


Tuesday, 10 April 2018

Spiffingly Good Easter

Hello there!

I'm back with the second card I did for Easter. Again this is a remake of a card I did a couple of years ago. 

In my last post, I changed the colour scheme of the original card but kept the same layout. With this one I have done the card exactly the same as the original because I just love the colours.


What you need...

Stamps: Claudine Hellmuth Doodles, Claudine Hellmuth Nature - Ranger; Cheree the Chicken - The Rubber Stamp Gallery
Embossing folder: Spots & Dots - Cuttlebug
Card stock: white, lime
Promarkers
Ink pads: Key Lime - VersaMagic; Onyx Black - Versafine
Buttons: orange, pink, yellow
Crochet cotton: white
Adhesives

I have the original card with full instructions here. For the sentiment banner, I created the sentiment on the computer, printed it out and then trimmed into a fish tail banner shape. I recommend printing a full sheet of sentiments, so that you have them to hand for future.

I am loving these bright zingy colours for Easter. This card could also be adapted for a birthday and you could use more muted colours for a male card.

I'm going to sign off now. Thank you for popping by and I'll be back soon with the birthday card I did for my husband Simon.


Wednesday, 14 January 2015

Holly Thank You Card

Good afternoon all!

I'm back with another little thank you card. I sent this one to my Nan to thank her for our Christmas pressies.

Again, as with the Rudolph card, it's a little A7 (7.5cm x 10.5cm) and I used some stickers by We R Memory Keepers that I've had in my stash for years.


The stickers are lovely as they are embossed giving a bit more dimension. The WRMK collection was called Merry & Bright and had lovely pink, red, lime and navy tones. 

I stamped the sentiment in Night Sky by VersaMagic and the 'thanks' came from the Many Thanks set by Paper Smooches. A few gems were added to add that bit of sparkle.

I hope you like my little card and will be back soon with another one. Thank you for popping in! :o)

post signature

Saturday, 15 November 2014

Let's Be Merry

Happy Saturday peeps!

I hope you are all having a lovely weekend.

This card is one of three I did using the Tim Holtz Halftone Christmas Stamps. I kept the colour scheme similar for all three. The card looks quite big in the photo, but it's only a tincy wincy one - 7.5cm x 14.5cm.


What you need...

Stamps: Tim Holtz Collection Halftone Christmas (CMS204) - Stampers Anonymous; Christmas Sampler - Paper Smooches
Patterned paper: Oh Deer! 6"x6" Paper Pad - Fancy Pants Designs
Card stock: white
Ink pads: Spanish Moss - Versafine; Aquamarine - Avery Elle; Jumbo Java - VersaMagic
Ribbon: teal
Gems: teal
Adhesives

What you do...

Create a white 7.5cm x 14.5cm top fold blank.
With Spanish Moss, stamp the halftone part of the tree to the left, just over half way up the blank. Over stamp the tree detail with Jumbo Java ink.
For the moon, stamp the halftone part of the snowflake in Aquamarine to the right at the top of the tree.
Cut a piece of the tree paper 4.5cm x 7.5cm and attach to the blank under the tree.
Wrap and tie ribbon around the patterned section.
Stamp the sentiment with Jumbo Java and finish with a few gems.

I love the colour combination of teals, blues and browns for Christmas. They seem to work really well together.

With this being an odd sized card, I'll have to make an envelope for it. It's a good way to use up old papers from my stash.

I'll be back soon with the last card I did using this colour scheme and stamp set. Thank you for calling by! TTFN xx

post signature

Tuesday, 14 October 2014

Pop Flowers

Hello my lovelies!

How are you today? I'm feeling much better, the yukky cold is on its way out - I think drinking plenty of fresh lemon/honey in hot water with a couple of paracetamol helped. 

So, what I got for you this time? Well, I was inspired by a card I found on the Internet and decided to create my version of it as a birthday card for my sister, Yvonne. 

It's very clean, simple and fresh.


What you need...

Stamps: Birthday Sampler, Perky Plants - Paper Smooches
Dies: Clouds - Paper Smooches
Ink pad: Tea Leaves - VersaMagic, Onyx Black - Versafine
Card stock: aqua (light & mid shades), bright pink, lime, turquoise (dark)
Card blank: white 14.5cm square
Pearls: white
Adhesives

What you do...

Hand cut a circle from lime card approximately 2.5cm diameter, three 2cm circles, one each in light aqua, dark turquoise and bright pink; lastly cut three 1.5cm circles, one each in light aqua, dark turquoise and bright pink.
Use Tea Leaves ink to create three stems with leaves at the bottom right corner.
Assemble three flowers and stick to the top of each stem.
Die cut three clouds in mid aqua card and arrange around the flowers.
Stamp the sentiment in Onyx Black at the lower left and embellish each flower with a pearl.

Ta dah!

Believe it or not, this card seemed to take me ages. I'm terrible at taking my time making sure placement of an element or image is just right. 

I won't commit to sticking anything down until I'm 100% happy - too fussy maybe? No. If you are going to make something unique and special, it's worth taking the time (even though I do get frustrated with myself). It always seems to happen when I need to get the card done quickly - grrr!

If I'm struggling, I find the best way is to walk away from my project and then come back to it later with a 'fresh' eye.

Any hoo, that's me for now. Back to the ol' commissions. Thanks for calling in and I'll see you soon xx

post signature

Saturday, 9 August 2014

Hello Peachy!

Good afternoon peeps!

I'm sat here typing this whilst sat at my Mum's in Yorkshire. I brought Emily back after spending two weeks with Simon and I (hence the lack of posts). So I'm spending the weekend at Mum's. 

This morning I popped into Samuel Taylors at Embsay to say hello to Dawn (I met her through my blog), a very lovely and talented lady :o)

Today I thought I would show you a little card I did for an earlier issue of Crafts Beautiful.


What you need...

Dies: Labels Eight - Spellbinders; English Roses - Marianne Designs Creatables
Card stock: white, pale green, cream, mid peach, dark peach
Stamp: Chit Chat - Paper Smooches
Ink pad: Aloe Vera Dew Drop Chalk Pad - VersaMagic
Ribbon: pale green
Pearls: white, mid peach, dark peach

What you do...

Cover the bottom half of a 12cm blank with mid peach card. Die cut the second largest label in pale green card and the third largest in white card. With the labels in landscape, layer and fix to the blank so the points are in line with the top of the peach section.

Die cut and assemble three roses in cream, mid peach and dark peach. Attach to the bottom left of the label. Tie a bow in ribbon and stick just above the roses.

Stamp the 'hello' sentiment in Aloe Vera ink on the lower right of the label and add three pearls just above.

There we have it, a simple yet pretty card. I usually scrunch up the roses before assembly to give them a shabby chic look.

Why not pop on over to www.crafts-beautiful.com? There are loads of ideas, projects, inspiration and free downloads!

Before I go, don't forget to post your entries in the Cosmic Colours Challenge, the colours this month are adorable. Click here to take you to the challenge and rules of entry.

Well, I must go for now. Enjoy the rest of your weekend and I'll be back soon. Thanks for dropping by xx

post signature


Friday, 11 July 2014

Mollie's Flowers

Good heevnin peeps!

Well it's been a few days since I posted, Simon is on holiday this week so we have been decorating, gardening, going for bike rides, visiting tea rooms for a cuppa and yummy cake....

My fingers have been itching and I've been chomping at the bit to have a play with my Cricut® Explore.

There is a wonderful lady called Mollie that lives over the road from my mum; I call her 'Grandma Mollie'. She is such good fun and a brilliant laugh. Well it's her birthday on the 26th July so I thought I would make her a card using the Explore.


I used flowers and leaves from the Cricut® Flower Shoppe cartridge.

Cricut® Flower Shoppe
What you need...

Electronic die-cutting machine:  Explore - Cricut®
Image cartridge: Flower Shoppe (S120) - Cricut®
Card stock: shades of aqua, turquoise, brown, green
Stamps: Sentiment Sampler - Paper Smooches
Ink pad: Jumbo Java - VersaMagic
Pearls: white (assorted sizes)
Ball tool: 3mm/8mm - McGill
Foam mat
Adhesives

What you do...

On the design canvas insert the flower and leaf images and re-size as desired. Set the Explore to cut out the flowers in shades of aqua, turquoise and brown. Cut out the leaves in shades of green.

Scrunch up the flowers and leaves, then using the large 8mm end of the ball tool, rub the petals/leaves on the foam mat to make them curl up. 

Some flowers have tabs, add a spot of glue to the tab, close up the flower and hold in place for a few seconds for the glue to bond. Assemble the flowers and add a pearl onto the centre of each.

Create a 12cm x 15cm top fold blank and stamp the sentiment in the lower right corner. Arrange the flowers and leaves across the top. When happy with the position, glue each in place.

Ta da!

As you can buy individual images with the Explore, here are the image codes for the flowers/leaves I have used...

Leaf: #M3E197
Flowers: #M4709B; #M441C7; #M472BF; #M3D715; #M4709A; #M46100

I chose the cool hues of aqua and turquoise for something that little bit different and added chocolate browns to add a touch of warmth. I think aqua and turquoise always make a good combination with chocolate brown. Don't ever be afraid to experiment with colour. 

Some crafters are a bit nervous of choosing colours or they are not sure what combinations work. This is one of the reasons I decided to do the Cosmic Colour Challenge. 

There are lots of sketch challenges (which I love) but I wanted to make it a bit easier for crafters to use colour in their projects by having the colours together on one swatch. As the colours are already picked for you, all you have to do is use them to create your beautiful designs.

Talking of challenges, why not give the current challenge a go? Click here to take you to the colour swatch, rules and linky.

A big thanks to all of you have played along so far, I'm really impressed with your projects :o)

So that's me for now. Thank you for popping by. xxx

post signature

Thursday, 12 December 2013

Dream

Hello peepsicles!
Hope you are all fit and well!
I would like to show you, if I may, a card I did back in October for my sister's birthday (I've only just discovered the photo I took of it - oops!).
It's a very simple card, but so pretty.


What you need...

Stamps: Large Flower (CG134) - Hero Arts; Life Sentiments - Kaisercraft
Ink pad: Cloud White - VersaMagic
Card stock: kraft
Pearls: pink

What you do...

Create a top fold kraft card and stamp the flower in the bottom left corner so that it overlaps the edges and the 'Dream' in the top right corner.

Embellish the centre of the flower and around the sentiment with a few pearls.

There you have it, a simple card that looks very elegant. Kraft card looks so boring on its own, but add a bit of colour and sparkle and it transforms into something wonderful.

I will leave you for now. I'd better go and check on the 'girls'. One of them is singing the 'egg song', so I'll go and collect my booty. I'm so proud of them :o}

Ta ta for now, thanks for visiting xxx

post signature

Tuesday, 24 September 2013

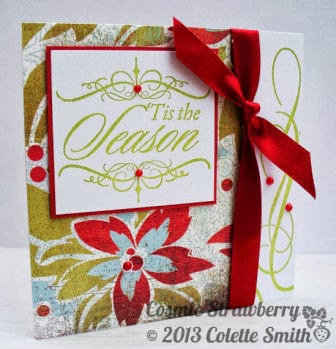
'Tis The Season

How's it going chums?

Just been outside spending time with the chickens. Bren has laid an egg every day now and they are getting bigger (bet it makes her eyes water).

Okay, onto the crafty stuff. I've made a card based on one I did last year (click here to view). I have some lovely papers from the Dasher Collection by Basic Grey that I have been hoarding for a few years; so I decided to dust them off and get them used. Another thing I dusted off was the Christmas Swirls stamp set by Hot Off The Press.
You can still find the papers and stamps out there if you're really sneaky.


What you need...

Patterned papers: Dasher 12" x 12" Collection Pack - Basic Grey
Stamps: Winter Swirls - Hot Off The Press
Ink pad: Tea Leaves - VersaMagic
Card stock: white, deep red
Ribbon: deep red
Flat backed pearls: red
Adhesives

What you do...

Stamp the largest swirl on the right edge of a side fold 13.5cm square blank in Tea Leaves ink. Cover three quarters of the left side with 'Starlight' paper. Wrap ribbon around the card to cover the edge of the paper and tie in a knot at the top.

Stamp the sentiment and a flourish above and below it in Tea Leaves, trim and mount onto red card. Adhere to the top left of the blank. Finish with a few red pearls.

Of course, you can use any papers and swirl, scroll or flourish stamps in your craft stash. This is certainly an elegant card.

Before I sign off, I would just like to say a big hello to all my new followers through Blogger, Bloglovin, Google, Email, Facebook, Twitter and Pinterest. I really appreciate your interest in my blog and for the lovely comments you leave. Thank you!
So, I go for now, thanks for visiting and happy crafting! xxx

post signature

Monday, 17 June 2013

Dad & Retrosketches #56

Heevnin me luvvies!
Hope you all had a fab weekend! I was busy finishing off a commission for Crafts Beautiful, so I didn't get to spend much time in the garden, but it was lovely sitting in my craft room with the window wide open, listening to the birdies :o)
In this post I'd like to show you the card I did for Simon's dad. He doesn't have a tache, but I love taches and I refuse to do an old fuddy duddy card. So here it is....


What you need...

Stamps: He Said Clear Stamps - Teresa Collins
Patterned paper: Quotes 12 x 12; Mustache 12 x 12 He Said She Said - Teresa Collins
Dies: Mustaches -  QuicKutz Lifestyle Crafts; Framelits Circles - Sizzix
Punch: corner rounder
Card stock: dark brown, white 
Ink pad: Wheat - VersaMagic
Alphabet stickers: dark brown
Hemp cord: cream, tan
Buttons: dark brown, blue, tan
Adhesives

What you do...

Round the bottom right corner of a 13cm x 15cm top fold blank. Attach a strip of the Mustache paper down the left side. Cut a banner in circles paper from the reverse side of the Quotes sheet. Attach to the top left with a dark brown button tied with tan hemp.

Stamp the speech mark and lines onto white card in wheat ink. Die cut into a circle and mount onto a larger one cut from the circles paper. Die cut a mustache in brown card and mount onto the circles. Adhere to the lower right of the blank. Finish with blue and tan buttons tied with cream hemp and letters to spell 'Dad'.

Cool eh??? I used the Retrosketches #56 sketch for the layout.


You can find this layout and many more at http://retrosketches.blogspot.co.uk/

This blog is full of inspiration and ideas and some fantastic works of creativity. It's brill if you are stuck on a layout for your card. Don't forget, you can also adapt it slightly to suit.

Well, I'll go for now. I'll be back soon with the card I did for my dad. Enjoy your evening. Toodle-pip! xxx
post signature