Sunday 13 December 2020

Winter Christmas Trees

Hello friends!

I'm back with another card to share with you, this one being Christmas. This is a card I did for my Mum and was inspired by one that Jennifer McGuire created. It is a trifold card where the sides open outwards and uses a beautiful die set by Hero Arts.


What you need...

Dies: 
Winter Pine Fancy Dies - Hero Arts

Stamps:
Silent Night - Concord & 9th

Ink pads:
Chipped Sapphire - Tim Holtz Distress Oxide
Blueprint Sketch
Salty Ocean
Onyx Black - Versafine

Embellishments:
Glass Crystal Collection - Little Things from Lucy's Cards

Extras:
Sparkle Sheer Shimmer Craft Spray - Imagine Crafts
Crystal Clear Sparkle - Spectrum Noir
Titanium White Acrylic Ink - Amsterdam
Adhesives

What you do...

1 To make the trifold section, click here to see the project by Jennifer along with the instructions and measurements - she can explain it better than I ever could!

2 Set the assembled trifold section aside. Cut a piece of card 4¼" x 5½" and blend the three blue inks over the surface. Spritz with the Sparkle spray and use a paintbrush to flick white ink over the surface. Allow to dry.

3 Fix the inked panel to the back of the trifold section. 

4 Add some Crystal sparkle around the edges of the trees and add plenty of the Glass crystals. Stamp the sentiment on the back panel between the trees.

I'm so sorry that the photo doesn't do the card justice, plus it was difficult to position due to the nature of the blank. The best thing is my Mum loved it.

Jennifer did her card with a pink/red/purple background which looked stunning, but I thought I would stick to the traditional blue night sky.

I hope you like my little make and thank you so much for popping by. I'll be back soon with another, until then take care and keep safe.


Tuesday 8 December 2020

Leafy Heart

Good morning all!

Wow! It is a very, very cold and frosty day here in Norfolk. Yesterday afternoon I had taken a friend shopping and the temperature had dropped from around 6°C to 1°C in about 10 minutes. It went from being a bright blue sky to a low lying, freezing cloud.

I've just been out to give the girls some warm porridge. I also now have a pheasant (whom I have named Wilf) residing in the garden. As I live in a rural area and the shooting season is well and truly upon us, he is more than welcome to live in my garden. 

Tomorrow I have to put up some temporary covered housing for the girls as the dreaded Avian Flu has struck again. Everything has to be disinfected and foot baths organised to help keep the risk of infection down. I don't think a lot of people who go out and get chickens on a whim realise some of the things you have to do, especially if your girls free range like mine do. Oh well :(

I want to share with you today a card I made for a dear friend a couple of weeks ago. As the card was for a male friend, I wanted to keep the colours quite masculine without being boring.


What you need...

Dies:
Fall Leaves - Waffle Flower

Stamps:
Painted Shapes - Concord & 9th
Happy Happy Happy - Lawn Fawn

Patterned paper:
Into the Woods Remix 6x6 Petite Paper Pack - Lawn Fawn

Ink pad:
Dark Chocolate - Gina K Designs

Card stock:
White

Embellishments:
Droplets Crystal Clear Hearts - Little Things From Lucy's Cards
Natural twine

Extras:
Foam sheet
Adhesives

What you do...

1 Die cut the leaf outline in white card and the background of the leaf once in foam sheet and once in striped paper. Assemble the leaf then back with the foam.

2 Create an 11cm x 14cm white top fold blank and stamp the heart from the Painted Shapes set centrally at the top in Dark Chocolate ink.

3 Fix the leaf to the heart.

4 Stamp the sentiment underneath the heart.

5 Add a bow made from natural twine to the base of the leaf and add some Crystal Clear Hearts to decorate.

I am a big follower of Cathy Zielske on YouTube and she did a wonderful card using this die set and paper pad. So I used her make as inspiration for my card. You can find her tutorial here.

The colour scheme of the paper pad is perfect for those masculine cards and the plus side is that the patterns aren't overly cutesy or girly.

Well, I think that is me for now. I will be hopefully back soon with some Christmas cards (life just keeps getting in the way).

Thanks for popping by. Keep safe and warm!

Wednesday 18 November 2020

Cold Outside

Good afternoon!

I know I promised another Halloween card, but I got busy and too much time has passed now, so I will share it with you next year...maybe. So, I have a lovely Christmas card instead.

This elegant card uses some simple die cut snowflakes with some Distress Oxide ink a printed die cut sentiment and a touch of sparkle.


What you need...

Dies:
Large Snowflakes - Paper Smooches

Ink pads:
Salty Ocean Tim Holtz Distress Oxide - Ranger

Printed die cut:
Wish Season Ephemera Pack - Fancy Pants Designs

Shimmer Spray:
Sparkle Sheer Shimmer Spray - Imagine Crafts

Embellishments:
Blue Lagoon Lucky Dip - Little Things from Lucy's Cards

Cardstock:
White

Extras:
Foam sheet
Adhesives

What you do...

1 Cut a piece of white card 3⅝" x 4⅞" and apply Salty Ocean ink in the centre with a blending brush or foam pad blending out the edges.

2 Spray Sparkle shimmer over the surface allowing some larger droplets to fall. Allow to dry.

3 Die cut two large snowflakes in white card and three small snowflakes. Arrange onto the inked panel.

4 Mat the inked panel onto a smaller piece of foam sheet. Create a 4¼" x 5½" white blank and mat the panel centrally onto it.

5 Add some gems and sequins to the centre of the snowflakes and add the sentiment with foam pads.

I'm afraid my photo doesn't really do the card justice. I can't seem to get the right settings on my camera for good close up work. The exposure is never spot on. I tend to take the photos in the conservatory with good daylight, but I can't get it right. Any tips would be highly appreciated.

This card would be great using any snowflake dies that you have in your stash along with any printed die cut sentiments you may have or stamp your own. For a different look it would be lovely with a red inked background.

Well, thank you for popping by and I'll be back soon with another Christmas card soon.

Keep safe and take care! x


Monday 9 November 2020

Mwaahaahahaaa!

Good morning!

I hope everyone had a lovely weekend. The weather here in Norfolk was beautiful and I finally managed to get out in the garden and do some tidying up. I did have a lot of help from my chickens. They had a field day. they just constantly followed me round and scattered all the leaves I had raked up. It's so funny to watch.

As promised, I have another Halloween card I made for a friend, I just adore this one.


What you need...

Stamps:
Ghoulfriends - Paper Smooches
Spooky Sweets - My Favorite Things

Ink pads:
Picked Raspberry Tim Holtz Distress - Ranger
Ripe Persimmon
Seedless Preserves
Onyx Black - Versafine

Masking paper:
Stamping Mask Paper - Inkadinkado

Stencil:
Circle Extraordinaire (ST122) - My Favorite Things

Embellishments:
Crystal Confetti - The Stamp Market
Sparkle Crystal Clear - Spectrum Noir
Glossy Accents - Ranger

Card stock:
White

Extras:
Adhesives
Foam sheet

What you do...

1 Cut a piece of white card to measure 4¼" x 5½". Lay down the circle stencil onto the card and secure in place with low tack tape.

2 Stamp the ghoul in the lower right of the circle. Stamp the ghoul onto masking paper, cut out and place over the original image.

3 Start to blend the Distress inks within the stencil working from Seedless Preserves to Picked Raspberry ending with the Ripe Persimmon.

4 Remove the stencil and mask. Use the stars from the Spooky Sweets set to create a cluster of stars in black ink above the ghoul. Highlight the stars with the Crystal Clear Sparkle.

5 Stamp the 'Mwaahaahahaaa!' below the image panel.

6 Trim the panel to 4" x 5¼", back with a smaller sheet of foam and attach to a 4¼" x 5½" white blank. Add some of the Crystal Confetti to decorate.

The Sparkle Crystal Clear doesn't photograph very well and gives the black a dull greyish tinge. In real life it looked great.

As with a lot of my makes I try and use some older stamps sets such as the Ghoulfriends and newer ones such as the Spooky Sweets. I think it's fun to go back and look in your stash and as there is now more choice now of inks, stencils, dies and embellishments you can give those old stamps a new lease of life.

I have one more Halloween card to share with you and then it is onto the ol' Christmas cards.

Thank you for stopping by and I'll see you soon! 


Tuesday 3 November 2020

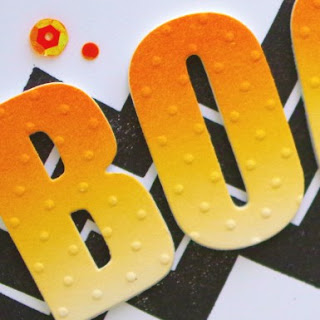
Boo!

Hello there!

I know that Halloween has been and gone, but I did make a few cards for some friends and I just never got round to posting them up to share with you. So, for the next few posts I will show you the Halloween cards I created.


What you need...

Stamps:
Pumpkinhead by Tim Holtz (CMS309) - Stampers Anonymous
Chevron Backdrops - Lawn Fawn

Dies:
Caps Bold - Altenew

Ink pads:
Marmalade - Concord & 9th
Onyx Black - Versafine

Embossing Folder:
Swiss Dots - Cuttlebug

Sprinkles:
Let's Polka - Little Things from Lucy's Cards

Sparklets:
Rainbow - Buttons Galore & More

Card stock:
Black
White

Extras:
Foam sheet
Adhesives

What you do:

1 Trim a piece of white card 4¼" x 5½". Apply black ink to the wide chevron stamp and with the card landscape, stamp the image diagonally across the top.

2 Stamp the pumpkin in the lower right corner, again with black ink.

3 Blend the Marmalade ink onto some white card stock fading it towards the bottom. Allow to dry.

4 Die cut the 'B', the 'O' twice and the 'I' from the blended card and again from a foam sheet. Emboss the letters with the Swiss Dots folder.

5 Attach the blended letters to the foam letters.

6 Create a 4¼" x 5½" white landscape bank and cover with black card. Trim the stamped panel to 4" x 5¼" and mat onto the blank.

7 Attach the letters to the blank over the chevrons, using the 'I' as an exclamation mark. Add some orange sequins from the Sparklets Rainbow and orange dots from the Sprinkles Let's Polka.

Ta da! A spooky card. Keeping the colour scheme to white, black and orange gives the card a fresh look whilst maintaining the Halloween feel.

Okay, I want to promote something now. I was never happy with the bone folders I had in my stash. They always seemed to leave shiny marks on the paper/card stock. I saw that a lot of card makers used a Teflon bone folder, but I couldn't justify paying around £26.00 for one.

I did some searching and found a company based here in Norfolk that specialises in book binding and preservation. They sell two sizes of Teflon bone folders, a medium one for £7.95 and a large one for £8.95 excluding VAT. Even with postage and VAT added I still only paid around £14.94. 

To me, it looks exactly the same as the ones sold for crafting. I love it and no more shiny marks. It scores very smoothly and has some weight to it, perfect for strengthening those folds. The company is called Preservation Equipment Ltd, click here to take you to the bone folder page.

Well, that's me for today. I will try to get the other cards uploaded in the next couple of days. Thank you for popping by!

Take care and keep safe x


Monday 12 October 2020

Home Sweet Home - Concord & 9th

Good morning!

It's been a few weeks since I last posted...time, where does it go? Some friends of mine recently moved from the village down to Surrey so I thought I would make them a new home card.

I've had the Floral Print Silhouette Stamp set from Concord & 9th for some time and have been itching to use it. Like most stamps and dies, you know exactly what occasion or project they will be perfect for. I decided to team the stamp set up with a set of dies by Sizzix called Townhouse which has several cute little houses you can cut and assemble.

For this card I just wanted to cut the house silhouette and use a couple of the inner pieces to add some detail. The stamp set comprises of three layers that you stamp in different colours. They need to be lined up perfectly to build up the whole image. A stamp positioning tool is really helpful when using this set.

I chose a black background for the main stamp section and added a lovely sea glass colour for the blooms and lime green for the foliage. This created a beautiful crisp, fresh image.
What you need...

Stamps: 
Floral Print Silhouette Stamp Set - Concord & 9th

Dies: 
Townhouse (661378) - Sizzix
Circles

Ink pads:
Onyx Black - Versafine
Sea Glass - Gina K
Key Lime
Clear Ultra Slow Drying Embossing Pad - WOW!

Embossing powder:
Opaque Bright White Super Fine (WL01SF-O) - WOW!

Embellishments:
Droplets - The Stamp Market

Card stock: 
White
Black

Other:
Foam sheets

What you do...

1 Use a stamp positioning tool to stamp the first layer of the floral image with black ink. Next, line up the flower section and stamp in Sea Glass. Line up the foliage layer and stamp in Key Lime ink.

2 Die cut the stamped panel with a circle die. Die cut the town house with the gable roof and small heart from the centre. 

3 Use the large heart from the set to cut a section around the small heart from the positive piece.

4 Die cut a smaller circle than the stamped section from a foam sheet, then cut a house from the centre of it. Attach the foam to the back of the stamped circle making sure you line up the edges.

5 Attach the stamped gable decoration and the heart section to the die cut foam pieces cut from the house.

6 Create an 11cm x 14cm white blank and adhere the stamped panel at the top. Add the gable and heart details.

7 Cut the 'Sweet Baby' stamp in half and use the 'Sweet' portion and the 'Home' stamp to create the sentiment. Ink up with clear embossing ink and emboss with white embossing powder and trim.

8 Mat the sentiment under the house panel and add some clear droplets to finish.

As more American products are getting popular over here in the UK, I am finding that I want to use the US A2 card size to create my makes and these obviously fit the American full dies and stamps better than the UK A6. The nearest cm equivalent is 11cm x 14cm. 

I actually find this a lovely size to work on. This card size still fits nicely into an A6 envelope. As I always make my own blanks, using US A2 isn't an issue for me. I do like to make more unusual card sizes and make my own envelopes if needed.

Also, don't be afraid to cut into your photopolymer stamps. Providing you cut between words, you can  make the stamp go further and it can always be used as intended when lined up on an acrylic block.

I really enjoyed making this card and the stamp set is lovely. I hope Rosanna & Simon like it. I am going to miss them.

Thank you for stopping by. I have been making lots of simple and quick Christmas cards using pre-printed die cuts, so I will be back soon to share them with you. TTFN!
          

Thursday 24 September 2020

Moonlight Deer

Good afternoon!

I'm back with another Christmas card. PaperCrafter asked some of its designers about their Christmas card makes for a feature in the current issue (#152). At the time I was working on a lovely card featuring some reindeer, a gorgeous moonlit sky and snowy background.
What you need...

Dies: 
Delightful Deer - My Favorite Things
Birch Trees - Mama Elephant
Stitched - Paper Smooches
Circles - Sizzix

Stamps:
Christmas Sampler

Ink pads:
Tim Holtz Distress Oxide Blueprint Sketch - Ranger
Tim Holtz Distress Oxide Salty Ocean
Onyx Black - Versafine

Masking paper:
Masking Magic - Gina K

Card stock:
Brown
Tan
White

Embellishments:
Itty Bitty Stars Rainbow Delight - Little Things from Lucy's Cards

Gel pen:
White UM-153 - Uni-ball Signo

What you do...

1 Cut an 11cm square of white card. Cut an 11cm square of masking paper and die cut a 9cm circle in the centre. Place over the white card stock.

2 Die cut a 2.5cm circle of masking paper and place within the circle.

3 Blend the Blueprint Sketch and Salty Ocean inks within the circle making it lighter around the inner circle. Remove the masks.
4 Create a 12cm x 14cm white blank and mat the blended panel centrally at the top.

5 Die cut three birch trees in white. Place one at the left. Use the curved stitched die to create a snowbank approximately 5cm deep and attach to the bottom of the blank. 

6 Add some snow in the sky with the white gel pen.
7 Die cut the two reindeer and assemble.

8 Add the two remaining birch trees and one of the reindeer.
9 Create another smaller snow bank and fix to the bottom of the blank along with the remaining reindeer.

10 Add a sentiment to the bottom left. Finish with a few stars.

I'd taken some extra photos of the process in case they wanted them for the feature, so rather than waste them I thought it would be a good idea to use them in these instructions.

I was so pleased with this card and the colour scheme is crisp and fresh.

Also in the magazine I have an adorable reindeer card. This one showcases a spin element where several reindeer dance around Rudolph sitting the middle. This is featured in my monthly Step by Step tutorial, where you can learn a technique in 9 steps. It is simple to make and such fun to play with.
PaperCrafter issue 152 is out until 15th October. For more ideas, free templates, projects and inspiration why not pop over to the PaperCrafter website?

Well, this has been quite a long winded blog post. I normally don't do posts about my magazine makes but I just wanted to share this adorable reindeer spin card with you.

Thank you for popping by and I'll be back soon with another make.


Tuesday 15 September 2020

Winter Snowglobe

Hello all!

I hope you are all well. I have a little Christmas card to share with you today. This features a cute little snow globe die set from Sizzix and was inspired by the wonderful Pete Hughes. There are a few of these little sets available and the domes are purchased separately. 

What you need...

Dies: 
Tiny Snowglobes by Tim Holtz (663119) - Sizzix

Snowglobe domes:
Dimensional Domes by Tim Holtz (663559) - Sizzix

Ink pads:
Turquoise Gem - VersaMagic

Card stock:
Turquoises
White

Gel pen:
White

Fonts: 
Raleway
Beach Script

Glitter: 
White iridescent

What you do...

1 Print the sentiment onto white card and trim to 6.5cm x 9.5cm.

2 Blend the Turquoise Gem ink from the top fading down to white.

3 Die cut the aperture centrally at the top and attach the dome.

4 Die cut two small trees and their branches from shades of turquoise card. Attach to a piec of white card so that they will sit perfectly within the globe.

5 Fill the dome with some iridescent glitter and place the tree panel on the back to seal.

6 Create an 8.5cm x 12.5cm white blank and attach the dome panel with foam tape. Use the white gel pen to add snowflakes.

There are lots of little Christmas/Winter images within this set, so you can chop and change along with the colour scheme. Of course you can use these dies without the domes to create flatter cards or gift tags. The die set also includes a snowglobe base.
The fonts were downloaded from FontSpace. They are free to use for personal use, however if you plan to sell your cards then you will need to purchase them for commercial use.

You can check out more inspiration for this die set by Pete Hughes by clicking here.

Thank you so much for popping by and I'll be back soon with another card to share!


Monday 24 August 2020

Stitched Hearts

Hello there!

I hope you are all well. I would like to share with you, if I may, a simple little card featuring a cute heart taken from the Paper Smooches stamp set - Needle Little Love. 

This card combines simple masking and stamping techniques. I finished off the card with the word 'Hi', but it could be adapted to a Valentine's or anniversary card by simply changing the sentiment.


What you need...

Stamps:
Needle Little Love - Paper Smooches

Ink pads:
Magenta - Avery Elle Pigment Ink 
Orchid
Raspberry
Onyx Black - Versafine

Masking paper: 
Stamping Mask Paper - Inkadinkado

Card stock:
White

Gems:
Clear

What you do...

1 Stamp a vertical row of four hearts onto white card with the Onyx Black ink so the stitches line up.

2 Stamp the hearts onto masking paper and cut out. Place over each of the hearts.

3 Apply the inks over the hearts so the paler shade of pink is at the top blending down to the deeper shade.

4 Remove the masks and trim the hearts leaving a narrow white border down each side.

5 Mat the heart strip down the left side of a white blank 10.5cm x 15cm trimming away any excess from the top and bottom. Stamp the 'hi' in the lower right corner and finish with some clear gems.

Sadly Paper Smooches are now closed for business. I will however continue to use their stamp and dies sets as they have such wonderful images and they are one of my favourite go to companies. Plus, I know a lot of people own many of their products. So look out for more of my makes featuring Paper Smooches!

Well, I have to sign off now. Thank you for stopping by and I'll be back soon.Take care!


Sunday 9 August 2020

Rainbow Unicorn

Good afternoon blog friends!

I'm back with an adorable make using a stamp and die set that I have been itching to play with. I have had it some time, but a friend asked to make a card for her granddaughter's birthday. As she loves unicorns I thought this was the perfect set to use.
What you need...

Stamps:
Decorate A Cake Stamp Set (CM438) - Hero Arts

Dies:
Decorate A Cake Frame Cuts (D1741) - Hero Arts

Promarkers:
Fresh Bloom*
Magenta
Mandarin
Yellow
Lime Green
Cyan
Cool Aqua
Purple

*Limited Edition

Ink pad:
Obsidian Amalgam Ink Pad - Gina K

Sprinkles:
Let's Polka - Little Things From Lucy's Cards

Patterned paper:
Really Rainbow 6x6 Paper Pad - Lawn Fawn

Card stock:
White

Font:
Enjoy Writing - Khurasan

What you do...

1 Stamp the cake and add the eyes and icing. Stamp the flower cluster, the large flower, the horn and two ears.

2 Colour in the images and cut out using the coordinating dies. Assemble the cake.

3 Create an 11cm x 18cm white card blank. Cover the bottom 6cm with rainbow paper.

4 Print a sentiment, trim and fix to the rainbow section with foam pads. 

5 Attach the unicorn to the top of the blank and add sprinkles around the image.

The font that I used is for personal use only, I must point out that I do not make cards to sell and I did not charge my friend for this card, so the use of this font was for personal use. Free fonts are okay to use for personal use, however if you do sell your cards, then you will have to purchase a commercial use version. To access this and many more by Khurasan check out FontSpace  or dafont.com

I decided to go with a tall blank for this make. Tall cards seem to be making a come back at the moment, I remember when tall slim and DL sized card were all the rage. 

I was really pleased with how this card turned out. The photo doesn't really do it justice and it is so cute in 'real life'. Needless to say, my friend was very pleased with it.

Okay, I'm going to sign off for now. Enjoy the rest of your weekend and I'll be back soon.


Sunday 26 July 2020

Rainbow Heart

Hello there!

Sorry I haven't been around for a while. I recently went away for a few days with some friends to a remote cottage up in the Lake District. We did lots of walking and laughing! After getting home, I had to get a few projects done for the magazines, so sadly the blog had to wait.

Well I'm back now! I have a lovely little heart/rainbow themed card to share with you. I hope you like!

What you need...

Stamps:
Positive Strokes - Paper Smooches

Dies:
Hello Love - Paper Smooches

Ink pads:
Bluebird - Wendy Vecchi
Buttercup
Tiger Lily
Peony Purple - Impress
Sour Apple - My Favorite Things
Melon Mambo - Stampin' Up!

Gems:
Black

Card stock:
Black
White

What you do...

1 Trim a piece of white card 10cm square. Stamp the brush strokes vertically down the left hand side in rainbow colours.

2 Cover a 10.5cm square blank with black card and mat the rainbow panel onto it.

3 Die cut the heart several times in black card (I did five) and stack together with wet adhesive.

4 Attach the heart towards the right of the blank. Add some gems to decorate.

I love the bright rainbow brush strokes against the white background and the black just makes the whole thing pop.

Stacking several die cuts really makes the image pop. You can get the same effect by cutting the image once in your chosen card and then once in craft foam. A great technique.

Well, that is all for now. Thank you so much for stopping by and I'll be back soon with another make. It won't be long now before I start posting Christmas makes up - yikes!

Take care!