Tuesday 28 July 2015

Beach Crab - Bugaboo/Incy Wincy

Good evening peeps!

It's been a soggy day here again today :o( Good job I didn't put any washing out and I begrudge using the tumble dryer in the summer.

I must apologise for the lack of posts over the last couple of months. I've been so bogged down with work and other things going on. I never seem to have enough time to do 'me' things lately. Things are easing off now, so hopefully I can get more of my own makes done and posted up for you.

Onto more important stuff - this week's challenge over at Incy Wincy. It is Summer Lovin'! Our fab sponsor is the ever popular Bugaboo.

I picked an amusing little crab holding a bucket and spade (well, I do live a couple of miles from Cromer - famous for its crabs).

Here is my make...


What you need...

Digital stamp: Beach Crab Bucket - Bugaboo
Card stock: bright blue, bright yellow, pale yellow, white
Promarkers: Amber, Azure, Bright Green, Bright Orange, Ice Grey 1, Praline*, Sand Dune*, Sunset*
Dies: Circles - Sizzix; Hello Sunshine - Lawn Fawn 
Punch: corner rounder
Baker's twine: blue, yellow
Gems: blue
Adhesives

* Limited Edition Colour

What you do...

Re-size the image, colour in and cut out.
Die cut a large circle in blue a smaller circle in pale yellow, the sun in bright yellow and two clouds in white card.
Round the corners of a top fold A6 blank.
Fix the dies cut motifs onto the blank, as shown and then the crab.
Hand write a sentiment around one of the circles and finish with baker's twine wrapped around the top of the blank and a few gems.

I just adore this little chap. I'm a big fan of Mr Krabs from Spongebob Squarepants and Sebastian from the Little Mermaid, so I had to have him :o)

Bugaboo is filled to the brim with gorgeous images, some very cute and some very witty, there is something to suit everyone. Click the badge below to take you to the store.


Why not head on over to Incy Wincy? My super talented teamies have come up with fantastic inspirational makes for you.

I'm going to sign off for now. Thank you for dropping by! xx
post signature

Tuesday 21 July 2015

Be Merry - Aurora Wings/Incy Wincy

Heevnin' peeps!

How's things with you? I've been very busy with illustrations and commissions for upcoming issues of Crafts Beautiful and PaperCrafter magazines. I'm sworn to secrecy and can't say what I've been doing, you'll have to wait until the magazines hit the shops! Sorry!

I can tell you that there is another fab challenge at Incy Wincy this week - Things with Wings! Our lovely sponsor is Aurora Wings.

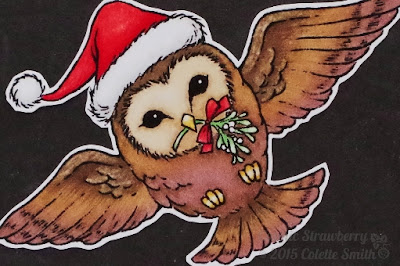
I chose a cute image called Christmas Owl.


Image by Aurora Wings - Coloured in by me!

What you need...

Digital stamp: Christmas Owl - Aurora Wings
Card stock: white
Patterned paper: December Documented 6x6 Paper Pad - Simple Stories
Promarkers: Apple,Champagne*, Chilly Red*, Fire Wood*, Ice Grey 1, Meadow Green, Molten Red*, Praline*, Sleigh Bell*, Tawny Owl*
Baker's twine: red
Gems: clear
Adhesives

* Limited Edition Colour

What you do...

Re-size the image, colour in and cut out.
Cover an A6 blank with the 'Be Merry' paper so that the wording runs across the bottom of the blank.
Stick the owl above the wording at the right.
Wrap and tie twine around the fold of the blank and add a few gems to the flourish.

This little owl just melts my heart, he's adorable. I can't say this is my first Christmas card of the year as I've been doing Christmas makes for the magazines for a couple of months now.

My talented teamies over at Incy Wincy have come up with great inspirational makes for you. Pop on over and say hello, we'd love to hear from you.

If you'd like to go shopping, then click the Aurora Wings badge below to take you to the store. You'll be spoilt for choice!


I'm going to sign off now, but I'll be back soon. Thank you for visiting! :o) x


post signature

Thursday 16 July 2015

Cool Dude - Cricut® Explore Air

Hello chums!

Has it been a lovely sunny day where you are? It's been glorious here, except I've been inside doing some illustrations.

I have another of the little note cards to show you. Tashes are still very popular and this one is perfect to send to that special 'dude' in your life.


What you need...

Digital die image: Facial Wear (M365CF) - Brooklyn cartridge  - Cricut®
Font: Simply Sweet cartridge - Cricut®
Card blank: Midnight Blush Capsule Collection A7 Cards and Envelopes (20 pack) - Papermania
Cricut® Vinyl - Linen


What you do...

Select the images and add to the Design Space. 
Re-size to suit.
Add the text and re-size.
Cut out in Linen vinyl.
Apply the tash and sentiment to the front of the blank.

The Facial Wear image has the spectacles, the tash and a bow tie, so you could get three cards from just one cut, or save for another make at a later date. 

The Midnight Blush set of cards includes black, two shades of grey and a lovely oyster colour. 

I hope you like this little make. Sometimes it's nice to do quick little cards.

Thank you for stopping by and I'll be back again soon. xx :o)

post signature


Tuesday 14 July 2015

I'm Nutty For You - Flat Friends/Incy Wincy

Heevnin' chums!

I hope you are all happy and well!

We have another exciting challenge for you at Incy Wincy this week - Doodle What?? You have to add a doodled 'something' to your design.

Our sponsor this week is the wonderful Flat Friends by Emma Canning. 

I chose the cute Squirrel Scene, I doodled some clouds and a border and here is my make.


What you need...

Digital stamp: Squirrel Scene - Flat Friends
Card stock: white
Promarkers: Bright Green, Grey Squirrel*, Lime Green, Pear Green, Pink Mittens*, Saddle Brown*, Umber
Fine liner: black
Gel pen: white
Adhesives

* Limited Edition Colour

What you do...

Re-size the image, add a sentiment underneath the image, print and colour.
Mat onto a top fold A6 blank.
Doodle some clouds and a border.

I adore this little fellow's face, he's so cute!

I do hope you will pop on over to Incy Wincy and take part in this week's challenge. We always love to see your beautiful creations. The very talented DT have come up with some great inspiration if you are stuck on what to doodle.

Click on the badge below to take you to Emma's lovely store. There are oodles of gorgeous images to be bought!


Thank you for visiting me today and I'll be back soon. TTFN!

post signature

Thursday 9 July 2015

Hello Heart - Cricut® Explore Air

Good evening peeps!

I do hope you are all well :o)

I have the second of ten note cards to show you that I created using the Cricut® Explore Air. this one is a simple little heart with the word 'hello' cut out of it. I did the heart in the Midnight Vinyl and stuck it to a lavender A7 card. 


What you need...

Digital die image: Note Card (Heart) (#M36FE9) - Fabulous Finds cartridge - Cricut®
Font: Simply Sweet cartridge - Cricut®
Card blank: French Lavender Capsule Collection A7 Cards and Envelopes (20 pack) - Papermania
Cricut® Vinyl - Midnight

What you do...

Select the images and add to the Design Space. 
Re-size to suit.
Add the text and re-size. Lay over the heart and image and 'slice'. 
Cut out in Midnight vinyl.
Apply the heart to the front of the blank.

I sliced the image which means that the text is cut out from the heart. When the machine cuts the heart out it also cuts out the lettering within the image. The good thing is that you can keep the cut out letters for another project!

So simple!

That's me for this evening, I had better go and put my chickens to bed. They stay up really late at the moment. Thanks for popping by and I'll be back soon.  xx

post signature

Monday 6 July 2015

How About A Nice Chianti? - Dr Digi/Incy Wincy

Good heevnin' chums!

How be you this fine night?

Incy Wincy has a great challenge again this week - Spots and Dots! Our sponsor is the brilliant Dr Digi's House of Stamps.

I purchased a great image from Dr Digi a while ago called Hello Hannibal. It's part of a collection with the Hello Kitty as famous horror film characters. I just love them!

I added a film appropriate sentiment from 'The Silence of the Lambs' and this is what I came up with...


Hello Hannibal by Dr Digi

What you need...

Card stock: white
Patterned paper: black/white spot
Natural garden twine
Adhesives

What you do...

Re-size the image, add the sentiment and print.
Mat onto a top fold A6 blank.
Cut a rough edge along a piece of black/white spot paper and stick to the top of the blank above the image.
Fray the garden twine, wrap and tie around the top of the card.

I used a font called Evil Bunny for the sentiment. It was a free font download from dafont.com. Click here to take you the download page.

Please click on the Dr Digi badge below to take you to the store. There are some wonderful and quirky images to be found.


The very talented Design Team over at Incy Wincy have come up trumps again with some fantastic inpirational samples for you drool over. Why not pop on over and say hello?

Okay, I'm going to sign off for now. I'll be back soon with another little note card created with the help of the Explore Air. Until then xxx

post signature

Sunday 5 July 2015

You Fog My Spectacles - Cricut® Explore Air (and a review)

Hello! Happy Sunday!

I mentioned in a previous post that I had made a set of note cards for the Zumbathon raffle. I did ten cards for the set each with a different design. I made another set of the same designs, the first one I'd like to share with you is 'You fog my spectacles'.


I used the Facial Wear (#M365CF) from the Brooklyn Iron-on cartridge and the font is Simply Sweet.

All the cards in the set are A7 size with matching coloured envelopes.

What you need...

Digital die image: Facial Wear (M365CF) - Brooklyn cartridge  - Cricut®
Font: Simply Sweet cartridge - Cricut®
Card blank: Midnight Blush Capsule Collection A7 Cards and Envelopes (20 pack) - Papermania
Cricut® Vinyl - Linen


What you do...

Select the images and add to the Design Space. 
Re-size to suit.
Add the text and re-size.
Cut out in Linen vinyl.
Apply the spectacles and sentiment to the front of the blank.

Ta dah! Quick and easy! Use the Cricut® Transfer Tape for easy placement of the images.

Okay, so I said I would give an honest review of the new Cricut® Explore Air. So how does it differ from the original Explore?

The Explore Air still has all the great features of the original but with a few small changes, one being that it comes in a gorgeous pale blue and white colour, whereas the original was in the traditional Cricut® green and white,

The other is that it now has inbuilt Bluetooth so can use it wireless from your laptop, pc or iPad. There is also an app available for the iPad. You can upload your own images. Everything is stored on the Cricut cloud so you will never lose an image or project! 

With the wireless you can sit in the comfort of you armchair an create you design. Providing you have your materials set up, you can cut from a distance! Great if you don't have a lot of craft space.

I found the machine to be a lot quieter when cutting. The machine beeps as each cut is made and was quite loud on the original machine.

There are still over 50,000+ images for you to download and purchase and of course you can still purchase full cartridges if you wish.

There is also the Smart Set Dial which enables you to quickly and easily choose your cutting material.

There are lots of materials and accessories that can be purchased separately such as Vinyl, Iron-on, Stencil Vinyl, Window Cling, pens and tools.

From opening the box you can be making your first project in minutes it is so easy to set up.

Many images can be printed, this can include your own too. Special printer sticker paper is available so you can print your own stickers.

Are there any cons to the Explore Air?

Honestly, I would say no. The only thing that I find is, if you have an Android tablet you can't use the app as it is only available for the iPad at the moment. It would have been good if an Android app was devised at the same time.

My laptop (runs on steam power) is about 5 years old now and doesn't have the capacity for Bluetooth, so I can't use it wireless. Even though I'm lucky to have a large craft room with two big desks, space is always a premium. Shame my laptop doesn't have the Bluetooth, this would have been good as I could have it on the other desk behind me, freeing up space on my main desk.

I'm not a fan of anything 'i' or Apple related and refuse to get an iPad. So I will just have to wait until an app for the Android is available before I splash out on a tablet.

Here is a list of the features and what you get in the box...

Features
  • Embedded Bluetooth for wireless cutting
  • Dual carriage for and writing or cutting and scoring in one step
  • Upload you own images for free (.svg, .jpg, .png, .gif, .dxf)
  • Cut materials from vellum to leather
  • Smart Set dial for easy material settings
  • Free Cricut Design Space™ online software and iPad app
  • Cut Smart precision cutting
  • Works with Cricut® cartridges
  • Cuts printable images
  • Integrated storage compartments
In the box
  • Storage bag
  • USB and power cords
  • Premium blade
  • 12" x 12" standard grip cutting mat
  • Accessory adaptor
  • Metallic silver pen
  • Card stock sample
  • Iron-on sample
  • More than 100 free images
  • Getting started guide
As soon as I get an updated laptop or a tablet, I will let you know what I think of the wireless function.

If you are seriously considering splashing out on a Cricut® Explore Air then I would highly recommend it. It is so simple to use and the images available are gorgeous. The problem is which one to choose. I can spend hours looking through and still not decide on which one to use!

Well that's me for the moment. Thanks for popping in and I'll be back soon! xx

post signature

Thursday 2 July 2015

Birdie Bag - Using Cricut® Explore Air

Hello crafty friends!

I hope you get this post as it is a scheduled one. I'm at the Royal Norfolk Show today then my Zumba class tonight - phew!

The wonderful peeps at Cricut® and Ranieri sent me a new Cricut® Explore Air. I went to a sneak peek launch back in March at the Berkeley Hotel where we were treated to the most wonderful afternoon tea.

I will give you my honest opinion and review of the machine in a later post.

I did a charity Zumbathon last weekend and for my raffle prize donation I made a cute shopper bag and a set of fab note cards.

Here is the bag I made...


What you need...

Digital die image: Bird (#M354D9) - Wild Card Cartridge  - Cricut®; Speech Bubble (#M38C10) - Close To My Heart - Artiste Cartridge (Z1790)
Font: Block -  Ashlyn's Alphabet Cartridge - Cricut®
Cricut® Iron-on Glitter - Pink, Silver; Iron-on Lite - Teal
Bag: 100% cotton - white

What you do...

Select the images and add to the Design Space.
Add a text box and create the 'tweet'.
Cut out the bird in pink glitter, the 'tweet' in silver glitter and the speech bubble in teal iron-on.
Apply the images to one side of the bag, following the iron-on instructions.

I hope the photos look okay. Bags are a bit dodgy to arrange. 

I'm going to create a load more with different images to sell on my crafty boot sale later in the summer. Methinks I'll be purchasing lots of rolls of Iron-on...whoop whoop!

I will be back soon as I said before, with my thoughts of the Explore Air and I will be starting to do posts the note cards. 

Until then, thank you for calling by! xx

post signature

Wednesday 1 July 2015

Cosmic Colours Challenge #15 - Win a £10.00 Gift Voucher from DigiStamp Boutique!

Hello again!

I'm here with this month's challenge - hooray!

For the Winner and Top 3 of Challenge #14, please scroll down to the last post :o)

Okay, I've picked another bright and summery palette for you...

Color Scooped - Design Seeds®

This month the lucky winner will receive a £10.00 Gift Voucher from DigiStamp Boutique!


Here is my card using the colours from the palette...


I used the blues, pinks and the brown on the flower and the green on the leaves (obviously).

The winner can grab a Challenge Winner 'brag badge' to proudly display on their blog.

Three runner up cards will be chosen and they can grab the Challenge Top 3! 'brag badge' to proudly display on their blog.

There is also a 'play along' badge that you can grab if you wish. The codes can be found in the 'Cosmic Colours Challenge Badges' page.

The challenge will run until 31st July 2015 - 23:55 (GMT+1)


Just before I sign off, please read the challenge rules as I have added a new one about the winner claiming their prize.

I can't wait to see what you create - good luck!

Challenge rules...


post signature

Cosmic Colours Challenge #14 - Winner and Top 3!

A bright and sunny hello to you all!

We are basking in sunshine here - Wa-hey! Isn't it lovely after the chilly start to the summer?

Thoughts of bright, sunny days brings me to the bright, sunny colour palette for the Cosmic Colours Challenge #14. There were some fantastic entries and it was difficult as usual to pick the Winner and Top 3, but I managed it :o)

I won't keep you in suspense any longer!

The lucky winner of the $10.00 Bugaboo Gift Certificate is...

#8 - Cornelia!


Congratulations Cornelia! I love the simplicity of this and the colour spots really stand out. If you send me your full name and email address through my contacts page, I will send your scrummy prize to you! Don't forget to grab your 'Winner' badge to proudly display on your blog.

The Top 3 are...

#11 - AJ
#12 - Scrapper Myra
#14 - Olivia

Well done ladies! Please grab your 'Top 3' badge for your blog.

I will be back later with a new challenge for you with another bright, summery colour palette.

Thank you all again for your lovely entries, I do appreciate you taking the time to enter!

Ta ta for now xx :o)

post signature