Showing posts with label Concord & 9th. Show all posts

Tuesday, 25 May 2021

Cute Elephants

Hello there!

I'm back again with another card...well four actually. I have a cute elephant die set by Sizzix/Craft Asylum in my stash. It's a few years old now and I thought it was about time I played with it again.

I wanted to make a thank you card using the die with four colours. I love the Concord & 9th card stock and inks so I put them to use. I wanted the main card to be a light grey elephant with pale pink, dark pink and dark grey details. I used the Ballet Slipper, Honeysuckle, Dove and Mushroom shades of card. Rather than waste the extra pieces or put them in a baggy to forget about, I decided to make another three additional cards.

For the speech bubble, I used the Ballet Slipper ink, which matched perfectly with the pale pink detailing.


What you need...

Dies:
Elephant Duo (660496) - Craft Asylum/Sizzix

Stamps:
Sketchy Thoughts - Winnie & Walter

Ink Pads:
Ballet Slipper - Concord & 9th
Onyx Black - VersaFine

Card stock:
Ballet Slipper - Concord & 9th
Honeysuckle
Mushroom
Dove
White

Extras:
Adhesives

Tools:
Big Shot - Sizzix

What you do...

1 Die cut the large elephant in Ballet Slipper, Honeysuckle, Mushroom and Dove.

2 Back the detail apertures of the elephant with low tack tape and infill the apertures with Ballet Slipper, Honeysuckle and Mushroom.

3 Mat the elephant onto a white 4¼" x 5½"  (11cm x 14cm) blank.

Stamp the speech bubble above the elephants trunk in Ballet Slipper. Stamp the sentiment within the speech bubble with Onyx Black ink.

These would make a great little gift set if you teamed them up with some matching envelopes and either tied them up with pretty ribbon or placed in a gift box. You can never have too many thank you cards.

Before I go, a wonderful store based in London reached out to me the other day. They are called Joel & Son Fabrics and they sell high end, designer and luxury fabrics. 

I've visited their website and there are truly some gorgeous fabrics to choose from. Perfect if you are making a special gown, outfit or wedding dress. Maybe you want to make some luxury soft furnishings to spice up your home decor. 

They sell everything from good quality cottons to luxurious designer silks. As someone who does sew occasionally and collects fat quarters 'just in case', I did ooh and aah over some of the fabrics.

Joel & Son Fabrics also carry the Royal Warrant from H.M. Queen Elizabeth. 

Why not pop on over and have a look ? Click here to take you to their store. I will also have a link in the Craft & Digi Stamp Shops page.

Thank you for popping by and I'll be back soon. Take care!


Thursday, 6 May 2021

miss YOU

Hi there!

As promised I'm back with another make. I decided not to share the remaining cactus card with you today, I will share it at a later date. I wanted to show you another card instead.

I purchased the You Confetti Cuts die set by Reverse Confetti some time ago and thought it was about time I used it.

As it is a large word die with a shadow background, I wanted it to be the main focus of the card and team it up with some other lettering/wording. The good thing about this die is that it can be used with many other words for different themes/occasions.


What you need...

Dies:
You Confetti Cuts - Reverse Confetti
Bee Bold Lowercase Honey Cuts - Honey Bee Stamps
A2 Layers Die Rectangles - Waffle Flower

Stencil:
Splash (TESN28) - Taylored Expressions

Stamps:
Chit Chat - Paper Smooches

Ink Pads:
Turquoise Gem  - VersaMagic
Onyx Black - VersaFine

Card stock:
Black - Concord & 9th
Grapefruit
White

Extras:
Adhesives

Tools:
Big Shot - Sizzix
Blending brushes

What you do...

1 Lightly blend the Turquoise Gem ink over white card. Secure the stencil over the inked card and blend the Turquoise Gem over the stencil creating a heavier tone. Remove the stencil and allow the inked card to dry.

2 Die cut the 'you' in black card along with letters form the Bee Bold set to spell 'miss'. Die cut the 'you' shadow in white and the little heart in Grapefruit. Assemble the 'you' dies and add the heart with foam pads.

3 Use the second largest die from the A2 Layers set to cut a rectangle from the inked/stencilled card.

4 Line up the letters/wording onto the stencilled panel and using these as a guide, stamp the 'so much' in Onyx Black.

Create a 4¼"x 5½" white blank and mat the stencilled panel onto it. Attach the 'you' with foam pads and stick the 'miss' directly onto the panel above the 'you'.

There we have it. The photo of the card doesn't really show the true colour of the ink, it is certainly more of a greener turquoise hue in real life.

I am so pleased with the way this turned out. I am planning to keep on using older items (such as the stamp set) along with newer items in future projects. I have recently discovered some really old stamp sets/dies in my stash that I would like to use again. Watch this space!

As usual, thank you so much for popping by, I really appreciate it. Take care and I'll be back soon.


Monday, 26 April 2021

Looking Sharp

Hi there!

I hope everyone is keeping safe and well. 

I mentioned in my last post that I have been making a few cactus themed cards lately. The card I want to show you today is a mix of stamping, ink blending and Nuvo Glimmer Paste. So, without further ado, let's get to it.


What you need...

Stamps:
Multi-step Cacti Stamps- Reverse Confetti
Stuck on You (ST-18-42) - Avery Elle

Dies:
Multi-step Cacti Dies - Reverse Confetti

Stencil:
Square Extraordinaire - My Favorite Things

Ink pads:
Honeysuckle - Concord & 9th
Parsley
Sea Glass
Sprout
Walnut Stain - Tim Holtz Distress
Carved Pumpkin
Onyx Black - Versafine

Glimmer paste:
Moonstone - Nuvo

Card stock:
White

Extras:
Black/white Washi
Adhesives

Tools:
Big Shot - Sizzix
Stamping platform - MISTI
Media spatulas - Nuvo

What you do...

1 Create a top fold white blank 4¼"x 5½" (11cm x 14cm) and place the stencil onto the blank, securing with some low tack tape. Blend the Sea Glass ink within the stencil so it is darker at the top and fading to wards the bottom. Allow to dry.

2 Spread the Moonstone paste over the blended area, allow to dry. (Remove the stencil immediately and place in a bowl of water or wash, along with the spatula). 

3 Stamp the solid parts of  the three cacti onto white card along with the flower. Over stamp the detail with black ink.

4 Stamp the outlines of three pots. Blend some of the Walnut Stain and Carved Pumpkin together to create a terracotta colour, add some water and paint the pots.

5 Die cut the cacti, pots and flower and assemble. Attach to the card blank overlapping the Moonstone section.

6 Add a strip of Washi across the base of the blank and add the sentiment above, towards the right.

I had such fun making this little cutey. It was great building up the cacti. You can add as much or little detail as you wish to each cactus.

I do have some more cacti themed cards, these are slightly different in that they are created using the Silhouette Cameo, so stay tuned for those.

I am going to enter this card into the Crafty Creations Challenge #420 - Anything Goes. Click here to take you to the challenge.

I am also going to enter it into the Creative Finger Challenge #206 - Anything Goes. Click here to take you to the challenge.

Thank you for popping by and I'll be back soon!


Tuesday, 20 April 2021

Floral Heart

Good afternoon!

I hope you are enjoying the lovely spring weather. I popped out this morning to get my annual tomato plants ready to put in the greenhouse. I also picked up a sweet yellow pepper plant and a hot chilli pepper plant. 

I think everyone else had the same idea, as the garden centre was packed. The garden centre had a really good system in place and luckily everyone practiced social distancing and wore their masks. 

Talking of garden centres and plants, I have an adorable little card to share with you that has a floral theme. This is created by using a stunning stamp set by Concord & 9th. I did do a card back in October (click here to take you to the post) that used this stamp set, but I did it as a new home card and with a different colour scheme.

I do believe that this stamp set is still available at Seven Hills Crafts and Bumbleberry Papercrafts (click on the shop name to link you to the product).


What you need...

Stamps: 
Floral Print Silhouette Stamp Set - Concord & 9th

Dies: 
Halftone Hearts - Altenew
Additional Circles - Waffle Flower

Ink pads:
Onyx Black - Versafine
Grapefruit - Concord & 9th
Sprout

Embellishments:
Droplets Crystal Clear Hearts - Little Things from Lucy's Cards

Card stock: 
White

Tools:
Big Shot  - Sizzix
Stamping Platform - MISTI

Extras:
Foam sheets
Adhesives


What you do...

1 Use a stamp positioning tool to stamp the first layer of the floral image with black ink. Next, line up the flower section and stamp in Grapefruit. Line up the foliage layer and stamp in Sprout ink.

Die cut the stamped panel with a circle die (approx. 3⅜" or 8.5cm diameter). Die cut the fourth largest heart from the centre of the circle. 

3 Die cut the the fifth largest heart from within the larger heart.

4 From a piece of foam sheet, die cut a slightly smaller circle than the stamped section; then cut the larger heart from the centre of it, making sure it lines up. Glue the printed circle onto the foam.

5 Die cut the smaller heart from a foam sheet and glue the printed heart to it.

6 Create a 4¼" x 5½" (11cm x 14cm) white blank and adhere the stamped circle panel at the top. Add the smaller heart to the centre of the larger one.

7 Stamp the sentiment underneath and finish with some heart droplets.

I love this stamp set, I think it's so elegant. I think a colour scheme where the flowers are stamped in red with bright green foliage would make a wonderful and different Christmas card.

I have been having an obsession with making cacti themed cards lately, so I'm looking forward to sharing those with you soon.

Thank you for popping by, take care and keep safe!


Wednesday, 14 April 2021

Goth Rainbow

Hello there!

I am back with something a little bit different. You may or may not know that I am a heavily tattooed, pierced, always wears black Goth (I do not possess any coloured clothing, apart from one little dress that has skulls and roses on it) and I'm proud to be one.

Well, a lot of people who know me are always surprised that I do such bright and colourful cards. I do love colour, especially lime green and shades of aqua/teal - just not on me.

I am so loving all the rainbows and bright colour schemes that is around at the moment in the card making world and I truly hope that these will never go out of favour. However, I did wonder what a rainbow would look like if it was Goth.

To all those closet Goth rainbows out there, I have made a card just for you...


What you need...

Stamps:
Rainbow Wishes - Concord & 9th

Dies:
Clouds - Paper Smooches

Ink pad:
Obsidian Amalgam  - Gina K

Card stock:
Black
White

Embellishments:
Silver Mix Pearls - Little Things from Lucy's Cards

Extras:
Rub-on lettering
Adhesives

What you do...

1 Cut a piece of white card 6.5" x 4.5". Stamp the arches of the rainbow in black ink, alternating between solid and patterned arches.

2 Die cut two clouds and fix at the ends of the arches.

3 Stamps some raindrops in black ink under each cloud and a heart under the smallest arch.

4 Apply the lettering around the top left of the largest arch. Add some silver pearls to decorate.

5 Mat onto a black 5" x 7" blank.

I had to go large with this card to fit the rainbow in as this is quite a large stamp set. I love the fact that you can mix and match the arches.

I do have some smaller rainbow stamp sets, so I might have to make them Goth too.

This was just a bit of silly, but I hope I have done those Goth rainbows (and Goths) proud!

Thank you for popping by and I'll be back soon with another brightly coloured make.


Saturday, 20 March 2021

Lucky Gnome - 3D Silhouette Project

Hello there!

I'm back again with another make (two in one week - wow!). 

As usual, I made a St Patrick's Day card for some good friends of mine, but this year I wanted to do something a little different.

I recently saw Lori Whitlock showcase some of her 3D pop up cards. She had created a cute gnome complete with a rainbow, pot of gold and clovers.

What you need...

Digital Die Image:
Decagon Pop Up St Patrick Gnome #344207 - Lori Whitlock (Silhouette)

Card stock:
Pink
Blush pink
Orange
Yellow
Lime green
Green
Pool
Purple
Black
White
Gold glitter - Neutrals Glitter Paper Pack #10420 - Concord & 9th

Die cutting machine:
Silhouette Cameo

Extras:
Stickles Yellow - Ranger
Stickles Frosted Lace
Adhesives

What you do:

1 Purchase the image and load onto your Design Page.

2 Ungroup the images and separate into colour groups and send to cut.

3 Assemble the rainbow/cloud layer, the gnome layer and then the pot/clover layer and set aside. I added some Frosted Lace Stickles to the cloud and Yellow Stickles to the gold coins.

4 Assemble the base and attach each layer.

5 Stick the panels onto the side wrap and fix to the card base, making sure everything lines up.

You can find full video instructions on how to assemble this type of card here.

This isn't a very big card and when folded flat will fit perfectly into and A2 (US) or A6 envelope, which is great for posting.

There are lots of other adorable 3D pop up cards available, some with a rectangular, circle and hexagonal base. There are also lots of themes/occasions to choose from.

After watching Lori's video I found it really easy to assemble. Just remember to use a strong adhesive and make sure everything is lined up.

I must admit I'm not a fan of leprechauns, so this cute gnome was ideal.

I hope you like this adorable little card, I might have a go at doing some of the others she has in the range.

Thank you for stopping by and I'll be back soon. I've been making quite a few cards recently (miracle).


Wednesday, 17 March 2021

Spring Roses Mother's Day Card - Altenew & Concord & 9th

Hi blog friends!

My, it's been a while hasn't it? I hope you are all still keeping safe and well in this crazy world.

To be honest I haven't really been making cards for personal use, the craft magazines have been keeping me exceptionally busy and after finishing those projects, I just wasn't in the mood. 

Anyhoo, with Mother's day coming up, I knew I had to get creating. I am a big fan of Altenew and last year I purchased their beautiful die set called Spring Roses. 

This die set consists of three quite large clusters of roses. I knew that I wanted to make my Mum a card using these dies. I teamed them up with some bold lettering by Concord & 9th and some subtle stencilling.

What you need...

Dies: 
Spring Roses - Altenew
Double Cut Alphabet - Concord & 9th

Stencil:
Basic Spots - Clearly Besotted

Ink pad:
Sprout - Concord & 9th

Card stock:
Key Lime - Silhouette Self Adhesive
Leaf Green
Mint
Black
Solar White 110lb - Neenah Classic Crest

Embellishments:
Lucky Dip Night - Little Things from Lucy's Cards

Extras:
Adhesives

What you do...

1 Die cut the larger of the double cluster of roses once each in Black, Mint and Key Lime. Use a small piece of Leaf Green to cut the small cluster of spiky leaves.

2 Cut a 10.5cm x 13.5cm piece of the white card and with the Sprout ink, stencil an area of spots in the centre of the card, blending to a fade.

3 Attach the roses to the lower right corner. Then infill with the Leaf Green, Key Lime and Mint die cut pieces.

4 Die cut the 'MUM' from the Black card and adhere above the rose cluster and add some black gems.

5 Mat the panel onto an 11cm x 14cm top fold blank.

I was debating as to create the roses with pink card, but I'm glad I went with the Mint colour. My Mum loved it. Remember to keep all the extra die cuts to create another card. 

Before I started to infill the roses, I noticed it looked really good with just the outline of the flowers over the stencilled background, I will have to do that one in a future project.

I will sign off for now, I do have a 3D St. Patrick's Day card I did for some friends which was created using my Silhouette, so I'll be back soon with that one.

I am entering this make into the Crafty Creations Challenge #419 - Anything goes. Click here to take you to the challenge.

Thank you for stopping by and see you soon, keep safe!


Sunday, 13 December 2020

Winter Christmas Trees

Hello friends!

I'm back with another card to share with you, this one being Christmas. This is a card I did for my Mum and was inspired by one that Jennifer McGuire created. It is a trifold card where the sides open outwards and uses a beautiful die set by Hero Arts.


What you need...

Dies: 
Winter Pine Fancy Dies - Hero Arts

Stamps:
Silent Night - Concord & 9th

Ink pads:
Chipped Sapphire - Tim Holtz Distress Oxide
Blueprint Sketch
Salty Ocean
Onyx Black - Versafine

Embellishments:
Glass Crystal Collection - Little Things from Lucy's Cards

Extras:
Sparkle Sheer Shimmer Craft Spray - Imagine Crafts
Crystal Clear Sparkle - Spectrum Noir
Titanium White Acrylic Ink - Amsterdam
Adhesives

What you do...

1 To make the trifold section, click here to see the project by Jennifer along with the instructions and measurements - she can explain it better than I ever could!

2 Set the assembled trifold section aside. Cut a piece of card 4¼" x 5½" and blend the three blue inks over the surface. Spritz with the Sparkle spray and use a paintbrush to flick white ink over the surface. Allow to dry.

3 Fix the inked panel to the back of the trifold section. 

4 Add some Crystal sparkle around the edges of the trees and add plenty of the Glass crystals. Stamp the sentiment on the back panel between the trees.

I'm so sorry that the photo doesn't do the card justice, plus it was difficult to position due to the nature of the blank. The best thing is my Mum loved it.

Jennifer did her card with a pink/red/purple background which looked stunning, but I thought I would stick to the traditional blue night sky.

I hope you like my little make and thank you so much for popping by. I'll be back soon with another, until then take care and keep safe.


Tuesday, 8 December 2020

Leafy Heart

Good morning all!

Wow! It is a very, very cold and frosty day here in Norfolk. Yesterday afternoon I had taken a friend shopping and the temperature had dropped from around 6°C to 1°C in about 10 minutes. It went from being a bright blue sky to a low lying, freezing cloud.

I've just been out to give the girls some warm porridge. I also now have a pheasant (whom I have named Wilf) residing in the garden. As I live in a rural area and the shooting season is well and truly upon us, he is more than welcome to live in my garden. 

Tomorrow I have to put up some temporary covered housing for the girls as the dreaded Avian Flu has struck again. Everything has to be disinfected and foot baths organised to help keep the risk of infection down. I don't think a lot of people who go out and get chickens on a whim realise some of the things you have to do, especially if your girls free range like mine do. Oh well :(

I want to share with you today a card I made for a dear friend a couple of weeks ago. As the card was for a male friend, I wanted to keep the colours quite masculine without being boring.


What you need...

Dies:
Fall Leaves - Waffle Flower

Stamps:
Painted Shapes - Concord & 9th
Happy Happy Happy - Lawn Fawn

Patterned paper:
Into the Woods Remix 6x6 Petite Paper Pack - Lawn Fawn

Ink pad:
Dark Chocolate - Gina K Designs

Card stock:
White

Embellishments:
Droplets Crystal Clear Hearts - Little Things From Lucy's Cards
Natural twine

Extras:
Foam sheet
Adhesives

What you do...

1 Die cut the leaf outline in white card and the background of the leaf once in foam sheet and once in striped paper. Assemble the leaf then back with the foam.

2 Create an 11cm x 14cm white top fold blank and stamp the heart from the Painted Shapes set centrally at the top in Dark Chocolate ink.

3 Fix the leaf to the heart.

4 Stamp the sentiment underneath the heart.

5 Add a bow made from natural twine to the base of the leaf and add some Crystal Clear Hearts to decorate.

I am a big follower of Cathy Zielske on YouTube and she did a wonderful card using this die set and paper pad. So I used her make as inspiration for my card. You can find her tutorial here.

The colour scheme of the paper pad is perfect for those masculine cards and the plus side is that the patterns aren't overly cutesy or girly.

Well, I think that is me for now. I will be hopefully back soon with some Christmas cards (life just keeps getting in the way).

Thanks for popping by. Keep safe and warm!

Tuesday, 3 November 2020

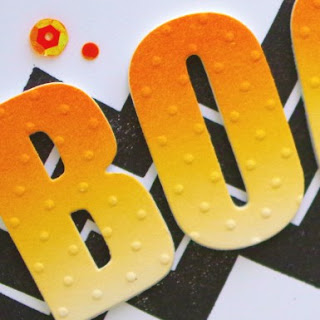
Boo!

Hello there!

I know that Halloween has been and gone, but I did make a few cards for some friends and I just never got round to posting them up to share with you. So, for the next few posts I will show you the Halloween cards I created.


What you need...

Stamps:
Pumpkinhead by Tim Holtz (CMS309) - Stampers Anonymous
Chevron Backdrops - Lawn Fawn

Dies:
Caps Bold - Altenew

Ink pads:
Marmalade - Concord & 9th
Onyx Black - Versafine

Embossing Folder:
Swiss Dots - Cuttlebug

Sprinkles:
Let's Polka - Little Things from Lucy's Cards

Sparklets:
Rainbow - Buttons Galore & More

Card stock:
Black
White

Extras:
Foam sheet
Adhesives

What you do:

1 Trim a piece of white card 4¼" x 5½". Apply black ink to the wide chevron stamp and with the card landscape, stamp the image diagonally across the top.

2 Stamp the pumpkin in the lower right corner, again with black ink.

3 Blend the Marmalade ink onto some white card stock fading it towards the bottom. Allow to dry.

4 Die cut the 'B', the 'O' twice and the 'I' from the blended card and again from a foam sheet. Emboss the letters with the Swiss Dots folder.

5 Attach the blended letters to the foam letters.

6 Create a 4¼" x 5½" white landscape bank and cover with black card. Trim the stamped panel to 4" x 5¼" and mat onto the blank.

7 Attach the letters to the blank over the chevrons, using the 'I' as an exclamation mark. Add some orange sequins from the Sparklets Rainbow and orange dots from the Sprinkles Let's Polka.

Ta da! A spooky card. Keeping the colour scheme to white, black and orange gives the card a fresh look whilst maintaining the Halloween feel.

Okay, I want to promote something now. I was never happy with the bone folders I had in my stash. They always seemed to leave shiny marks on the paper/card stock. I saw that a lot of card makers used a Teflon bone folder, but I couldn't justify paying around £26.00 for one.

I did some searching and found a company based here in Norfolk that specialises in book binding and preservation. They sell two sizes of Teflon bone folders, a medium one for £7.95 and a large one for £8.95 excluding VAT. Even with postage and VAT added I still only paid around £14.94. 

To me, it looks exactly the same as the ones sold for crafting. I love it and no more shiny marks. It scores very smoothly and has some weight to it, perfect for strengthening those folds. The company is called Preservation Equipment Ltd, click here to take you to the bone folder page.

Well, that's me for today. I will try to get the other cards uploaded in the next couple of days. Thank you for popping by!

Take care and keep safe x


Monday, 12 October 2020

Home Sweet Home - Concord & 9th

Good morning!

It's been a few weeks since I last posted...time, where does it go? Some friends of mine recently moved from the village down to Surrey so I thought I would make them a new home card.

I've had the Floral Print Silhouette Stamp set from Concord & 9th for some time and have been itching to use it. Like most stamps and dies, you know exactly what occasion or project they will be perfect for. I decided to team the stamp set up with a set of dies by Sizzix called Townhouse which has several cute little houses you can cut and assemble.

For this card I just wanted to cut the house silhouette and use a couple of the inner pieces to add some detail. The stamp set comprises of three layers that you stamp in different colours. They need to be lined up perfectly to build up the whole image. A stamp positioning tool is really helpful when using this set.

I chose a black background for the main stamp section and added a lovely sea glass colour for the blooms and lime green for the foliage. This created a beautiful crisp, fresh image.
What you need...

Stamps: 
Floral Print Silhouette Stamp Set - Concord & 9th

Dies: 
Townhouse (661378) - Sizzix
Circles

Ink pads:
Onyx Black - Versafine
Sea Glass - Gina K
Key Lime
Clear Ultra Slow Drying Embossing Pad - WOW!

Embossing powder:
Opaque Bright White Super Fine (WL01SF-O) - WOW!

Embellishments:
Droplets - The Stamp Market

Card stock: 
White
Black

Other:
Foam sheets

What you do...

1 Use a stamp positioning tool to stamp the first layer of the floral image with black ink. Next, line up the flower section and stamp in Sea Glass. Line up the foliage layer and stamp in Key Lime ink.

2 Die cut the stamped panel with a circle die. Die cut the town house with the gable roof and small heart from the centre. 

3 Use the large heart from the set to cut a section around the small heart from the positive piece.

4 Die cut a smaller circle than the stamped section from a foam sheet, then cut a house from the centre of it. Attach the foam to the back of the stamped circle making sure you line up the edges.

5 Attach the stamped gable decoration and the heart section to the die cut foam pieces cut from the house.

6 Create an 11cm x 14cm white blank and adhere the stamped panel at the top. Add the gable and heart details.

7 Cut the 'Sweet Baby' stamp in half and use the 'Sweet' portion and the 'Home' stamp to create the sentiment. Ink up with clear embossing ink and emboss with white embossing powder and trim.

8 Mat the sentiment under the house panel and add some clear droplets to finish.

As more American products are getting popular over here in the UK, I am finding that I want to use the US A2 card size to create my makes and these obviously fit the American full dies and stamps better than the UK A6. The nearest cm equivalent is 11cm x 14cm. 

I actually find this a lovely size to work on. This card size still fits nicely into an A6 envelope. As I always make my own blanks, using US A2 isn't an issue for me. I do like to make more unusual card sizes and make my own envelopes if needed.

Also, don't be afraid to cut into your photopolymer stamps. Providing you cut between words, you can  make the stamp go further and it can always be used as intended when lined up on an acrylic block.

I really enjoyed making this card and the stamp set is lovely. I hope Rosanna & Simon like it. I am going to miss them.

Thank you for stopping by. I have been making lots of simple and quick Christmas cards using pre-printed die cuts, so I will be back soon to share them with you. TTFN!