Showing posts with label Pebbles Inc. Show all posts

Sunday, 11 February 2018

Love Wings

Hello peeps!

I'm here not with another Christmas card, but a Valentine's card. My husband and I don't usually do the Valentine thing, but I thought I would do a soppy card for all you romantics out there.

I had a sort through some of my older Sizzix dies and came across the Heart Wings Bigz die and the Scallops On the Edge die.

Pebbles has a really cute Valentine collection this year called Forever My Always, so I've teamed some of the papers up with the dies.


What you need...

Dies: Tim Holtz On the Edge Scallops (656627); Tim Holtz Heart Wings Bigz (656638) - Sizzix
Patterned paper: Forever My Always 6x6 Paper Pad - Pebbles
Card stock: black, red
Gems: clear
Rub on: love
Adhesives

I'm not sure how many of the dies are now available, you may be able to find one or two on the internet. Any heart die would also work teamed up with some simple wings cut from patterned paper.

This card would also be perfect for an anniversary or just to tell someone you love them any time of the year!

I hope you like my simple little love card. Thank you for stopping by! 


Sunday, 24 July 2016

Hello

Happy Sunday lovely peeps!

I know I haven't been around blog land for a couple of weeks. I'm still busy with commissions, at this time of year we are even more busy as there is usually an extra issue to squeeze in. I've also been up to North Yorkshire for a few days to stay with my mum :o)

Here is another quick card made with a scrapbook collection. This one uses papers and items from the Spring Fling Collection by Pebbles.


Items needed...

Card stock: white
Die cuts: Spring Fling Cardstock & Vellum Shapes - Pebbles
Pearls: black

I adore this collection. It is just too cute. I love the mix of subtle colours and adorable images.

I hope you like this little make and I'll be back soon with another creation!

Thanks for popping by! x


Sunday, 3 July 2016

Thank You

Happy Sunday lovelies!

I'm back with another quick make using coordinating elements and papers from a paper craft collection. This is another one using items from the Spring Fling Collection by Pebbles.


Items needed...

Patterned paper: Spring Fling 6x6 Paper Pad - Pebbles
Die cut shapes: Spring Fling Card Stock and Vellum Shapes - Pebbles
Ribbon: pale pink
Decorative pin: pink heart
Adhesives

I adore the colour palette in this collection. The muted pink and greens along with the pop of yellow and red really work with the chalky black background. Some of the designs in the pad are set against a kraft background which also works really well.

I hope you like this quick and simple, but oh so cute card. Thank you for stopping by and I hope to see you soon. x


Friday, 10 June 2016

Cute Giraffes

Morning lovelies!

The card I would like to share with you today is so cute. It uses die cuts from the Spring Fling collection by Pebbles.


Items needed...

Card stock: Kraft, white
Die cuts: Spring Fling Cardstock & Vellum Shapes - Pebbles
Stamps; Shadows - Paper Smooches
Ink pad: Smokey Gray - Versafine
Gems: clear

The Spring Fling collection is made up of cute images and subtle colours such as pale pinks, greens and yellows mixed with a Kraft base. I didn't want a patterned background, so I added a simple Kraft panel to compliment the colours. The heart was hand cut from white card to really make the sentiment banner pop. I stamped a shadow for the giraffes to stand on so that they didn't look like they were floating in mid air!

Okay, that is me for the moment, thank you for stopping by and I'll be back soon with another quick and simple make :o) 


Friday, 16 October 2015

Spooky Spider Luminary - Cricut® Explore Air

Good afternoon peeps!

I'm back with another spooky treat for you, a spider luminary.

This one is quite easy to put together. It is like a gift bag with a cut out front in the shape of a spider. Instead if just using plain card for the 'bag' part I used some lovely spider web paper from the Pebbles Boo! 12" x 12" paper pad.

Here it is...


I love the way the green gems for his eyes actually seem to light up.

For this little lantern you will need the Spider Luminary Bag (#M3F6F3) from the Monster Bash Cartridge, Boo! 12"x12" Paper Pad by Pebbles, black card and green gems.

This would be great made in a batch to place on party tables. There are some more designs that you can use such as a spider's web and a haunted house.

Of course, the lit up picture doesn't really do it justice. It looks fantastic in the 'flesh'.

Thank you for calling by and I'll be back soon with some more makes!

TTFN!

post signature

Monday, 20 April 2015

Doodle Flower 2 - Dilly Beans/Incy Wincy

Good heevnin' peeps!

I do hope you had a lovely weekend. 

It's Monday so that means a new challenge over at Incy Wincy. This week we have a challenging challenge for you - 'Faux Techniques'. We also have two sponsors! The brilliant Flat Friends and Dilly Beans.

Now back to the faux techniques. Hmmm, what to do? I was going to do faux stitching until I saw some of my lovely teamies had created some gorg cards with this technique.

As I had chosen Doodle Flower 2 by Dilly Beans I decided to create a faux stamped doodle border around the edge of my card to keep in with the doodle theme. 

Here is what I came up with...


Coloured by Cosmic Strawberry - Image by Dilly Beans

What you need...

Card stock: white
Promarkers: Fire Wood, Oasis
Fine liner pen: black
Rub-on sentiment: Thank You - Pebbles Inc
Adhesives

What you do...

Print the image onto white card and colour in.
Mat onto a 12.5cm square white blank, making sure the flower sits at the lower right corner.
Doodle a two line border around the edge of the card with black fine liner and then divide into little squares colouring in alternate ones with the black pen.
Add the sentiment to the top left corner.

Are you a bit stuck for faux technique ideas? Splitcoast Stampers have some great ideas, click here to take you to the Handmade Tutorials page.

If you want to have a browse at all the lovely images that can be purchased from our fantastic sponsors, then click on their badge below to take you to their shop - I know you won't be disappointed.


It would be great to see your creative makes in this week's challenge. Head on over to Incy Wincy to have a peek at the fab DT makes and for oodles of inspiration. Go on, have a go and fake it!

Thanks for dropping by, take care and I'll be back soon ;o) x

post signature

Tuesday, 27 January 2015

Unicorn Betsy - Ppinkydolls/Incy Wincy

Good morning!

I hope you all fair well out there in craft land!

It's my turn to present this week's challenge over at Incy Wincy and we are also introducing a new sponsor...Ppinkydolls and the lucky winner will receive 3 digis.


Ppinkydolls produce the most delicate sketched images. You can either colour them fully, add just a hint of colour (as I did with my DT make) or leave them as they are.

This week's challenge is a sketch with a simple layout...


...and here is my DT make...


What you need...

Digi stamp: Unicorn Betsy - Ppinkydolls
Digital card stock: white - Craftwork Cards
Patterned paper: Color Crush 6x6 Paper Pad - Ki Memories
Coloured pencils: Bruynzeel Design
Gems: clear
Ribbon: cerise
Decorative pins: black teardrop; pink heart
Rub-on: Hello - Pebbles Inc

What you do...

Re-size the image to suit. Colour in and trim. Mat onto pink paper.
Cover the top half of a 13.5cm x 15cm blank with green paper. Wrap ribbon around the join and tie in a bow at the right. 
Cut a piece of floral paper to the same size as the image, and mat both to the blank as shown on the sketch.
Push pins through the knot of the bow, add a sentiment and a few gems to finish.

I decided to use coloured pencils this time to keep in with the delicate nature of the image. 

The girls over at Incy Wincy are certainly keeping me 'challenged' lately as I don't usually do sketch layouts such as this one. I think it's good for us to get out of our 'comfort zone' every once in a while, don't you?

Have a peep at what the talented Design Team have created, grab some inspiration and have a go at the challenge. You could be the lucky winner of 3 Ppinkydolls digi images! Good luck!

That's me for the nonce, thanks for popping in! xx

post signature

Sunday, 18 January 2015

Presents Thank You Card

Hello peeps!

Hope you are all having a fun weekend.

I'm back with another of those teeny little Christmas pressie thank you cards, and here is the little fella...


The stars, border and presents are rub-ons by Kaisercraft and the sentiment is a Pebbles Inc Duplicates.

Just to add a little splash of colour, I added a few red gems. Cute eh?

I have one more thank you card to show you, so I'll be back later with that one. Until then, thank you for stopping by and enjoy the rest of your weekend :o) xx

post signature

Thursday, 15 January 2015

Bauble Tree Thanks

Good aft'noon my lovelies!

Wow! We had some wind last night (no, not Simon & I). It was horrible. All I kept thinking about was my poor chickens!

Well today is bright and sunny and the chickens are fine and happily strutting around the garden. They are starting to lay again now that their annual moult has finished - whoopee!

As promised, here is another little Christmas pressie thank you card. 


This time I used die cuts from the My Mind's Eye Colorful Christmas Collection. This has got to be one of my favourite Christmas collections ever! I love these bright and cheery colours, the last couple of years manufacturers seem to have toned down the colours :o( 

Bring the bright ones back I say!! :o))

The sentiment is one of the Pebbles Inc Duplicates and I added a few gems to finish.

There you go, another quick and simple thank you card using up stuff from my stash. I still have a couple more to show you, so I'll be later with those. Until then ttfn & thanks for dropping in.

post signature

Sunday, 11 January 2015

Rudolph Thanks

Hello! Me again!

Just a quick post tonight.

Last week I did some thank you cards with a Christmassy theme to send out to family and friends for our lovely Christmas pressies. 

I needed to make them quite quickly and decided to use up some of the fab Christmas stickers and die cuts that I have.

They are little A7 sized cards (7.5cm x 10.5cm), perfect for a little thank you card.


The Rudolph and scallops are taken from the Everybody Loves Christmas Element Sticker sheet by Echo Park. The wording is a rub-on by Pebbles Inc. I just added a large red flat backed pearl for his lovely nose.

I will be back soon with another little thank you card. So glad you stopped by :o)

post signature

Thursday, 1 November 2012

Birdy Bauble

Mornin' all!
Hope you all had a fearfully, frightful Halloween. I live in a little tiny village and there aren't really many children (plus we don't have street lights), so we had a very quiet night last night. I did watch the 'Come Dine With Me' Halloween special - Robert Englund (aka Freddy Kreuger) was brilliant, he even brought his 'glove' along.
Come Dine With Me is one of the VERY few TV programmes I watch. The concept is so clever, it's even better if one of the peeps is really obnoxious.
Ok, now onto today's card, another Christmas one!

What I used...
Winter Wonderland 6x6 paper pad - My Mind's Eye
Pattern Play Holiday stamp set - Inkadinkado
Cardstock - white, green
Black ink - Versafine
Clear embossing powder - Stampendous
Promarkers
Punch - corner
Baker's twine - red
Button - red
Stickles Christmas Red glitter glue - Ranger
Rub-on - black, Merry Christmas - Pebbles Inc.
Adhere a panel of green card centrally to a square blank. Trim four lengths of different patterned paper and attach to the left hand side of the panel, rounding the top left corner of the top strip.
Stamp, heat emboss and colour in the bird bauble. Stamp a swirl above and embellish with glitter glue. When dry, trim and round off the bottom right corner, wrap and tie baker's twine around the panel and mount onto the blank with foam tape, overlapping the patterned strips.
Finish with a button and a sentiment - and there you have it!
This card layout was inspired by Retrosketch #32. This and many more fantastic sketches, challenges, samples and cool ideas can be found at http://retrosketches.blogspot.co.uk/ or you can find a direct link to the site in the 'Brilliant blogs I follow' section. Please check this site out, it is wonderful for inspiration if you know what you want to put on a card but have lost your layout mojo. There is a new sketch posted every Saturday.
Well, that's me for the nonce. Thanks for stopping by. xx

Friday, 21 September 2012

Merry Diamonds

Good aft'noon peeps!
Time for another Christmas card. I made a few yesterday, but I've chosen this one to show today. A few years back I saw a card made with diamonds (the shape not the real thing). This gave me the inspiration for this card.


Several diamonds were cut from white, red and two shades of green card. I shuffled them around the front of a card blank until I was happy with the layout. After trimming, I inked the edges black (Ranger Distress Ink - Black Soot) and adhered them to the blank.

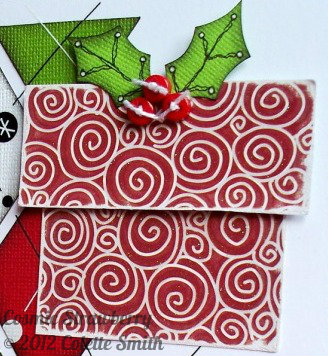
I rubbed on black and white lines (Sizzix Rub Ons - Background, Lines & Circles - 655095) and the sentiment (Pebbles Inc. Duplicates - 760269). Next, I made a present with two pieces of red glitter swirl paper (Kris Kringle Collection - Peppermint Swirl - S.E.I). Two holly leaves were sketched, cut out, edges inked and details doodled on.

The holly was adhered to the top of the present along with three tiny red buttons, threaded and tied with white cord. I doodled around the edge of the blank and attached the present to the top right corner.

I've just realised I've done another red/green Christmas card! So much for me not usually doing the traditional colours. Oh well.

Ok peeps, I'm signing off for now. Thanks for visiting and enjoy the rest of your Friday! xx

Thursday, 30 August 2012

Sledding Snoopy

Aft'noon peeps! What a horrible wet and windy day!
Today I have made another Snoopy Christmas card. It's soooo cute!


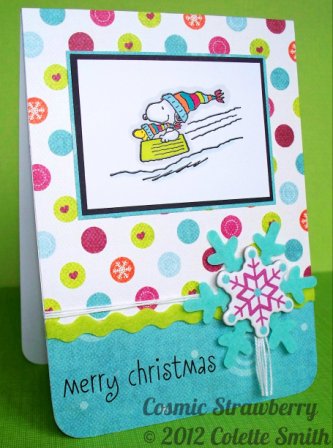
I covered a portrait top fold A6 blank with paper from My Mind's Eye Colorful Christmas range. The two lower corners were rounded off. I adhered a length of green felt ricrac over the join and knotted some white cord above, leaving a tassel. The knot was covered with a felt and a chipboard snowflake from the Colorful Christmas range. A Pebbles Inc. sentiment rub-on was applied to the lower left corner.

The Snoopy stamp is called Snow Sledding (FR1045) by Stampabilities, this was stamped in black Versafine and clear embossed. It was then coloured in with Promarkers, trimmed and matted on black card then onto a piece of patterned paper. The image was then adhered to the top of the card.

Tip: When heat embossing I heat from behind, you have much more control and you get a smoother finish with less chance of burning. Don't 'waft' the heat gun around, hold it in one place and when the powder starts to melt, move to another part of the image.

I hope you like this card, it is fun, bright and quirky. As soon as I saw this stamp it was one of those I HAD to have!!!

Right, off now to do an hour of Yoga. Until next time....Colette xx