Tuesday, 18 September 2012

Jolly Holly

A happy Tuesday evening to you all.
It's been a bright and breezy day here in Norfolk, you can tell that Autumn is in the air. According to my calendar it officially begins on Saturday 22nd September. Yipes!! Where has the time gone?
Some of that time has been well spent on this little card.....


I cut a piece of Black and White Mini Dot Reverse paper (Canvas Corp) and die cut along one edge with Scallops (On the Edge - Tim Holtz - Sizzix). It was adhered to the top of a blank and trimmed.

Using the Holly & Berries #2 die (Sizzix) I cut the holly in pear green spotty paper (Dots & Stripes - Soda Fountain 6x6 pad - Echo Park) They were mounted on to the top left of the card with foam tape.

Two small red buttons were threaded and knotted with red baker's twine. A larger button had baker's twine threaded and tied in a bow, securing short lengths of frayed string and garden twine on the reverse. These were then glued at the top of the holly.

A 'Jolly' word was die cut in black card (Merry, Bright & Jolly - Decorative Phrase Strip - Sizzix) and adhered to the bottom right . The card was finished with a tiny red gem on each button and clear glitter dots on the holly.

This card was supposed to be quick, but the time spent on choosing the right papers and colours was ridiculous! Oh well, I got there in the end. I think the black, white and pear green colour theme is striking and the touch of red really brings the whole thing together.

That's me for now. Have a good evening and thanks for looking! xx


Monday, 17 September 2012

Yuletide Robin

Good evenin'!
Hope this post finds you all well. I made another card last night (must have been on a roll yesterday - or there was something in the water).
Without further ado.....


This image is sooooo cute. I've had the robin stamp for quite a few years now. It is a wood mounted stamp called Stick Leg Robin (F-E59) by Funstamps. The sentiment is also a wood mounted stamp; Little Christmas by Stampendous, they are both still available to buy, but the Little Christmas is now made as a cling stamp (CRJ194).

So, I stamped the robin in black Versafine and heat embossed with clear powder, then coloured him in with Promarkers. I trimmed the image to a long rectangle. This was mounted with foam tape near the top of a white A6 tent fold blank. The sentiment was then stamped in black ink at the bottom right corner.

I wrapped red baker's twine around the card three times and tied in a knot, trimming and fraying the ends. A red button was threaded with frayed baker's twine and tied in a bow. I have some little felt 'double' holly leaves in my stash, so one of these was glued over the knot along with the red button. Stickles Crystal glitter glue adds a bit of sparkle to his hat!

Well, that's it for the nonce, I shall be back!


Sunday, 16 September 2012

Oh Christmas Tree!

Aft'noon all!
Yep, another post.
Since my last post (a couple or so hours ago) I've come up with another Christmas card. This time it features Christmas trees.


Bright & colourful eh? I stamped out three trees from the Oh Christmas Tree set by Personal Impressions in Versacolor Opera Pink, Lime and Mountain Lake then overstamped in black Versafine along with the sentiment. This piece was trimmed and two opposite corners were rounded off. I wrapped bright pink grosgrain underneath the sentiment and tied in a bow at the right.

I chose the tree patterned paper from the Merry Magic paper pack by Dovecraft, trimmed it to size, rounded off the same opposite two corners and along with the image, adhered them to a white square blank, again rounding off the corners.

Three 1" circles were punched out in matching card and clustered just behind the lower left corner of the image. They were embellished with three co-ordinating buttons tied with white thread.

The stamp set is great because you get background and detail images for each tree. I like to off-set the detail just a tad, it gives that quirky 1950's feel to the image.

Well, hope you like and thanks for popping in. Colette xx


Christmas Banners

Happy Sunday chums!
I meant to post this card last night, but time ran away with me. I spent ages on this one for some reason. I think it's because I had several ideas floating around my head and couldn't quite decide which way to go.
I eventually settled on a 'banner' card. I wanted to use some papers from one collection, after spending lost hours looking through my stash I finally found some. Then I spent time trying to decide what colour the blank should be. The colours are varied in the paper collection, but I thought it lent itself very well to a kraft blank, so here it is!


The papers used are from the Crate Paper 6x6 Snow Day Collection. A fab collection with quirky images and mix of colours. I cut five papers into 2cm wide strips, then snipped a triangle piece from one end. I laid them on the blank and arranged them until I was happy with the layout, trimmed and stuck them down.

Five buttons were selected in varying sizes, styles and in colours which co-ordinated with the papers. They were threaded and knotted with parcel string, with the exception of one, this had garden twine threaded and tied in a bow securing a short length of the parcel string. The buttons were then attached to the end of each banner, just above the 'triangle'.

Finally the 'Merry Christmas' sentiment was stamped in the bottom right corner in Vintage Sepia Versafine ink. The sentiment comes from the Let it Snow set by Lawn Fawn.

I think I might make a few more of these using different paper collections, now I know the layout, it is quite a quick and simple card to make. I think the hardest thing will be choosing the papers, but that's the beauty of collections, they usually all co-ordinate. Then again, which collection do you choose?.....................Tough one.

I'll post some cards in different colourways as I do them (not sure when that will be).

Well, until next time, ta ta. x

Friday, 14 September 2012

Crafts Beautiful Christmas Special 2012

Aft'noon peeps!
Been busy this week. I had an extra commission to do for Crafts Beautiful and I've just finished another one to meet the next deadline.
The Christmas Special issue is out today. Here is my Bouncing Baubles project. 


I went for a retro theme, with red, pink and lime green as the colour way. The papers are from the K & Company Peppermint Twist collection and are much brighter than they appear here. For more crafting ideas visit Crafts Beautiful. Where you can download free papers and templates, such as the bauble and noel for my projects.

This month's issue is packed with festive projects, ideas, tips and inspiration. You also get a fab free gift, well two actually. A 64 page luxury Christmas paper pack and a set of festive toppers.

Well, I'm off now to make another Christmas card, so I'll post it as soon as it's finished.

Until then, toodle pip!


Saturday, 8 September 2012

Define Good #1

And a jolly good evening to you!
Now then, the big question that children (and some adults) get asked at Christmas is 'Have you been good or naughty?'
So, this card is perfect for those who may have been a tad on the naughty side this year, me included.........


I think this image is just gorgeous. As soon as I saw it I had to have! It is called (surprise surprise) Define Good by The Cat's Pajamas. I stamped the image with black Versafine, heat embossed with clear powder and coloured it in with Promarkers. Then I added some glitter glue to the fur trim on the hat.

The image was die cut using a circle from the Sizzix Framelits - Circles set. A larger circle was cut in green card and another larger circle in spotty Christmas paper. These were layered up, adhered to the bottom right corner of a white blank, just so it overlapped the edges, and trimmed. The sentiment was then stamped above in black.

I've had the spotty paper for a few years now, it's Jolly Dot by Creative Imaginations, I don't think you can get it now, but there are a lot of spotty, Christmassy papers out there in some wonderful colours, so you don't just have to stick with the red and green theme.

Right-he-ho! Off now to order a pepperoni pizza....deep pan....mmmmmm.

Thanks for dropping by!

Colette xx

Universal Craft Blog Directory

Hi Peeps!

Just a quick post to tell you about a great site where you can post a link to your blog. It's called CraftyRie: Universal Craft Blog Directory. Click on the link and have a look! http://www.craftyrie.com/2011/10/universal-craft-blog-directory.html I also have one of their buttons (scroll down on the right) so you can link from there too.

Ta ta!

Colette xx

Thursday, 6 September 2012

Elegant Christmas

Well hello and a good Thursday afternoon to you all!
Sorry I haven't posted for a couple of days, I had a last minute commission to do for Crafts Beautiful. I thought I'd post another Christmas card before I start the next commission.


This is very different for me, but I have a lovely Basic Grey paper collection that I knew would work perfectly with a couple of stamp sets.


The paper is the reverse side of Winter Garden from the 12" x 12" Jovial Collection by Basic Grey. The stamps used are from the Winter Swirls and Christmas Art sets by Hot Off The Press, both the Jovial Collection and stamps are still available.

I stamped a long swirl down the right hand side of a 15cm square white blank in Versafine Olympia Green ink. I then covered the left hand side with the mistletoe design, covering about three quarters of the blank. The 'Tis the Season and flourishes were stamped in Olympia Green onto white card. After trimming it was layered onto card in a shade of green that complimented the paper, then mounted at the top left.

I wrapped a length of gorgeous green satin ribbon (again in a shade which complimented the paper) over the paper join and knotted it at the top. To finish, a few Swarovski gems were attached to the flourishes and swirls.

The papers have a traditional vintage feel, but keeping the design simple and using a white blank gives it a fresh modern look whilst still looking elegant.

Hope you like and thanks for popping by!

Colette x

Sunday, 2 September 2012

Retro Noel

Aft'noon Peeps!
Just thought I'd post another Christmas card for you to peruse. I love anything retro, especially 1950's/60's. I think this card captures that era, but with a modern twist, so here it is!


The paper is from the fantastic Peppermint Twist collection by K & Company, I trimmed some of the striped paper at an angle, then I embellished some of the snowflakes with a co-ordinating brad and covered the top of a square blank. I cut a thin strip to border the edge in a contrasting pattern.

The Rudolph stamp is a wood mounted one called Solid Rudolph by Judikins (2808G), this is still available from Stamp Addicts. I stamped him in black Versafine and embossed with clear powder, then trimmed the image at quirky angles. This was then mounted onto red card and trimmed.

Next, the letters N,O,E and L from the Papermania Fun Alphabet stamp set (PMA 9071101) were stamped in black and embossed. These were cut out and coloured in with Promarkers to match the colours in the paper. They were then mounted onto red card, slightly overlapping each other, the red card was then trimmed at quirky angles.

The image and sentiment were then mounted onto the blank. I finished off with a few snowflakes embellished with a glitter dot.

I love the colours in this card, they work really well. I don't think you can get the Peppermint Twist collection now, but if you are lucky enough to have purchased this in the past, why not treat yourself to the Rudolph stamp and have a go?

You don't have to copy the papers and stamps exactly, use anything in your collection and put your own mark on it!

Well, toodle-pip for the nonce. Thanks for visiting, Colette xx

Thursday, 30 August 2012

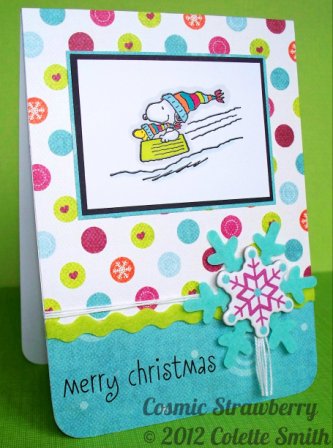
Sledding Snoopy

Aft'noon peeps! What a horrible wet and windy day!
Today I have made another Snoopy Christmas card. It's soooo cute!


I covered a portrait top fold A6 blank with paper from My Mind's Eye Colorful Christmas range. The two lower corners were rounded off. I adhered a length of green felt ricrac over the join and knotted some white cord above, leaving a tassel. The knot was covered with a felt and a chipboard snowflake from the Colorful Christmas range. A Pebbles Inc. sentiment rub-on was applied to the lower left corner.

The Snoopy stamp is called Snow Sledding (FR1045) by Stampabilities, this was stamped in black Versafine and clear embossed. It was then coloured in with Promarkers, trimmed and matted on black card then onto a piece of patterned paper. The image was then adhered to the top of the card.

Tip: When heat embossing I heat from behind, you have much more control and you get a smoother finish with less chance of burning. Don't 'waft' the heat gun around, hold it in one place and when the powder starts to melt, move to another part of the image.

I hope you like this card, it is fun, bright and quirky. As soon as I saw this stamp it was one of those I HAD to have!!!

Right, off now to do an hour of Yoga. Until next time....Colette xx