Friday, 12 October 2012

Holly Golightly

Mewnin' Peeps!
Today is my sister Yvonne's birthday. Happy birthday sis! I couldn't post a pic of this card when I originally made it, because she reads my blog.
It's quite a simple card with limited colours. The focus mainly in black and white with a pop of bright pink. The image stamp I used is Breakfast at Tiffanys - Audrey Hepburn by The Octopode Factory.
Breakfast at Tiffanys is one of my favourite films and when I saw this beautiful stamp - well, had to have didn't I?
So, here's Holly Golightly.....


I love the fact that the image even has 'Cat' in it.

What I used.....

Stamp - Breakfast at Tiffanys - Audrey Hepburn - The Octopode Factory
Paper - Sketchbook by Amy Tangerine 6x6 paper pad - American Crafts
Rub-ons - Mollipop (655497), Background Shapes (655079) - Sizzix
Ink pad - Onyx Black - Versafine
Promarkers
Punch - corner rounder
Card - white, black
Card blank - 15cm square, white
Clear embossing powder
Ribbon - bright pink
Crystals - clear, 2mm, 3mm - Hot Fix

Firstly, with the fold at the top I trimmed 2cm off one side and rounded the bottom right corner. A piece of patterned paper was attached horizontally to the left of the card, again with its lower right corner rounded off.

After stamping, heat embossing and colouring the image, it was trimmed and mounted onto black card and trimmed again, rounding off the bottom right corners on each. Hot Fix crystals were glued to her tiara and ear-rings. Rub-ons were applied to the lower right corner.

I tied pink ribbon around the card and knotted it at the right. She was then mounted to the blank with foam tape. Ta da!

I love The Octopode Factory stamps, they do great interpretations of Alice in Wonderland and The Wizard of Oz characters. This one is just stunning though. Love it!

That's me for now, toodle-pip! xx

Thursday, 11 October 2012

Merry & Bright!

Well hello and a good Thursday afternoon to you all!
I've just finished another commission for Crafts Beautiful and I thought before I start doing the instructions and templates, I would make a quick Christmas card. This is a cutey.


What I used.....

Snowman (656299) - Bigz Die - Sizzix
Winter Wonderland 6x6 paper pad - My Minds Eye
Baker's twine
Snowman charm
Glitter dots
15cm square card blank - white
Card - white, red, orange, black, brown
Gel pen - white

With the fold at the top, I covered the top of the blank with cottage paper. I trimmed the Merry & Bright phrase strip from the tags and borders paper and attached it below the cottage paper. Next, I wrapped baker's twine around the card under the border, threaded on the snowman charm and tied a bow.

The snowman and accessories were die cut and assembled. He was mounted onto the card with foam tape. The card was finished off with a few glitter dots on the snowflakes and a few highlights on the snowman with white pen.

This was quite a quick card to do, the thing is, as Christmas gets closer, the more time consuming, trickier cards get pushed aside for quick, simple ones. I think that's why I like buying co-ordinating stickers, rub-ons and die cuts, they're great for last minute cards (it can still take me ages to decide which papers etc. to use and the actual layout of the card!).

That's me for the nonce, I may just rattle off another couple of quickies - watch this space! Thanks for popping in. xx

Monday, 8 October 2012

Joy!

Aft'noon peeps!
Here I am again with another Christmas card. This one was inspired by a project by the fabulous Pete Hughes (from Sizzix) in the current issue of Papercraft Inspirations (Issue 105 - Nov 2012). I have put my own take on it, using a die cut mistletoe branch, 'Joy' phrase, snowflake and scalloped borders instead of Pete's branch, 'Noel' phrase and lacy edges. Plus, I fixed my bauble to the card front, where Pete had left his to dangle so it could be removed and used as a tree ornament.
So here it is....


What I used.....

Carved Ornaments - Movers & Shapers - Sizzix
Joy - Movers & Shapers - Sizzix
Scallops - On the Edge - Sizzix
Snow Flurries - On the Edge - Sizzix
Mistletoe - Marianne D Creatables
Aspen Frost 6x6 Paper Pad - Basic Grey
Green Card
Baker's Twine - Red
Pearls - Flat Backed

I die cut two baubles, one in patterned paper and one in green card, and another in red patterned paper with the 'Joy' die inserted. They were then layered up, and the red bauble was mounted with foam pads. I snipped the top off the green bauble and stuck it to the top of the red. I tied baker's twine around the top.

A scallop border and a snowflake border were cut in patterned paper. These were adhered to a white blank along with a wide strip of co-ordinating paper. I die cut a mistletoe sprig in green card, distressed and embellished it with pearls. This was then adhered to the card along with the bauble. Ta da!

I must say I do love Pete's creations. Whenever I see his projects in magazines I always 'ooh' & 'ahh' along with, 'got to have a go at that'.

Enjoy the rest of your Monday! Thanks for calling by. xxx

Saturday, 6 October 2012

Lazy Puss!

Aft'noon peepsicles!
Sorry I haven't posted much this week, have been busy, busy, busy with commissions. It's my Mum's birthday today (Happy Birthday Mum!) and she has a great sense of humour, so when I saw this stamp set, I had her card in mind.


I stamped the cat image and phrase (Art Impressions - Zoo Crew - Feline Set 4193) onto white card with black ink (Versafine - Onyx Black) and heat embossed with clear embossing powder. The cat was coloured in with Promarkers and mounted onto black card and the phrase onto pink card.

Strips of patterned paper (Anna Griffin - Fifi and Fido collection) were cut and attached at varying heights to the front of a 15cm square blank. The cat and phrase were then mounted onto the card. I finished the whole thing off with some black baker's twine wrapped and knotted around the card and a black button threaded with pink baker's twine and tied in a bow.

This cat reminds me so much of our cat Bazoo - except she is black. The face and pose are exactly like her. To me the look on this cat's face says everything. Brilliant!

Well, enjoy the rest of your Saturday and thanks for dropping by!


Friday, 28 September 2012

Ding-dong!

Good afternoon chums!
The Christmas card I'm showing you today is just a quick one I put together. I actually did this one last year and I showcased it in a post in January. This time, I've changed it just a little bit.


I adhered the 'Ding-dongs' phrase (Jolly by Golly Elements - Cosmo Cricket) to the top of a tent fold A6 blank, then covered the bottom with the bells paper (Jolly by Golly 6x6 Mini Deck - Cosmo Cricket).

The join was covered with green grosgrain ribbon, I tied red baker's twine around the ribbon, threaded on two silver bells and tied the twine into a bow.

Last time I made this, I used two jingle bells in yellow and green and tied with pink baker's twine. I bought these little silver bells and thought they would be good to use on this card. I love the colours of this Cosmo Cricket collection, they are just that little bit different, especially with the yellow.

Okay, I'm signing off now. Thanks for looking and enjoy the rest of your Friday! xxx

Tuesday, 25 September 2012

Pretty Bauble

Evenin' Peeps!

I haven't posted for a couple of days as I've been busy with a commission for Crafts Beautiful. I made a few cards in advance the other day, so here is another one for you to peruse.


I created a top fold A6 blank and adhered some lovely paper from one of my all time favourite collections (Peppermint Twist - K & Company). I just love, love, love it! A strip of bright pink card was punched with a decorative border (Upper Crest - Fiskars) and attached underneath. I wrapped white satin ribbon around the card to cover the join, tied it in a knot and frayed the ends slightly.

A 3D bauble sticker (Grand Adhesions - Peppermint Twist - K & Company) was applied to a piece of white card, a 'hanger' was created using tiny pink gems and I added a bow made from pink baker's twine. This was mounted onto a piece of bright pink card, trimmed and finished with a black 'Believe' rub-on and gem.

I think the reason why I love the K & Company Peppermint Twist and Swell Noel collections so much, is because they have such a fantastic retro feel (as you know by now I lurrve), they also remind me of Christmases from my childhood. Perry Como, Andy Williams, Bing Crosby, Morecambe & Wise Christmas Specials.....

I wish K & Company would re-print them again! Oh well...good job I stocked up on them when I did.....but you never know.

That's me done for the mo. Going to do a bit more of my commission. Night night all!

Saturday, 22 September 2012

Christmas Stars

Hello Chums!

Hope you are all fit and well. I am proud to present another one of my creations which I've called Christmas Stars....because it's a Christmas card and it's got stars on it. Coming up with names for 'said' creations can be quite difficult, especially if you've done a few with the same type of theme. I suppose I could be really boring and name them Stars 1, Stars 2, Stars 3... not very inspirational though.

Anyhoo, here it is, Christmas Stars!


I think it's a simple and effective card and it's quite quick to do.

I cut a piece of red card and used a little craft sewing machine to stitch around the edges. I did the stitching a little wonky to add to the 'crafty' feel. This was then matted onto a white card blank.

Two small stars and a larger star were cut from patterned paper (Fa La La Collection 6x6 paper pack - #LF421 - Lawn Fawn) and attached to the lower right corner. One star was embellished with a small white button threaded and tied with red baker's twine and a couple of glitter dots.

I applied a rub-on sentiment (Bazzill Basics - #304026) to a piece of white card, trimmed and adhered it to the top left in line with the edge of the card.


Tip: If you don't have a sewing machine or don't want to use real stitching, try doodling faux stitching around the edges with a white gel pen.

Tip: Try making the card in various colour themes and patterns. The possibilities are endless.

The Fa La La Collection by Lawn Fawn is a fab new set of papers, stamps and a 12x12 collection kit with sticker sheets. They have a definite retro theme and the colours are quoted as 'pine, poinsettia, and snowy sky'. They are just beautiful, I got mine from Make the Day Special.
That's me for the nonce. Thanks for popping by and see you soon. xx

Friday, 21 September 2012

Merry Diamonds

Good aft'noon peeps!
Time for another Christmas card. I made a few yesterday, but I've chosen this one to show today. A few years back I saw a card made with diamonds (the shape not the real thing). This gave me the inspiration for this card.


Several diamonds were cut from white, red and two shades of green card. I shuffled them around the front of a card blank until I was happy with the layout. After trimming, I inked the edges black (Ranger Distress Ink - Black Soot) and adhered them to the blank.

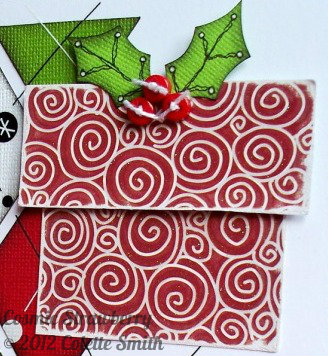
I rubbed on black and white lines (Sizzix Rub Ons - Background, Lines & Circles - 655095) and the sentiment (Pebbles Inc. Duplicates - 760269). Next, I made a present with two pieces of red glitter swirl paper (Kris Kringle Collection - Peppermint Swirl - S.E.I). Two holly leaves were sketched, cut out, edges inked and details doodled on.

The holly was adhered to the top of the present along with three tiny red buttons, threaded and tied with white cord. I doodled around the edge of the blank and attached the present to the top right corner.

I've just realised I've done another red/green Christmas card! So much for me not usually doing the traditional colours. Oh well.

Ok peeps, I'm signing off for now. Thanks for visiting and enjoy the rest of your Friday! xx

Wednesday, 19 September 2012

Kissing Santa

Hello Peepsicles, hope you are well this fine Wednesday afternoon.
I have another Christmas Card for you. Here we go....


The sentiment is from a fab stamp set I came across whilst browsing Country View Crafts website. It's called Egg & Nog 9 (SIEN9) from the Squiggly Ink range by PaperArtsy. I absolutely adore Squiggly Ink stamps, I've got quite a few in my collection now.

So..on with the card. Firstly, I stamped the sentiment on white card with black Versfine and trimmed it to size. I cut a section of patterned paper (Mistletoe Collection 6x6 pad - Bo Bunny) and adhered the sentiment at the top. White seam binding was tied and knotted around the patterned paper under the sentiment.

I die cut three mistletoe branches (Vixen Limited Edition dies - QuicKutz) in green card, arranged and stuck them to the lower right hand corner of the paper panel. I embellised the mistletoe with pearls and a tiny red button threaded with white cord.

I don't usually follow the traditional red/green combo, but the new Bo Bunny Mistletoe Collection is gorgeous with really bright reds and greens. Very retro.

That's me for the time being, thanks for visiting. xx

Pirate Cards - Arr!

Arr! Good mornin' te ye!
Today is International Talk Like a Pirate Day! So in honour of this fab occasion, I thought I would post a couple of my cards that featured in the August issue of Crafts Beautiful, under the project titled '7 ways with...pirate motifs'.
First, Gappy the Pirate...


And now Peed Off Parrot...


I had great fun designing these illustrations, you can download these and my other pirate illustrations free from www.crafts-beautiful.com in the download section. The illustrations are in black and white, so you can download, print and choose your own colour theme to colour in!. Other illustrations include a treasure map, cannon, treasure chest, and two different pirate ships.

The fonts I used were downloaded from www.fontspace.com (or link from the 'funky free fonts' section on the right). There are some really cool pirate fonts out there, so have a good hunt.

To find out more about International Talk Like a Pirate Day visit www.talklikeapirate.com it's a fab site. I just love it!

Right... off to check me scuppers, arr! Thank ye for comin' alongside and walkin' me poopdeck. Be back in a while me beauties!