Friday, 18 January 2013

Udderly Brill Birthday!

Good aft'noon friends!

Ooooh! It's like a winter wonderland. Snow, snow and more snow. Perfect time to make a lovely mug of cocoa methinks.

Today I would like to show you a birthday card I have made for my nephew, Tom. After school and on weekends he works at a dairy farm. So I made him a card with a cow on it - ha ha!


Isn't the image cool? It's from a set by Paper Smooches.

What you need...

Stamps: Chubby Chums - Paper Smooches
Paper: Sweet Summertime (Citrus Circle 12x12 sheet) - Echo Park
Stickers: Summer Days Element Stickers - Echo Park
Card stock: white
Ink: Jet Black Archival - Ranger
Promarkers
Baker's twine: black
Punch: corner rounder
Font: King Cool - Ace Free Fonts
Adhesives

What you do...

Make a top fold A6 blank. Round the lower right corner on a 6.5cm x 13cm piece of Citrus Circles paper (reverse side). Attach a piece of the scallop border sticker about a third up from the bottom, wrap and tie baker's twine under it. Mount onto the left of the blank.

Stamp and colour in the cow. Trim to 4.5cm x 7cm, round the lower right corner and attach to the patterned panel. Type and print the sentiment, trim into a banner and fix under the cow, as shown.

I think this card is so funny. I love the expression on the cow's face. Hope Tom will like it. It's difficult to make a card for a 16 year old. Better than a card with fishermen, sailing boats, steam trains and old racing cars on.

I'm going to sign off now, make a cocoa and get on with my commission for Let's Make Cards. Why not make the most of the snow and get out there and build a snowman! If it's still around tomorrow, I think I will do just that :)

Take care and keep warm. xxx

Thursday, 17 January 2013

You Make Me Smile!

Howdy peepsicles!

This is my 100th post!!! Whoopee! OK, that's the excitement over for today.

I would like to show you a card that I did last night. No occasion. The layout, colours and so on, just popped into my head. So I made it :) Here it is...


What you need...

Stamps: Labels, Fancy #2 Framelits Die & Stamp Set (657582) - Sizzix/Hero Arts
Dies: Labels, Fancy #4 Framelits (657913) - Sizzix; Chinese Rose - Marianne Design Creatables
Paper: Blissful 6 x 6 Bundle - Authentique
Card stock: white, pale yellow
Ink: Onyx Black - Versafine
Seam binding: Walnut
Decorative stick pin
Pearls
Adhesives

What you do...

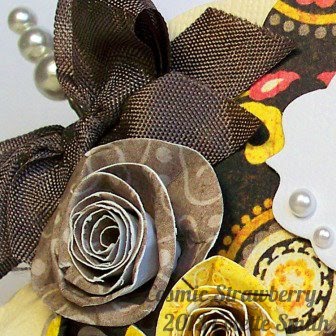
Wrap a double length of seam binding around a top fold 12cm square blank and tie in a bow on the left edge. Die cut a label in pale yellow card, and a smaller one in patterned paper. Mount onto the card, over the binding.

Stamp the sentiment onto white card. Cut out with a label die, mount centrally onto the other labels. Die cut two large roses and a small one in co-ordinating patterned paper. Make up and glue to the left of the label, under the bow. Die cut two leaves in pale yellow card and also attach these to the card. Finish with a decorative pin and a few pearls.

I'm really pleased with this card. It turned out just as I imagined and I didn't have to fiddle around for ages getting it just right. Sometimes you have an idea in your head and it just won't work out on the card. So frustrating, especially if you've spent hours choosing colours and arranging stuff only to abandon it. Grrr!

Hope you like. Thanks for looking. xxx

Wednesday, 16 January 2013

Dad's Tash!

H'afternoon chums!

Hope you are all fit and well on this Wednesday afternoon. I'm sitting here with a nice hot coffee, mmm. Lovely!

Today I would like to show you a card I have made for my Dad. It's his birthday on the 26th. He doesn't have a 'tash', but he used to years ago. I got him a set of freshly wrapped assorted style tashes as a daft silly present for Christmas, so I thought I would follow it up with a tash themed card for his birthday.

Here goes:)


What you need...

Dies: Mustaches (QuicKutz) - Lifestyle Crafts
Paper: My Favorite Things 6 x 6 Designer Paper Pad - My Mind's Eye
Card stock: white, black, greys, browns
Adhesives

What you do...

Cover a top fold 11cm x 14cm blank with mustache paper. Attach a 6.5cm x 12cm panel of white card down the centre.

Die cut the mustaches in shades of brown, grey and black card and fix to the white panel. Print the sentiment onto white card, trim into a banner, mount onto grey card and trim again. Adhere centrally to the bottom of the white panel. Ta da!

There you have a quick and amusing card to give to the man in your life...or one of them anyway - ahem! I just love these dies and I bought the paper pad just because it had tashes in it!

Okay, I'm going now, enjoy the rest of your day. Thanks for dropping by.xxx


Tuesday, 15 January 2013

Crafts Beautiful February 2013 - Pt 2

Aft'noon peeps!

How's the snow with you? We had a good amount last night, mostly gone this morning, beautiful sunshine, then came in dark, another heavy fall, now the sun out and shining bright! Go figure??!!

This is the final part of my projects in the February issue of Crafts Beautiful.


Again, I apologise for the quality of the images (don't know why they aren't scanning as well this time - even enhancing doesn't help).
 
These were great fun. The stamps were from another two companies that I love, Lawn Fawn and October Afternoon. I adore this sunburst stamp. I did do another two samples, but they weren't showcased in the mag. 
 
You can use smaller stamps to create backgrounds, by stamping randomly on a piece of card, then selecting an area which you think looks the best and trimming it to size. Voila!
 
The February issue is out now and this month you get a fantastic 'Celebration' 64 page paper collection, worth £8.99, plus a bonus digi stamp set which you can download free from the Crafts Beautiful website.
 
The issue is jam packed with gorgeous projects and Holly has a brilliant feature on cake decorating with sugarpaste. She spent the day learning this fabulous technique with my friend Paula (a very talented lady I might add). I was surprised to see Paula's face grinning at me from the pages!
 
So, that's me for now. Thanks for looking. xxx

Monday, 14 January 2013

Crafts Beautiful February 2013 - Pt 1

Evenin' all!

I'd like to show you a little peep at one of two commissions I did for the February issue of Crafts Beautiful.
 
 
Sorry if the image quality isn't good. The magazine didn't scan that well:(
 
I had great fun creating these using some stamps from my one of my favourite companies, Paper Smooches. As you can see, I decided not to go with the traditional red/pink theme typical for Valentine's Day. There is a little hint though ;)
 
The verse on the 'to my core' card is from the Crafts Beautiful verse app that you can download to your phone. You get a new verse everyday and they cover all occasions, so you'll never be stuck for those special words you want to put on your card. Don't worry if you haven't got the facility to download the app, there are loads of verses to be found on the website. Why not visit Crafts Beautiful for loads more crafting ideas?
 
Well then, that's it for now. Thanks for popping by. xxx


Thank You - Whoo!

Well hello there chums!

It's a beautiful if somewhat cold day here in Norfolk. We had a smattering of snow last night and now the sun is shining, looks just like a wintry wonderland on a Christmas card.

I have for you today another thank you card (I sent it to my Mum & Dad for my Christmas pressies). Again, it is one I did for Crafts Beautiful in the January 2012 issue.


What you need...

Stamps: Swirls V1 - Autumn Leaves; Birds Galore - Inkadinkado
Dies: Labels One - Spellbinders
Ink: Onyx Black - Versafine
Embossing powder: Detail Clear - Stampendous
Card stock: white, pink, blues
Promarkers: pink, blue
Buttons: white, pink,
Ribbon: blue grosgrain
Rub-ons: black
Cotton: white, pink
Adhesives
Flower templates - download from Crafts Beautiful

What you do...

Stamp swirls in black ink on the lower right corner of a top fold A6 landscape blank. Wrap ribbon around the card and tie in a knot on the right.

Stamp, emboss and colour the owl and cut out with the 6cm label die. Mount onto pink card, cut with the 7cm label die. Adhere to the top left of the blank.

Download the flower templates and cut out three flowers in shades of blue card. Attach a button tied with cotton to the centre of each flower. Adhere the flowers to the card, as shown. Create the sentiment with rub-ons, to finish.

I don't think birdies will ever go out of fashion. The good thing is they are suitable for all cards, male or female (though you might not want to give a pink and blue card to a bloke - well, maybe you would..... depends).

The Crafts Beautiful website has all the archive templates from past issues, plus lots of free papers you can download and print. You just need to register with the site to be able to access them. Simples!!

That is me for now. I'll be back later to show you a sneeky peek of my projects in this months issue of Crafts Beautiful. I have to make a card for my Dad and I have a pile of ironing that is the height of Ben Nevis (no exaggeration here). I will have to put on my climbing spikes just to reach the top to sort it out. I could pull a few things from the bottom, but I am not going to take the risk of being buried alive by an avalanche of underpants - no, not a good idea.

Actually, several of the items are now dead. Especially the bedding. Two pillowcases and the fitted sheet were massacred yesterday morning whilst changing the bed. As with most serial killers, Bazoo went back and had another go at the dead sheet. Cats!

Thanks for dropping in. xxx

Thursday, 10 January 2013

What's New Pussycat?

Heevnin' peepsicles!

The weather is foggy and chilly here today, definitely January weather :(

Sorry I've not been around for a couple of days. I've been busy with commissions for Let's Make Cards and Crafts Beautiful.

I'd like to show you the birthday card I made for my niece Emily (you may remember from a previous post that she had the afro and goaty bubbles).

What you need...

Stamps: It's a Mod Mod World (W-7512) - The Cat's Pajamas; Quatros Snippets (LL994) - Hero Arts
Card Stock: white, lime, purple, turquoise
Ink: Onyx Black, Versafine; Lime, Mountain Lake, Violet - Versacolor
Brads: black, small
Acetate
Adhesives

How you do it...

Trim a 15cm square blank so that is angular. Repeat with dark turquoise and white card. Mat onto the blank.

Stamp the cat and stars onto lime card and trim. Stamp the television and cut out the screen, back with acetate, trim angular and attach brads over the knobs and antenna.  Mat onto the cat image with foam pads. Mount onto an angular piece of purple card, attach to the lower right corner of the blank.

Stamp the sentiment, trim, mount onto lime card and fix to the upper left corner, overlapping the edge of the card slightly.

Stamp a few Snippets around the television in coloured inks, stamp twinkles over them in black ink and a few twinkles around the top of the television. On a piece of white card, stamp a Snippet in Mountain Lake and a twinkle. Trim, mat onto turquoise card and attach to the left of the blank.

I just adore this stamp set. The images are just my thing, with the whole 1950's/1960's retro look. This set reminds me of a cartoon called 'The Jetsons' and some Looney Tunes/Merrie Melodies. Yes I love Looney Tunes too - in fact we are building quite a collection on DVD - Daffy Duck & Bugs Bunny? My heroes. Bwah ha ha ha! Warner Bros. also did some quirky one off cartoons, which again are very retro and I love to watch.

Right, that's me for the nonce. Off now to finish the sausages in onion gravy - we're having it with huge Yorkshire Puddings (which I do make myself - smug look on face).

Thanks for calling, until next time. xxx


Saturday, 5 January 2013

Flowery Thanks

Hello folks!
Saturday already. Simon only went back to work Thursday and now he's off for the weekend, a two day week - not bad :) Hope you are all having a lovely 2013 so far.

Today I thought I would show a thank you card I made for Crafts Beautiful way back in the March 2012 issue. It was part of the Cut Out & Keep feature.


What you need...
Stamps: Curly Flowers (CG136); Thanks Flowers (CG137) - Hero Arts
Card stock: white, black, orange
Ink: Onyx Black - Versafine
Embossing Powder: Detail Clear - Stampendous
Promarkers: Amber, Bright Orange, Sunflower, Yellow, Lime Green, Ice Grey 1
Ribbon: lime green patterned
Rub-ons: Hunky Dory Alphabet (655085) - Sizzix
How you do it...
On a 10cm x 28cm piece of white card, score lines at 10cm, 20cm and 24cm, fold to create a double tent fold blank. Cover the facing inside panel with orange card. Stamp, emboss and colour in three long stemmed flowers, highlight around the edges with the Ice Grey 1 Promarker. Cut out, mount onto black card and trim.

Adhere two of the flowers to the orange panel, overlapping the top and left edges. Cut a wavy edge along a piece of 10cm wide card and attach to the base of the flowers.

Stick the remaining flower to the front panel, positioning it so it sits between the other two. Wrap and tie green ribbon around the bottom edge and tie in a knot on the left. Use rub-on letters to create the sentiment.

Ta da! There you have it. A cute, bright, cheerful card.
I did a pink card, a turquoise and lime card and a purple tag for the remaining projects. They were very bright and vibrant. I think this one would look really good in those colours too. It would make a lovely Mother's Day card.

Hope you like this little project. Thanks for stopping by, until next time.....xxxx


Friday, 4 January 2013

January Blog Candy!

Heevnin chaps!
 
Just a quick reminder about my January blog candy giveaway. Just click on the 'Win Blog Candy' link in the sidebar, this will take you to the candy and explain how to enter the giveaway!
 
I was going to post another thank you card, but there seems to be a problem with some users of Blogger uploading pictures. I think I'm one of those users :(
 
I'll post it as soon as I can :)
 
Ta for dropping in! xxx

Thursday, 3 January 2013

Dave, Mark Antony & a Mad Scientist!

H'afternoon chums!

Hope you all had a fabulous New Year's Eve/Day/Night! We went out in fancy dress to our local, The Vernon Arms. A merry time was had by all.

I went as Dave (it's what everyone calls me - not telling you why though - bwah ha ha ha) a 1970's film star of a certain nature and Simon went as a roman centurion (he liked to think himself as Mark Antony). Needless to say we had a great night. 
At The Vernon I asked for a manly film star drink of a pint of bitter with a straw, slice of lemon, a cherry and an umbrella, but they could only accommodate the lemon and straw. Luckily I don't get tipsy on bitter, but after a couple of glasses I went onto the ol' lime and soda.

Here are a couple of piccies...

Simon was doing his Mad Mark Antony face here - scary!

We were out on New Year's Night too. I think I'm a bit partied out now. We seem to have been out more this Christmas than any other I can remember. Saying that, we're out tomorrow night - gasp!

Right - ho! On with the proper blog stuff, my first official one of 2013! A birthday card I've made for my nephew William.

What you need...
Stamps: Great Chemistry - Paper Smooches
Printed card stock: Ledger - Papermania 12x12" Kraft Basics Pack
Card stock: white, lime
Ink: Onyx Black - Versafine
Embossing powder: Detail Clear - Stampendous
Promarkers: Lime Zest, Lime Twist, Ice Grey 1, Ice Grey 3, Cool Grey 4, Black, Red, March Hare
Embellishments: Googly eyes
How you do it...
Create a 10cm x 15cm blank from the ledger card. Stamp, emboss, colour and cut out the scientist, sentiment, bottle and two vapour clouds. Cut a notch in one end of a 4cm x 10.5cm piece of lime card stock. Mat onto the card blank so the notch overlaps the left side slightly.
Attach the scientist to the right of the lime strip, cut out the centre of a vapour cloud and mat onto the remaining vapour cloud, adhere to the bottle, then attach to the scientists hand.
Cut out the sentiment to look like an explosion, fix to the blank. Stick googly eyes over the scientists own, to finish.
I think you may have guessed by now that I LOVE Paper Smooches stamps. The scientist looks good without the googly eyes, but I wanted to add just a bit more silliness to the card.
Phew! This was quite a long post. Hopefully I should be back with a shorter one tomorrow. So, I'm signing off for the nonce. Thanks for popping by. xxx